The task for this week was to find out how connect and control a Liquid Crystal Display (LCD) with an Arduino.
Connecting an LCD is physically very easy (4 or so wires) but controlling it is more complicated. The Arduino IDE requires extension and additional features to have the required functionality, this is provided by installing additional Libraries.
There are many different Libraries designed to provide additional functionality for the IDE and Arduinos themselves. For everything from controlling Stepper motors and LCDs to connecting Ethernet or Wifi.
Arduino libraries are downloaded and installed via the IDE. There is a ‘Libraries’ tab which opens the libraries manager, from here you can search, download, install and uninstall libraries. Additionally, it is possible to source customised libraries (for more specific tasks) online and install these onto the IDE software as .ZIP file. More info about managing libraries and a tutorial on how to install and manage libraries can be found here.
For this task we obviously used the LCD library – this link has some really useful info about the functions the library provides to allow the Arduino to control the LCD. It also covered some of the commands that an LCD library would allow you to use, such as:
- Autoscroll: Shift text right and left.
- Blink: Control of the block-style cursor.
- Cursor: Control of the underscore-style cursor.
- Display: Quickly blank the display without losing what’s on it.
- Hello World: Displays “hello world!” and the seconds since reset.
- Scroll: Scroll text left and right.
- Serial Display: Accepts serial input, displays it.
- Set Cursor: Set the cursor position.
- Text Direction: Control which way text flows from the cursor.
So that’s libraries and setting up the IDE for an LCD, this is how to set up the hardware:
On the back of the LCD units we used there are 6 connection pins and a contrast adjustment unit (blue box).

The 2 pins of the right side control the backlight, if shorted the backlight will remain on – I shorted them through a breadboard.

The 4 pins on the left are GND, VCC, SDA and SCL. These connect to the Arduino power and analog pins like so:
| LCD | Arduino |
| GND | GND |
| VCC | +5v |
| SDA | A4 |
| SCL | A5 |

The contrast adjustment unit is adjusted with a small philips screwdriver – make the adjustments once the code is uploaded and working to find the ideal setting for the display.

The complete set up looks like this:
Black and red wires connect the Arduino the the LCD, green and blue to turn on the backlight.

The code I used looked like this:
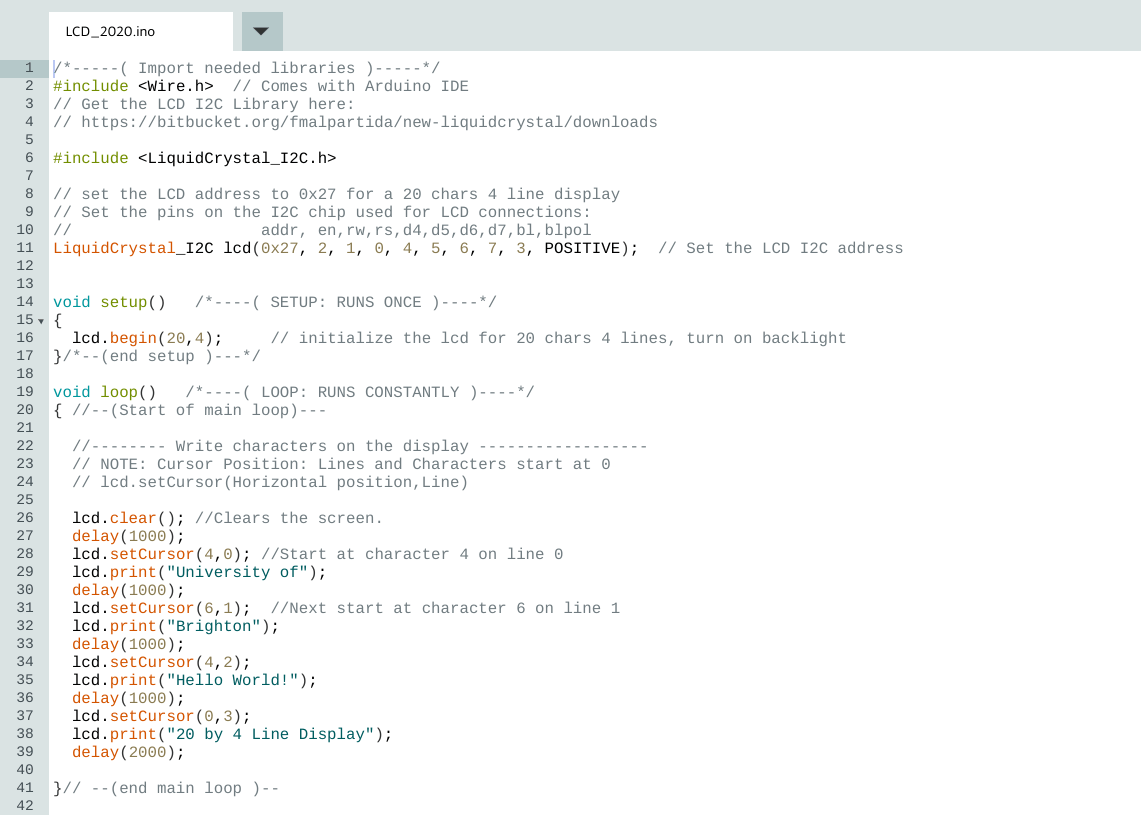
and can be downloaded here: https://create.arduino.cc/editor/ohafoahspjpoid/068afdd4-1b5f-4419-a167-2cfdd2026253/preview
As it says in the loop section of the code, the LCD will display the text “University of” “Brighton” “Hello World!” “20 by 4 Line Display” over 4 lines. As seen in this video:
