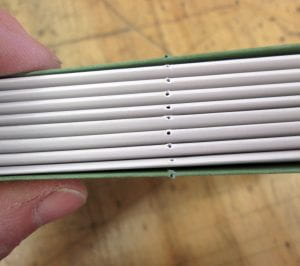
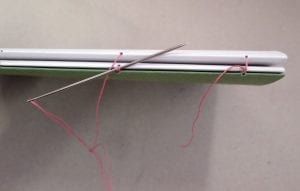
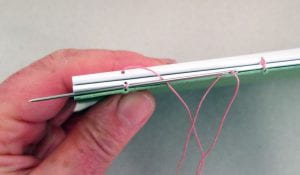
This is a multi-section sewing structure that is usually visible on the spine of the book. The Coptic sewing is characterised by lines of chain link stitches across the spine. A useful structure for books that you want to open flat.
This is an ancient sewing pattern for making books and one of the first structures developed to join multiple gatherings of folded sheets together. The Copts were an early Christian community from Egypt – so this sewing pattern is about 2000 years old.
Use coloured thread to accentuate the sewing pattern or sew in white thread for a more subtle texture. You can have as many lines of chain stitches as you like and it is possible to make them angled across the back of the book or even to create writing with them though this is quite difficult!
Take your time with this one as it can seem quite complicated, especially at the start. You will speed up once you have done it once or twice. You can ask the technician for help if there is anything you are not sure of.
Sew with short pieces of thread (100cm at a time) and join new pieces in when you need to. If you sew with long pieces of thread they are more likely to get tangled up which is very frustrating. The best knot to use to join new thread is called the weaver's knot but if you find this too difficult, just use any knot. Join on the inside of a section and try not to pull the knot through a hole.
Tip: keep the grain direction of all papers running head to tail or parallel to the spine folds.
- Start by folding up some 16-page sections. Each section is made from 4 folded sheets of paper gathered together, folded and pressed well with the bone folder. The better the sections are pressed the easier it is to make a strong and stable structure so press them twice with the bone folder. Fold 6 sections as the chain link stitches show better on a thicker book.


For future projects

You can have as many holes as you like and they can be placed wherever you like but some things to bear in mind when designing are:

1. More holes take longer to sew.

2. Avoid large spaces between holes (max 5-7cm).


7. Now, take your needle and thread across and into the top hole of the first folded section. Pull the thread through and then come down and out of the second hole. Keep the sewing tension tight as you go on this one as you cannot adjust it at the end.


10. Repeat steps 8 and 9 to make the same connection at the third and fourth holes down.

12. Take the peg out of the pages and lay them horizontally on your desk (cover at the bottom) with the spine facing you and lining up with the edge of the workbench. Place the next section on top and check that the sewing holes align.

14. Repeat this link stitch at the next two holes.

16. Now place the next section on top, check holes align and sew into the hole directly above the one you have just come out of. Sew out of the second hole.

18. Continue with this sewing pattern until you reach the end of all sections, including the cover, when you should finish with a double kettle stitch.

Now give the pages a short nip in the press between two pressing boards, to squeeze some air out of the pages.
Then set up your pages between the two boards ready for glueing:
Use the small brush to apply one or two layers of PVA to make the spine stronger and to seal the gaps between the sections. The spine should look white all along whilst the PVA is wet so check that you have filled in all the gaps. Rub the loose ends of thread into the glue with your fingers.
When the glue is dry, carefully remove the book from the boards and take to the technician at the guillotine for cutting. (The glue is dry enough when it doesn’t stick to your fingers. Should take about 5-10mins)
When you have finished, please tidy up your workspace by placing any rubbish into the bin.
Please also wash out the brushes you used and leave them in the pot in the sink.

