Contents
Introduction
Golf is a widely recognised sport and is played across the entire world. According to statista.com, there were 693,600 participants in England in 2021, previous year totalled to around 1 million participants. In the US this number was approximately 24.3 million in 2019. Also in Europe there are 6,861 golf courses.
For more statistics visit the website: https://www.statista.com/topics/1672/golf/#dossierKeyfigures
Many golfers are looking to improve their golf game, this can be because they want to win tournaments or because they want to enjoy golf more.
There are many ways to improve in golf, for example, your posture can change how you perform, weather reading and golf course condition reading can improve you game or simply changing your golf equipment can make your golfing better.
For this project I will be trying to find a way in which a golfer (beginner or professional) can better their golf swing.
The Aim
To produce a system which analyses a sequence of positions of a putters club head to measure inconsistencies.
The Objectives
Here are the objectives which I set of this project:
- Research into Existing Devices, Systems and Apps to see what already exists and what has been done before
- Record and Analyse myself to find out what is the best way of recording and obtaining data
- Perform Interview to find out how the data should be used and the accessibility of the data
- Record and Analyse other people to collect a starting range of data
Deliverables
Webpage/Portfolio/Presentation, Existing Devices and Systems, User Requirements, System Requirements, Concepts, Wizard of Oz, Preliminary testing, Blender, Tracker, Comparison between Blender and Tracker, Technical Report, Talking to a Professional, Huskylens, Using Microbit with the Huskylens, TQM, Social Context, Codes of Conduct, Costing.
Existing Devices and Systems
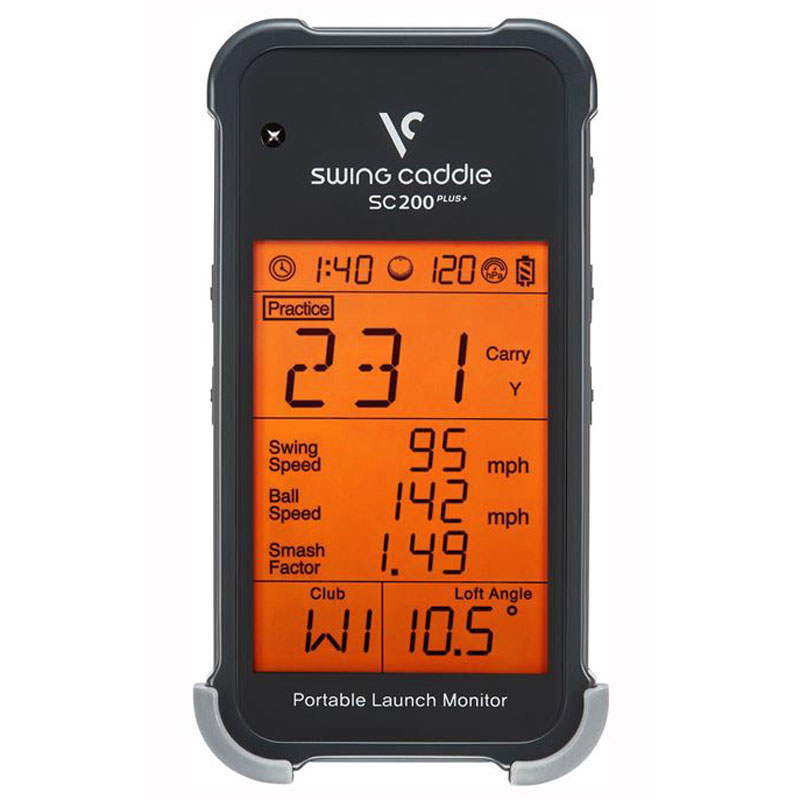
There are many devices that already exist, a common design that I came across was a device that told the user the ball speed and the swing speed. Example: the Swing Caddie SC200 Plus Launch Monitor.
Here is the link to the website
Another common device was an app which recorded your swing and you could look back at your swing in a variety of ways such as analysing your body movement, swing speed and what type of shot you have made. The most popular app is V1 Golf, its on the Google Play Store.
There were also some devices which used sensors to record data and you could access this data via an app which you could put on you phone. An example of this is the Arccos Caddie Smart Sensors
Here is the link to the website
Requirements
Performance Requirements
- The system needs to be able to identify the golf club
- The system should function at different light levels
- The system needs to track positions at high speeds (above 70mph)
- The system needs to show inconsistencies between the user’s swing and the target range
- The system should be no bigger than 20cm in length
- The system needs to be waterproof
- The user should be able to compare their video with a target range of their choice
- The system needs to provide a save option for the user
- The user should be able to go back and look at previous analyses
- The system should be no heavier than 400 grams
- The system should provide results visually through a screen
- The system needs to verbally communicate results to the user
Manufacture Requirements
- The Casing of the system should be made out of material which is environmentally friendly
- The system needs to be able to withstand being dropped from at least 1 metre
- The screen of the system should have a screen protector
Operation Requirements
- Wires used for the system shouldn’t be exposed
- Software used need to be updated to the latest version
- The system should be chargeable
- The system need have a battery life of at least 4 hours
Acceptance Standard
- The system shouldn’t break any golf rules set if used in a competition. Rule Overview Here: https://www.randa.org/en/rulesoverview
- The system must follow ISO 9241-304: 2008 Ergonomics of human-system interaction – part 304: User performance test methods for electronic visual displays
Disposal Requirements
- The systems recyclable components need to be separable from non-recyclable materials
- Any hazardous chemicals should follow COSHH
- Any non-recyclable material should be disposed of properly and/or reused
Concepts
Concept 1: Golf Club Attachment
Here is the first concept, the idea is to have an attachment for your golf clubs which you have attached to any golf club during a game of golf. The device measures different qualities such as the swing speed, ball speed, the club angle, whether you are hitting the ball up a hill, etc. The device would have a screen which presents these values and when combined with the speaker it can tell you the results without having to look at the screen every time.
Concept 2: Golf Recorder
The second concept uses a recording device which collected data of your golf swing and presents this data using the screen. It will compare this data to target data and the idea is for the user to try to get as close as possible to the target data, over time this will improve the users golf swing.
Concept 3: Wrist Grip for Golfing
Many golfers move their wrists during the golf swing, this can cause your golf ball to fly in the wrong direction, you can hit the ball at a different angle and you could even miss the ball. This concept is a grip which keeps the wrists locked together and prevent the wrists from moving during the golf swing. The idea is to have the user use this until they build the muscle memory to keep the wrists from moving during the golf swing.
These concepts were produced using a sketching pencil, a ruler, an eraser and three fine liners (0.5mm, 1mm and 2mm)
The 0.5mm was used for slight shading of the concepts, the 1mm fine liner was used for inside lines of the concepts and the 2mm was used for the outline. The 2mm is slightly different, it uses the same ink however is more of a brush. I used this instead of the other fine liners as it provides the thickest line but also allows me to vary the line thickness depending on how I used the fine liner.
For the colouring of the concepts I used the NOVA Dual-tip Designer Markers. These are alcohol based ink markers that have a fine 1mm tip and a broad 1-8mm tip. These come in a wide range of colours and shades. I found these very useful as they allowed me to colour large areas with very little bleeding.
I problem that I came across with these were that I had to go over the area multiple times to get a consistent saturation throughout the coloured area.
Decision Matrix
DOWNLOAD: Decision Matrix
This is the decision matrix which I produced for the concepts, I decided to score the concepts against the requirements to see the percentage of requirements which were fulfilled for each, and then the concept with the highest percentage would be the concept which would be taken further for the project. Each requirement would be scored between 1 and 3, 1 being just fulfilled and 3 being completely fulfilled. 0 meant that the requirement didn’t apply to the concept.
The end result showed that Concept 2 – the golf recording device fulfilled the most requirements and therefore I will be taking this forward.
Ethics BREAM
Before producing the concept, I completed a BREAM application. This is being done to underline any ethical issues, as well as to present what I will be doing for this project and how to remain ethical during the project.
This application will allow myself and others to be aware of any issues within the project and how to either avoid them or make them less of a risk to the project overall. This application also allows me to be aware of previously unknown issues and deal with them before the issue occurs.
An example of this is data relating to specific people. If a person wishes to remain anonymous then I would need to relate the data with something other than their personal information. My way of doing this would be to provide a reference number and only myself and the people would know which reference number relates to who.
There will be other issues which will present themselves throughout the project, however, there will be less of them and less of an issue if they occur.
BREAM Golf Swing Analysis Project
Risk Issues
Here are some risk issues which have been identified. These are being identified to realise the different issues that could potentially be a threat to this project.
- Illness – this can prevent the project from being completed, for example Covid 19 meant that quarantining was in place as law and thus you were only allowed to go out when you had to. This meant that most of the workshops were unavailable and this could have caused delays or even the project to not be moved along.
- failure to complete the project could cause time wastage and potential financial waste. Myself and others could be affected and I could be wasting time and money.
- Not conveying the information produced and gained could make the project worthless and useless to myself and those who are interested.
- Over-buying could result in material and products not being used and being wasted.
Wizard of Oz (how the solution works)
Here is a video on what the solution would look like and how it could perform when in use.
I used HitFilm Express to produce this video, from this software I was able to combine MP4 files with images. This software allowed me to edit the MP4 file, slowing certain segments down when I needed to do some explaining and it also allowed me to cut unnecessary parts from the video.
I was able to produce a voice recording and voice over the video, and from here I could adjust the volume so a loud and clear level. I was also able to export the video into a new MP4 file.
Preliminary Testing
To start with I tried to record the position of a microbit with an accelerometer. My goal was to calculate the Y-axis by recording the acceleration and then from there calculate the displacement and the velocity. I used the equations: V = u + at and s = ut +(1/2)a*t^2 to do this.
I used two microbits, the first collected and sent data and the second received data.
Here is the code for the sender. This code also calculated the acceleration, velocity and displacement.
This is the code for the second microbit, this was used to receive data sent from the first microbit.
Unfortunately I wasn’t able to obtain accurate data. The values obtained were drastically different to the expected values.
I found that this wasn’t working because the equations used are for acceleration which is constant and a golf swing does not have constant acceleration. The acceleration changes at multiple points during a golf swing.
Risk Assessment – Recording Videos for Golf Swing Analysis
Before recording the videos I decided to make a risk assessment for recording the videos, I have identified the main risks and stated who might be harmed and how to prevent them. I decided to produce this risk assessment to make sure that myself and anyone else taking part and/or are around the area are as safe a possible when recording videos for this project.
Risk Assessment – Recording Videos for Golf Swing Analysis
Blender
After the microbit idea not working I decided to try recording a video and using a tracking software. At first I used Blender. This was a software which had the capability of motion tracking.
This is the tracking software in use. I found that the tracker would stop tracking if became too blurry or the contrast between the tracking point and the background was too similar. Therefore I had to use a vibrant colour as my point and the video had to be bright. A video of a higher frame rate (i.e. 60FPS) also helped to produce a better track.
This was the graph which was produced, This showed the speed of the trackers at each frame in both the X and Y axis. Unfortunately I wasn’t able to do anything with these results.
I learnt how to use the motion tracking tool that Blender provided in order to obtain data for X and Y axis’s; and I learnt what was needed to produce a good quality video in order to obtain more accurate data.
Tracker
After using Blender I tried using Tracker, this software is similar to blender however it was designed for engineering purposes and not filming purposes like Blender.
This is my initial attempt at using tracker. I was able to plot the positions of the putter head manually and automatically.
There was also a calibration option which allowed me to record measurements accurate to the real world.
This is the data in graph form, this shows the X and Y axis. This also shows the time elapsed at each data point obtained.
Once I had obtained the values I was able to export the data and produce a graph on excel. This was the result which I was looking for as from these graphs I am able to compare and find the differences between golfers swings.
I have learnt how to calibrate recorded videos in order to collect data accurate to the real world. This has allowed me to compare golf swings on a realistic level since not everyone is the same size.
Comparing Blender and Tracker
Before moving on I made a comparison table between blender and tracker to determine what tracking software I should use. I listed the Pros and the Cons for each.
Comparison of Blender and Tracker
From this I decided to use tacker, it enables me to export data quickly, the calibration allows for more accurate results and the tracking is both manual and automatic so I am able to make adjustments were they are needed.
Technical Report: Comparing Data
I focused on trying to compare different videos after this. I wrote a technical report on comparing data through repeatability study and normalising data.
Gallery produced using HitFilm Express software
Here are the DOWNLOAD files and a couple images of the work, please download the files for a full view of the report and the excel spreadsheets.
12-12-2021 60FPS Repeatability
Technical Report – Comparing Data 2
I have learnt to calculate the standard deviation and confidence interval to produce upper and lower limits. I have also learnt to normalise data in position and time to line up data for an accurate comparison.
Sim, M. and Kim, J.U., 2010. Differences between experts and novices in kinematics and accuracy of golf putting. Human movement science, 29(6), pp.932-946. – This was used to compare my findings.
Talking to a Professional Golfer
After this I showed my comparison to a professional golfer to see what he thought of the project.
Before talking to the professional I produce a semi structured interview just to give myself an idea on what I was going to talk about.
tools4dev.org. How to do semi-structured interviews
I wanted to focus on comparing the data and the accessibility of the data, I felt that they were the two most important topics.
To begin with I explained the project and what I was trying to achieve, the professional was interested in the project however he said ‘don’t direct this at beginners’. This is for many reasons, they are new to the sport and complicate their learning, they may end up copying the swing in the comparison without learning the techniques.
When discussing about comparing the data he said: ‘it would be useless to compare a beginner to a professional’ and he suggested to have a structure to the comparison. So beginners compare to 18 handicapped golfers, 18 handicapped golfers to 10 handicapped golfers and then 10 handicapped golfers to professionals.
The professional also said to try this comparison with a driver as ‘there is more variety and variability with a driver than a putter, with a putter its miniscule’. With Driving there are also more factors such as the turning of the body and the angle of the golf club.
After talking about comparing the data, I went on to talk about the accessibility, the professionals response was: ‘ you want to make this idiot proof’. The professional mentioned, having the user input data themselves could potentially be confusing and we both agreed that a system which does this automatically for the user would be best.
Here I have learnt to produce valuable questions for interviews in order to not waste time and obtain valuable information that can help in my experiments and studies.
Poster Advert for Collecting Data
Within the Ethics BREAM I mentioned producing a poster advert for collecting data, the aim for this is to attract people into having their golf swings recorded, tracked and compared.
I have included a short description about how this process would work, I have also provided a graph to show the reader what the end result would look like. Contact details will be available if they wish to know more about this project or if they want to record the videos themselves and sent them to me. (Contact details are blank for privacy reasons)
I have also stated that this will be anonymous and only myself will know who’s swing is who’s. Each person will be given a reference number in advance.
Huskylens
Here is the DOWNLOAD of the document.
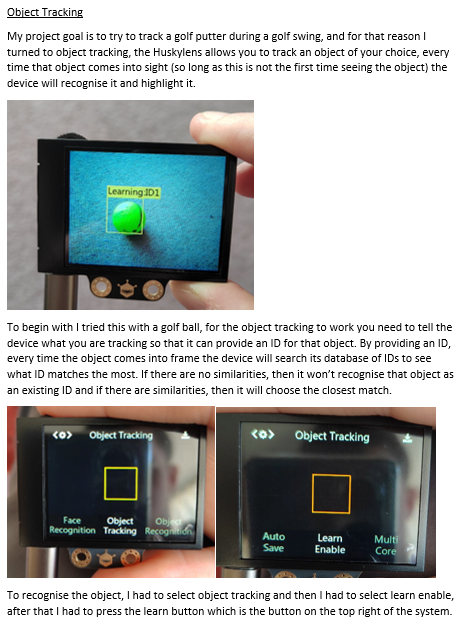
In this document I explain and show my experimentation with the Huskylens device and I show how I am using this to track objects and record data. I have also provided a link to linking the Huskylens with Arduino.
Using Microbit with the Huskylens
To get the Huskylens to record a sequence of positions I needed to connect a Microbit to this. NOTE: you will need a microbit extender which allows you to connect wires to an SLA and SLD Here is the set up:
Here is the circuit diagram for the setup.
After setting up you need to go to the microbit make code website. start a new project and add the Huskylens Extension.
https://makecode.microbit.org/
After adding the extension you will be able to build this code to make the Huskylens record coordinates.
input.onButtonPressed(Button.A, function () {

    serial.writeValue("x start", huskylens.readeBox(1, Content1.xCenter))

    serial.writeValue("y start", huskylens.readeBox(1, Content1.yCenter))

})

huskylens.initI2c()

huskylens.initMode(protocolAlgorithm.ALGORITHM_OBJECT_TRACKING)

huskylens.clearOSD()

basic.forever(function () {

    huskylens.request()

    if (huskylens.isLearned(1)) {

        huskylens.writeOSD(convertToText(huskylens.readeBox(1, Content1.xCenter)), 20, 20)

        huskylens.writeOSD(convertToText(huskylens.readeBox(1, Content1.yCenter)), 20, 40)

    }

})
This is the JavaScript code for the microbit
This code works by setting the Huskylens to object tracking and when the ID is tracked the coordinates show on the Huskylens screen.
I have also made it so that when I push a button the coordinates are recorded. I did this so that I could test whether or not this feature works.
I replicated a golf swing and at certain points I would record the coordinates. After recording the positions I exported the data into Excel.
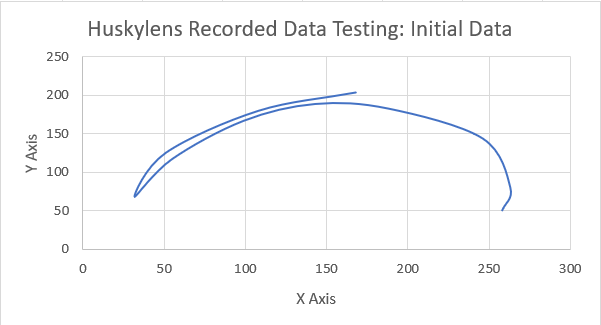
Here are the results:
I found that the graph was inverted, this was because 0,0 is not the centre of the screen. For the Huskylens 0,0 is the top left corner. Fortunately I was able to reinvert this, as well as normalise the positions as well.
References for Huskylens and Microbit
Huskylens overview and specifications here: https://dronebotworkshop.com/huskylens/
Update Huskylens software and firmware here: https://github.com/HuskyLens/HUSKYLENSUploader
Huskylens learning pack can be bought here and some tutorials are available to view here as well: https://www.dfrobot.com/product-2378.html
Microbit edge connecter pin layout available here: https://tech.microbit.org/hardware/edgeconnector/
Casing for the Golf Swing Analysis Device
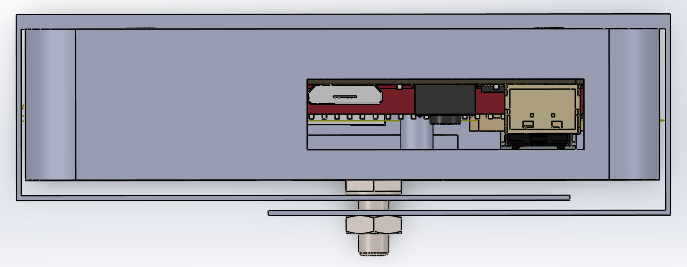
I decided to build a case for the Huskylens and microbit to sit in so that the wires wouldn’t be exposed and the components would be easier to hold. By making a case it would be easier to hold the components and it would also be a more complete produce. Stability would be better provided as the components would be packaged and secured to the casing when recording data. It will also keep the components safe if they are dropped. Here are some images of the case.
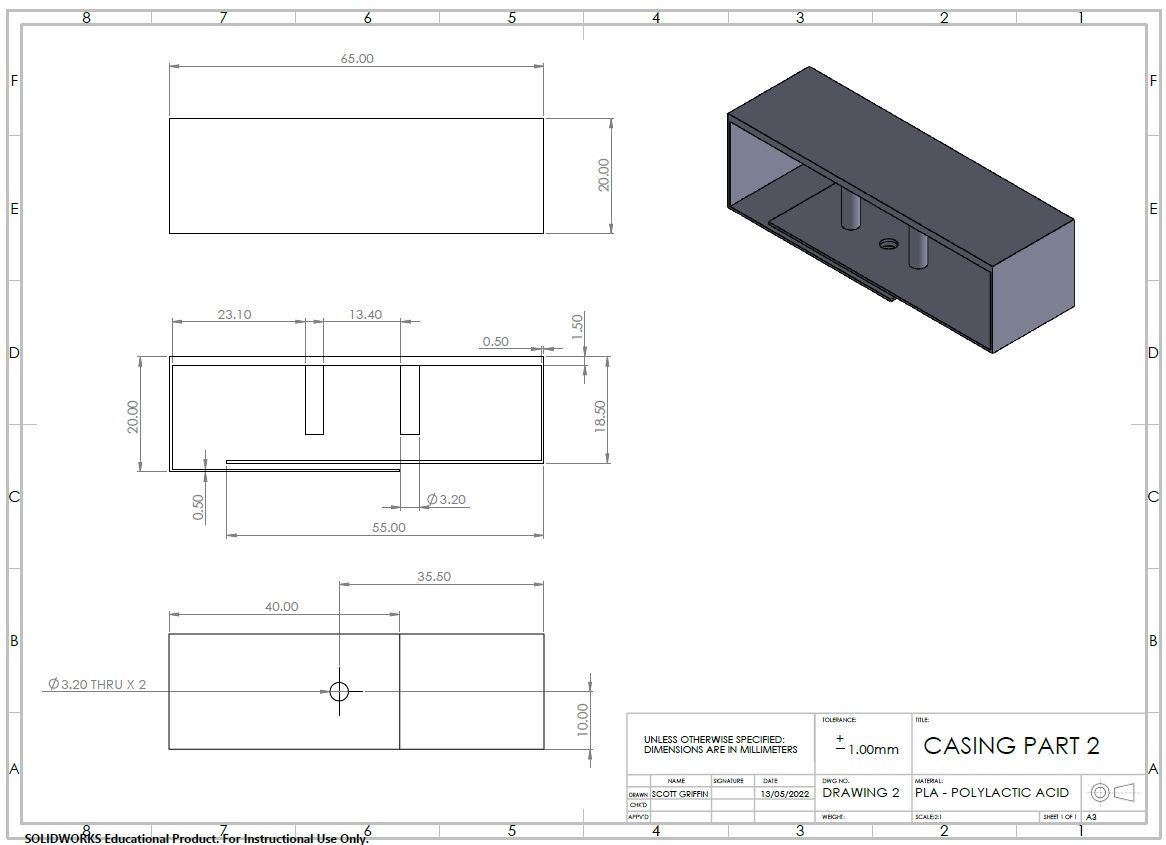
The case consists of two parts, the first houses the microbit and Huskylens, with areas such as the ports, buttons, screen and the camera left exposed for easy use. The second part of the case is there to keep the Huskylens from moving within the main part of the case, and at the back you can screw together the two loose ends. This will also allow you to attach the case onto something if you needed to. To manufacture this casing I will be using a 3D printer.
DOWNLOAD: Golf Swing Analysis Casing
Engineering Drawings
Here are the engineering drawings for the casing:
Assembly Drawing
Here is the assembly drawing of the golf swing analysis casing
Total Quality Management
For this project there are some quality issues, for example, is the software version of the Huskylens. When first bought the Huskylens will be set to the latest version of software, this means that if this product were to be made at different at one time and then again at another, there is a possibility that they run would on different versions of the software. This could result in the older product performing worse than the newer product.
Similarly if I were to alter the code for the microbit during production, this could cause the quality to differ and it would be unfair for the people who buy the older batches.
To prevent this the code must which I provide should only be altered before or after selling the product and updates/upgrades of the software should be available for those who wish to better their device.
Quality Planning
1 in very 50 of this devices casing made should be tested for its tolerance for resistance of impact damage. This is to check that the casing can withstand being dropped and to check that this property is being manufactured consistently. The casing should be tested again when the components are secured in the casing to see whether or not the components are protected to a standard.
Quality Assurance (Preventing Defects)
3D printing should print the casing using the same G-code instructions every time so that all the casings are made in the same way. If multiple 3D printers are required then the code should be transferred if possible and not replicated.
Any tools used need to not be worn down too increase the amount of times it can be used and to get the best performance out of the tool. All tools mustn’t change to another tool which is not the same make/type/brand. Some tools may do the same task but leave a different finish to the job.
Quality Control (Meeting Standards)
Faulty machinery should have parts replaced with an identical part (manuals usually have a list of parts), or a new machine should replace the faulty one (if there is a fault which cannot be replaced or repaired)
Quality Improvement
The quality can be improved by including tolerances, surface finishes, materials, the estimated weight. Any products which are outside the limits or do not have these properties should be thrown and a new one should be made. Any screws, threads, holes and nuts should used ISO standards to allow them to have an almost perfect fit, as well as a more stable product.
Taking these into account with reduce the waste produced and it will allow for the quality of the product to remain the same throughout the batch.
Standards and Legislations
Here are some standards and legislations that I will need to consider when working on this project. If I don’t follow these or acknowledge these then I could potentially be breaking the law and I could be at risk of harming myself and others.
- Video Recordings Act 2010
- The Health and Safety (Display Screen Equipment) Regulations 1992
- Data Protection Act 2018
-
BS EN IEC 62435-8:2020 Electronic components. Long-term storage of electronic semiconductor devices. Passive electronic devices
-
The Management of Health and Safety at Work and Fire Precautions (Workplace) (Amendment) Regulations 2003
-
The Fire Precautions (Workplace) (Amendment) Regulations 1999
-
The Restriction of the Use of Certain Hazardous Substances in Electrical and Electronic Equipment (Amendment) Regulations 2021
Proposal
My proposition for this project is to patent this design, as well as registering the design and hopefully selling this product to the public.
Patents
According to https://www.wipo.int/portal/en/index.html patents are ‘an exclusive right for an invention’ which a product ‘offers a new technical solution to a problem’
By obtaining a patent the owner can prevent others from exploiting the product for their own personal gain. Unless they have the owners consent.
A patent lasts around 20 years and would need to be renewed when it runs out.
It is important to search for existing patents as this will allow you to see and compare what already has a patent and may also give you an insight on what types of patents there are. For example there are Utility, Provisional, Design and Plant Patents. https://www.legalzoom.com/articles/what-are-the-different-types-of-patents
Searching for existing patents will also reduce the likelihood of you infringing on them. Infringement can lead to you being liable for damages such as profit losses and it could even lead to injunction.
Registering the Design
https://www.gov.uk/register-a-design
The government website provides a guide on how to register a design. This can last up to 25 years and you will have to renew the application every 5 years. Without registering the design there are still some rights that will protect your design.
https://www.gov.uk/unregistered-designs
Here is a link to what is available for unregistered designs.
Social Context
For this product I will be using social media as a form of advertisement, this will hopefully expand the number of people who will see the product. The will be a link to a website which is where people will be able to buy the product.
My other advertisement method will be to have posters placed at golf courses, most golf courses have a golf shop with a professional running the shop, I could also perhaps have these people buy batches of the product to have in their golf shops. By having the advertisement within the area of interest will make potential buyers easier to gain.
Costings
For this project I produced a costings business models spreadsheet. Here I have provided two scenarios, the first is the most realistic for my current position, the aim is to manufacture 500 of the product and I am assuming that I will be making these alone and on demand. I have set the starting budget to £20,000.
The second scenario is if the product was being made for a much higher quantity, this included labour costs, indirect costs, work hours, finding a work area and providing equipment and tools. The aim was to manufacture 100,000 and the starting budget was 1 million.
During the spreadsheet I also compared a 3D printing service price to what it would cost to 3D print on my own.
I have included references, calculations and small explanations of different actions taken throughout the spreadsheet.
I have produced this costings model to see what selling this product could be like for both a small batch size and a large batch size. Here I am also able to see how much time I would need, as well as the equipment, tools, labour, machinery, materials, etc…
DOWNLOAD: Costings Business Model
Codes of Conduct
Here are some codes of conduct, these have been identified to keep the work area a friendly environment and safe for the workers. If we had two workers arguing, being racist, homophobic, etc… this could cause tension, lack of work, or even fighting between co-workers.
- Workers must respect one another within the workplace. No violence, insulting, any disrespectful behaviour (can be insulting and affect other peoples mentality and behaviour).
- Discrimination within the work area is unacceptable. Furthermore, singling out people of a different race, sex, size, status, etc… is not acceptable for the work area.
- encouraging poor/bad behaviour will affect the work area and shouldn’t be done.
- sharing personal information should only be done if the person consents to sharing the information
- computers should be used for the work and the work only
