RSS Feed

‘apps’ Category

  1. Screen Sharing How to… appleTV

    March 11, 2016 by Robin Englebright

    Following on from the HEA event where Vikki showed how she improved visibility of the fine close up work she does on knitting machines, I’ve had several people ask me about how to set the appleTVs up.
    The answer is… it depends… but I thought it worth sharing my solution.

    In order to enable “conference room” screen sharing the devices have to be on the same network, which means getting an eduroam account for each of the devices.
    Policy demands we don’t use a common account for all, meaning each configuration of the device is different, and the profile has to be edited before pushing to the apple TV.
    To “build” an appleTV to the required configuration takes about 20 minutes plus testing, and final “lock down” where additional or superfluous items are removed from the home screen, and the device is set to default to conference room mode.
    Less time is required for additional configurations as the latest version of iOS doesn’t have to be pushed to the devices.
    Set up and installation of the devices has proved problematic for a number of reasons.
    Whilst much of the setup can be done through the “configurator” software the final step requires access to the individual device menus, which means connecting up an HDMI monitor.

    On a (newish) mac download configurator:
    https://itunes.apple.com/gb/app/apple-configurator/id434433123?mt=12

    Launch Configurator and in the “Supervise” section select “Create Profile”>
    (At this point we “Import Profile” and pick eduroam.mobileconfig which will then be listed in the Profiles pane.)

    First off you’ll need to get hold of whatever certificates you use on your network, once you have them, select the “Certificates options” in the left hand panel of the configurator and add them using the + button.

    Next select the Wi-Fi menu and set the SSID to eduroam, check the “Auto Join” box, and pick WPA/WPA2 Enterprise as the security type.
    check the PEAP box and and set the Username and Password for the device, this needs to be different for each device.

    configurator
    Next select the “Trust” settings, and check all of the certificates you have installed and Save.

    Connect the appleTV with the USB cable and power up the apple TV.
    Configurator will launch a pop up “Apple TV Assistant”.

    Select “Don’t Enrol”>Next
    Select “Erase and install latest version”>Next
    Name the device – this is the name that will identify the device to folk who look for it using AirPlay,
    default naming convention is the eduroam account e.g.: abc123
    More useful especially in situations where many appleTVs may co-exist and be offered to folk, is to describe the location
    e.g.: GP321 appleTV – This can be changed once the device is located using the on screen menus on the appleTV.

    Set language to English, and uncheck “Send Diagnostics Data to Apple”>Next

    Pick the eduroam configuration profile Next

    unplugitthenplugitbackinagain

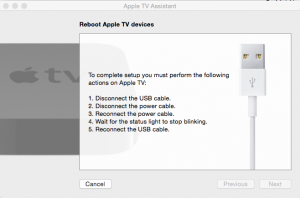
    Once configured you’ll need to follow the instructions, disconnect the usb, disconnect the power, reconnect the power, wait till the LED stops flashing, connect the usb again.

    With luck you then get a big green tick.

    The devices can then be further configured using the onscreen menus to enable conference mode with an onscreen password, to hide the unneeded icons, and to set a passcode on the device.

    Testing revealed that whilst the devices are pretty much uniform, some proved harder to get to the point where they accepted a profile. Some devices required 2 or 3 (in one case 4) attempts before the settings took, there is no clear reason why this should be the case.

    Deployment has proved complex due to the lack of capacity of the existing infrastructure control panels for auxiliary inputs, and the lack of HDMI inputs at all.
    This means the likely solution is to plumb the devices in to the PC laptop port using a VGA converter, OR to connect to the HDMI and then use the remote control to select the source.
    On my site there are no two installations that are completely the same, which means slightly different instructions are required for each installation, and awareness of this difference by those intending to use the devices.
    This is further complicated by the need for a power supply for the appleTV and more pressingly, a way to cycle the power if the device goes to standby, and needs to be restarted.

    instructions

    Risks

    – Complexity and inconsistency of connection may put people off using the devices
    – Reliability of the appleTV units once active (they often require multiple attempts to connect) may have a considerable technical support overhead.
    – Configuration of the devices takes a significant time.

    Recommendations
    The biggest barrier to use is the varied connection to the screens. A common approach at least within a campus would be beneficial.
    What works well:
    Free roaming devices, with HDMI cable and VGA/HDMI adaptor for personal use.
    Connection by HDMI cable to modern Flat screen devices.

    Even better if:
    Identify requirement as part of the room refits and agree a common approach, common connections, capacity for future expansion.
    Review common software alternatives – use of reflector,(I’ll write up Reflector details shortly) or air parrot for laptop users and a solution for fixed desktop units.
    Look at design of the instructions to provide concise, clear common approach.
    Work with Learning Technology Advisors, site technicians and school technicians to ensure awareness, and support capacity and capability.

  2. Sharing your screen

    March 7, 2016 by Robin Englebright

    At the HEA arts and humanities conference  on the 3rd March 2016, Vikki Haffenden presented her research into improving the student experience in workshop sessions.

    When teaching Vikki demonstrates really intricate settings on knitting machines and close up work, to University of Brighton Textiles students,  and it can be hard for the students to see. After much experimentation she settled on using the camera on an old iphone4S in a chest harness to stream video to an appleTV and then onto a 32″ TV screen, so students can see even if their view is obstructed, and in fact can see in more detail as the image gets magnified.

    To test the decisions Vikki made the session then moved to a hands on workshop, comparing a range of screen sharing technologies and drawing out the pros and cons of each.
    We started with a quick Poll using PollEverywhere to gather thoughts from the delegates on potential uses for the technologies.

    PollEv

    PollEverwhere performs the function of the older style voting buttons, but using mobiles to access the poll either through the website: PollEv.com/brightonhea or by Texting BRIGHTONHEA to 020 3322 5822.

    For our demo the question was “How do you think you might use screen sharing for in your teaching?””

    We then spilt into two teams, to see how easy it is to set up the kit, as this was one of the areas Vikki identified as important, if it’s too tricky to set up, or unreliable it leads to a bad experience.
    Team one (team Vikki) used Vikki’s iPhone in a chest harness streaming to an apple TV and screen combination.

    Team two used a Go Pro with a head harness (because a head harness is way funnier) streaming to the Go Pro app, connected to a projector by an adaptor cable.

    GoPro app

    Both teams had the kit up and running with minimal support, and both setups seemed to offer similar functionality. The GoPro has more settings and a removable sdcard which could be a benefit, as video recording takes up loads of memory.
    There are some interesting points with both devices  that need consideration however.

    When using the appleTV setup both devices must be on the same wireless network. This means a personal appleTV setup carried to a teaching space is ok, but slightly trickier is one leaves the device setup in a room, as it will require it’s own eduroam account, which may not be popular with IT depts. In order to setup an eduroam account one needs to connect the apple TV to a modern mac, and run the configurator app, which is a bit of bother.

    The GoPro bypasses the problems of requiring an eduroam account by acting as it’s own streaming server, and in order to connect the app one has to first connect to its wifi network. The downside of the GoPro is that it streams to a mobile device, which is slightly harder to then connect to a screen, we used an adaptor cable, and to be honest were quite surprised when it worked. There is a way of accessing the GoPro stream via a PC web browser, but it seems quite a faff.
    Our next Demo failed, probably due to the conference centre wifi, but I’m not totally sure.
    I tried it again as soon as I got back to the office and it worked fine.
    Reflector2  works in a similar way to the appleTV, screen sharing requires both devices to be on the same wifi network, and the person sharing their screen has to swipe up to reveal their “Airplay” settings, and then pick the device to stream to, The upside of reflector is it only costs around £10 and runs on your laptop, so if you already take a laptop to your lectures/demos, it doesn’t require much other work. It also (in theory) allows android (and windows phone) users to share their screens, although I’ve had no luck with my Nexus 4 or Nexus 7.
    A big difference is that it allows multiple screens to be shared simultaneously, we’ve tested it with 9 devices before it all went wrong.

    9reflections

    As an added bonus individual shared screens can be recorded on the laptop, I’ve no idea what would happen if you tried to record 9 simultaneously, but it would probably be ugly. Whilst you could have multiple mobile devices streaming from their cameras, Reflector seems to lend itself to sharing sketches, or photographs to compare and contrast.
    After spending most of the session looking at sharing detailed work, we moved to sharing at a grander scale.
    The SWIVL device is a small motorised base unit that can hold an iPhone, or iPad, and will track the movements of a presenter who wears a small wireless lanyard.
    This lends itself to more expansive demos, maybe where those watching are viewing remotely, so we paired it up with an iPhone running Periscope, which streams to the web.
    It is worth noting that whilst I’ve found the cheaper basic appleTVs work better in conference mode setting  the new devices have a periscope app, which could make connecting easier…

    We closed the demo using Nearpod which allows the presenter to control the screens of the delegates whether they are in the room or not, and push slides, links questions and activities out to them, and then share the responses back.

    Nearpod

    For University of Brighton Folk on Monday 14th March 12-1 in G4 I’ll be running a Lunch hour app swap, where we’ll revisit the hands on part of the session, and I’ll bring along:
    A visualiser, an AppleTV and GoPro, Reflector2, SWIVL, Periscope and Nearpod.
    …and of course there’ll be a chance to share your ideas and favourite apps.

    See you there.


  3. iOS8 on the move

    November 4, 2014 by Robin Englebright

    What’s new in iOS8?

    There are a few things about new iOS that may be useful for the University employee on the move.

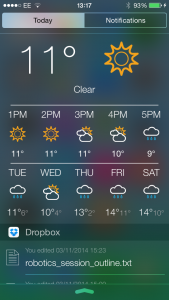
    Widgets are now available in the Notification Centre. Notification centre is the thing that slides down over the screen if you drag your finger from the area off the top of the screen toward the bottom.

    Notifications centre widgetsYou can find out if you have any apps installed that can show useful data by clicking on “Edit”.
    I’ve got the standard “Today Summary” widget (which is very much like the “Google Now” feature on my Nexus phone. It shows what the weather is upto and how long it’d take to get home if I left right now.)
    The Calendar widget shows today’s events, the dropbox widget shows recently amended files…
    As a quick glance overview tool it’s ok, but probably the best feature is that I can delete the useless (for me) Stocks widget.

     
    So what does adding these little helper services do your battery life? Well you can check to see which apps are draining your precious battery under Settings > General > Usage then Battery Usage.
    Obviously I use the iPlayer waaay too much.

    way too much player

    So your phone may not last the day on one charge, which is a bit of a pickle, but even more so if you lose it, as the “find my phone” feature can’t find a dead phone… Luckily there is now a send last location before your battery dies setting… – This can be set through Settings>iCloud>Find my Phone then Send Last Location.


    All of this is fine and dandy but probably the most useful new feature is the ability to use 3rd party keyboards.
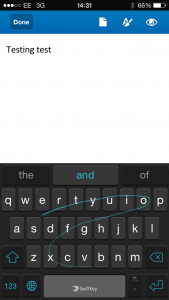
    On my Nexus 4 I use swiftkey, which offers good predictive text, and importantly for someone who uses the bumpy train network, a feature called flow.

    flowFlow lets you draw a line between letters rather than pecking out individual letters in a word. Whe you are stuck on a packed commuter train this is a boon.
    Finally the new keyboards feature also includes a set of Emoji characters – like a grown up version of the old 🙂 smiley face.


  4. Power complex

    May 13, 2014 by Robin Englebright

    At our app swap cafe today we shared some top tips for iOS devices, Beth previously shared a tip that charging your iPhone in Airplane mode made it charge faster… However at the event Beth had a bit of follow up – that the tip might have been an urban myth.

    Later the topic of closing apps on iPads as a way of prolonging battery life came up, which I was pretty sure didn’t make much difference.

    So I thought I’d investigate and maybe find the truth.

    An iPhone 5S has a 3.8v 1560 mAh Lithium ion battery, and can charge at up-to 1 amp, limited by the charge control circuits in the phone, battery condition, battery temperature and the rating of the charger attached… so the very fastest it could charge is about 1.5hrs (1.56 aH/ 1 A) However we probably won’t have optimal conditions, so for our example lets assume we can charge the device in two hours.

    Now the question becomes can we significantly drain the battery over two hours?

    Obviously if you sit around watching Netflix on the phone during the two hours the battery won’t charge as fast, and I’m assuming putting the device in airplane mode isn’t just a way of preventing user activity, so to test a likely situation I rashly assume that the phone won’t be used when charging.

    In this case the draw on the battery will come from active apps, and those running in the background, which touches on our second “myth” that closing apps will prolong battery life.

    The developer guidelines for iOS indicate there are 5 states for an app, of these two have potential to use power.
    If the app is “Active”, it’s in the foreground AND recieving events,

    or

    If the app is executing code in the “Background”.

    Apps usually only briefly pass through the Background activity state to close threads when switching between apps, unless they have permission to run in the background.

    However iOS is dead smart at managing its resources and is happy to move inactive apps to a suspended state, which keeps them in memory but not executing any code, and if memory runs low the system may close suspended apps to provide resources to the foreground app.

    The upshot of this automatic app management is that iOS will suspend apps that aren’t actively being used, so the power draw from these apps is negligible.

    The only apps that may be drawing power are active Background apps, and the only ones affected by switching to airplane mode are those that use the the wireless, carrier connection and bluetooth.

    The behaviour of apps in Background can be set in:

    Settings > General > Background App Refresh.

    and indeed here it does state that turning off background refresh may help preserve battery life. I was a bit surprised to find I had 25 apps using background refresh.

    iPhone Background app settings

    So in summary switching to airplane mode may well make your device charge faster if you have lots of apps set to Background refresh, but probably not by much.

    Closing apps manually is going to free up memory, but if they are suspended will not change power consumption.


  5. What’s on your Homescreen?

    April 29, 2014 by Robin Englebright

    Homescreens

    I recently joined Fiona and Beth at an app swap Breakfast planning meeting, and at one point we discussed the “Homescreens” idea that David Sparks runs as a regular feature on his blog MacSparky.
    He talks to folk about what’s on their iPhone home screen, and asks the same few questions each time:

    WHAT ARE SOME OF YOUR FAVORITE APPS?

    WHICH APP IS YOUR GUILTY PLEASURE?

    HOW MANY TIMES A DAY DO YOU USE YOUR IPHONE?

    WHAT IS YOUR FAVORITE FEATURE OF THE IPHONE?

    IF YOU WERE IN CHARGE AT APPLE, WHAT WOULD YOU ADD OR CHANGE?

    These questions turn up some fascinating apps, tips and points of view, like the recent entry by the teacher Robert McGinley Myers where I first heard about the Command-C app which allows copy and paste sharing across devices. It seemed likely that UoB folk might be interested  in what’s on the home screens of colleagues, so I changed the questions slightly to reflect a learning technology slant and to encompass iPads and android devices, and wrote a list of folk to question.

    To test this out, I thought I’d best subject myself to the questions first:

    Who are you, and what do you do?

    I’m Rob, and I’m a Learning Technology Advisor/Developer at the University of Brighton Falmer Campus. I’m new here and have mainly been working on the migration of StudentCentral.

    What’s on your homescreen:

    Homescreen_rob

    Turns out not very much of interest. This is a new iPad, and I haven’t downloaded all my apps, but rather am gradually addding things when I need them, this has resulted in a pretty sparse collection. Everything I frequently use is on the homescreen, and everything else is in folders on the second screen, but I actually use the finder to launch apps… except when I can’t remember what they’re called.

    Which three apps couldn’t you live without?

    1. Probably 1Password, which syncs up all my passwords across all my devices, so I can have good strong unique passwords for all the sites that need them… Just looked and that’s 318 passwords!
      If you’ve ever tried typing complex strong passwords using the iPhone keyboard this will be a revelation, use ONE strong password to access the app, and then use the built in browser to automatically populate the username and password fields.

      1Password-manager

    2. Evernote allows me to capture stuff quickly, sync it across all my devices and has a good search function. I use it to take notes in meetings (really useful share function) snap snots of presentations, record audio clips and add them to the note, and even set alerts to email notes on certain times and dates.
      The downside of the free app is that it doesn’t allow access to your notes when not connected (wifi) which was a bit of a shock the first time I used it.

    3. Evernote1
      Evernote links well with services like IFTTT, which means you can use it do cool things like archive hastagged tweets. Evernote is gradually adding functionality, and their acquisition of Skitch makes it really simple to take a photo, or screenshot, annotate and add to a notebook.
      skitch_to_evernote
    4. Twitter gives me instant access to collaeagues across the globe. The basic twitter app does a fair job as a reader, no fancy scheduling, or columns, just a timeline with previews of the images.

    twitter_app

    What app are you still searching for?

    A version of iPlayer Radio that goes straight to 6music…

    What’s your top tip?

    Aside from using the search bar to find and launch apps (drag down anywhere on the screen and type your search) … I’d suggest using the “add to reading list” feature in Safari, which syncs with Safari on my mac and phone  (Sync seems to be my essential feature)

    Screenshot of add to reading list feature in Safari

    So that’s my homescreen.

    If  you have any comments, suggestions, or fancy sharing your home screen with the Uni, and the world drop me a line.


  6. Sentiment Analysis made simple

    March 27, 2014 by Robin Englebright

    A while back I enrolled on a MOOC module on Data Analytics, and one of the first assignments was to perform a sentiment analysis on twitter. This involved getting a developer API key from Twitter, then writing a python script to suck tweets from the mighty twitter firehose. Analysis involved comparison against a sentiment sorted dictionary of terms.

    Whilst those skills are obviously useful, for those not willing to learn Python there’s a cracking tool available to analyse tweets with a hashtag:

    http://www.csc.ncsu.edu/faculty/healey/tweet_viz/tweet_app/
    I found out about it in a tweet from Randy Olsen, who ran it to visualise the sentiment regarding the recent release of Java 8.

    I thought I’d have a look at the #Maharauk14 hashtag and follow  over the next few months as we progress toward the big event. So far there are 5 tweets using that hashtag.


    Screen Shot 2014-03-26 at 13.51.29


    The sentiment analysis isn’t very useful on so few, but it’s worth a look at the tag cloud now and to compare it to the final result.


    Screen Shot 2014-03-26 at 13.51.55

    To compare approaches I’ve also set up a hashtag archive on GoogleDocs using Martin Hawksey’s template: http://mashe.hawksey.info/2012/01/twitter-archive-tagsv3/ which does require twitter API keys and what not, but is rather good.


  7. WordPress for Android

    March 26, 2014 by Robin Englebright

    I’ve been following the Learning Analytics conference tweets today,  and was looking at their poster session over lunch on my Android phone,  a nexus 4. I was quite impressed that I could read the site and even the posters on my tiny phone,  guessing it was some fancy responsive design site…  I was a bit surprised to find it was yet another WordPress site. (like this one)
    At the bottom of the page they were advertising the WordPress for Android app.  So I’ve downloaded it and am using it to write this post.  Pretty neat.

    image

    There’s all the functionality  I need,  and the most useful features are right at hand…  Or finger. Because its a native app not just a Web page I can switch between apps and check links without fear of losing what I’ve typed into a Web form field.

    image

    To top it off the Google play store tells me that Web guru Brian Kelly has given it a thumbs up.
    So there you have it,  WordPress blogs and therefore http://blogs.brighton.ac.uk blogs look good on a mobile device,  and there’s a free app to help create and control your content.
    Back to the Learning Analytics briefly it’s worth noting that there is data emerging that indicates that for your students the mobile device is likely their main device,  and unless you are writing for mobile,  you may  just not get read…
    Next post on mobile stats and learning Analytics I think.


Skip to toolbar