RSS Feed

Posts Tagged ‘appleTV’

  1. Screen Sharing How to… appleTV

    March 11, 2016 by Robin Englebright

    Following on from the HEA event where Vikki showed how she improved visibility of the fine close up work she does on knitting machines, I’ve had several people ask me about how to set the appleTVs up.
    The answer is… it depends… but I thought it worth sharing my solution.

    In order to enable “conference room” screen sharing the devices have to be on the same network, which means getting an eduroam account for each of the devices.
    Policy demands we don’t use a common account for all, meaning each configuration of the device is different, and the profile has to be edited before pushing to the apple TV.
    To “build” an appleTV to the required configuration takes about 20 minutes plus testing, and final “lock down” where additional or superfluous items are removed from the home screen, and the device is set to default to conference room mode.
    Less time is required for additional configurations as the latest version of iOS doesn’t have to be pushed to the devices.
    Set up and installation of the devices has proved problematic for a number of reasons.
    Whilst much of the setup can be done through the “configurator” software the final step requires access to the individual device menus, which means connecting up an HDMI monitor.

    On a (newish) mac download configurator:
    https://itunes.apple.com/gb/app/apple-configurator/id434433123?mt=12

    Launch Configurator and in the “Supervise” section select “Create Profile”>
    (At this point we “Import Profile” and pick eduroam.mobileconfig which will then be listed in the Profiles pane.)

    First off you’ll need to get hold of whatever certificates you use on your network, once you have them, select the “Certificates options” in the left hand panel of the configurator and add them using the + button.

    Next select the Wi-Fi menu and set the SSID to eduroam, check the “Auto Join” box, and pick WPA/WPA2 Enterprise as the security type.
    check the PEAP box and and set the Username and Password for the device, this needs to be different for each device.

    configurator
    Next select the “Trust” settings, and check all of the certificates you have installed and Save.

    Connect the appleTV with the USB cable and power up the apple TV.
    Configurator will launch a pop up “Apple TV Assistant”.

    Select “Don’t Enrol”>Next
    Select “Erase and install latest version”>Next
    Name the device – this is the name that will identify the device to folk who look for it using AirPlay,
    default naming convention is the eduroam account e.g.: abc123
    More useful especially in situations where many appleTVs may co-exist and be offered to folk, is to describe the location
    e.g.: GP321 appleTV – This can be changed once the device is located using the on screen menus on the appleTV.

    Set language to English, and uncheck “Send Diagnostics Data to Apple”>Next

    Pick the eduroam configuration profile Next

    unplugitthenplugitbackinagain

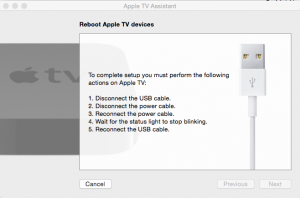
    Once configured you’ll need to follow the instructions, disconnect the usb, disconnect the power, reconnect the power, wait till the LED stops flashing, connect the usb again.

    With luck you then get a big green tick.

    The devices can then be further configured using the onscreen menus to enable conference mode with an onscreen password, to hide the unneeded icons, and to set a passcode on the device.

    Testing revealed that whilst the devices are pretty much uniform, some proved harder to get to the point where they accepted a profile. Some devices required 2 or 3 (in one case 4) attempts before the settings took, there is no clear reason why this should be the case.

    Deployment has proved complex due to the lack of capacity of the existing infrastructure control panels for auxiliary inputs, and the lack of HDMI inputs at all.
    This means the likely solution is to plumb the devices in to the PC laptop port using a VGA converter, OR to connect to the HDMI and then use the remote control to select the source.
    On my site there are no two installations that are completely the same, which means slightly different instructions are required for each installation, and awareness of this difference by those intending to use the devices.
    This is further complicated by the need for a power supply for the appleTV and more pressingly, a way to cycle the power if the device goes to standby, and needs to be restarted.

    instructions

    Risks

    – Complexity and inconsistency of connection may put people off using the devices
    – Reliability of the appleTV units once active (they often require multiple attempts to connect) may have a considerable technical support overhead.
    – Configuration of the devices takes a significant time.

    Recommendations
    The biggest barrier to use is the varied connection to the screens. A common approach at least within a campus would be beneficial.
    What works well:
    Free roaming devices, with HDMI cable and VGA/HDMI adaptor for personal use.
    Connection by HDMI cable to modern Flat screen devices.

    Even better if:
    Identify requirement as part of the room refits and agree a common approach, common connections, capacity for future expansion.
    Review common software alternatives – use of reflector,(I’ll write up Reflector details shortly) or air parrot for laptop users and a solution for fixed desktop units.
    Look at design of the instructions to provide concise, clear common approach.
    Work with Learning Technology Advisors, site technicians and school technicians to ensure awareness, and support capacity and capability.


  2. Sharing your screen

    March 7, 2016 by Robin Englebright

    At the HEA arts and humanities conference  on the 3rd March 2016, Vikki Haffenden presented her research into improving the student experience in workshop sessions.

    When teaching Vikki demonstrates really intricate settings on knitting machines and close up work, to University of Brighton Textiles students,  and it can be hard for the students to see. After much experimentation she settled on using the camera on an old iphone4S in a chest harness to stream video to an appleTV and then onto a 32″ TV screen, so students can see even if their view is obstructed, and in fact can see in more detail as the image gets magnified.

    To test the decisions Vikki made the session then moved to a hands on workshop, comparing a range of screen sharing technologies and drawing out the pros and cons of each.
    We started with a quick Poll using PollEverywhere to gather thoughts from the delegates on potential uses for the technologies.

    PollEv

    PollEverwhere performs the function of the older style voting buttons, but using mobiles to access the poll either through the website: PollEv.com/brightonhea or by Texting BRIGHTONHEA to 020 3322 5822.

    For our demo the question was “How do you think you might use screen sharing for in your teaching?””

    We then spilt into two teams, to see how easy it is to set up the kit, as this was one of the areas Vikki identified as important, if it’s too tricky to set up, or unreliable it leads to a bad experience.
    Team one (team Vikki) used Vikki’s iPhone in a chest harness streaming to an apple TV and screen combination.

    Team two used a Go Pro with a head harness (because a head harness is way funnier) streaming to the Go Pro app, connected to a projector by an adaptor cable.

    GoPro app

    Both teams had the kit up and running with minimal support, and both setups seemed to offer similar functionality. The GoPro has more settings and a removable sdcard which could be a benefit, as video recording takes up loads of memory.
    There are some interesting points with both devices  that need consideration however.

    When using the appleTV setup both devices must be on the same wireless network. This means a personal appleTV setup carried to a teaching space is ok, but slightly trickier is one leaves the device setup in a room, as it will require it’s own eduroam account, which may not be popular with IT depts. In order to setup an eduroam account one needs to connect the apple TV to a modern mac, and run the configurator app, which is a bit of bother.

    The GoPro bypasses the problems of requiring an eduroam account by acting as it’s own streaming server, and in order to connect the app one has to first connect to its wifi network. The downside of the GoPro is that it streams to a mobile device, which is slightly harder to then connect to a screen, we used an adaptor cable, and to be honest were quite surprised when it worked. There is a way of accessing the GoPro stream via a PC web browser, but it seems quite a faff.
    Our next Demo failed, probably due to the conference centre wifi, but I’m not totally sure.
    I tried it again as soon as I got back to the office and it worked fine.
    Reflector2  works in a similar way to the appleTV, screen sharing requires both devices to be on the same wifi network, and the person sharing their screen has to swipe up to reveal their “Airplay” settings, and then pick the device to stream to, The upside of reflector is it only costs around £10 and runs on your laptop, so if you already take a laptop to your lectures/demos, it doesn’t require much other work. It also (in theory) allows android (and windows phone) users to share their screens, although I’ve had no luck with my Nexus 4 or Nexus 7.
    A big difference is that it allows multiple screens to be shared simultaneously, we’ve tested it with 9 devices before it all went wrong.

    9reflections

    As an added bonus individual shared screens can be recorded on the laptop, I’ve no idea what would happen if you tried to record 9 simultaneously, but it would probably be ugly. Whilst you could have multiple mobile devices streaming from their cameras, Reflector seems to lend itself to sharing sketches, or photographs to compare and contrast.
    After spending most of the session looking at sharing detailed work, we moved to sharing at a grander scale.
    The SWIVL device is a small motorised base unit that can hold an iPhone, or iPad, and will track the movements of a presenter who wears a small wireless lanyard.
    This lends itself to more expansive demos, maybe where those watching are viewing remotely, so we paired it up with an iPhone running Periscope, which streams to the web.
    It is worth noting that whilst I’ve found the cheaper basic appleTVs work better in conference mode setting  the new devices have a periscope app, which could make connecting easier…

    We closed the demo using Nearpod which allows the presenter to control the screens of the delegates whether they are in the room or not, and push slides, links questions and activities out to them, and then share the responses back.

    Nearpod

    For University of Brighton Folk on Monday 14th March 12-1 in G4 I’ll be running a Lunch hour app swap, where we’ll revisit the hands on part of the session, and I’ll bring along:
    A visualiser, an AppleTV and GoPro, Reflector2, SWIVL, Periscope and Nearpod.
    …and of course there’ll be a chance to share your ideas and favourite apps.

    See you there.


Skip to toolbar