Search results for: Max Gill

Items of interest

As I mentioned before, the documentation process allowed me to make note and plan for any more challenging issues that myself and Melissa Williams might come across during conservation and I thought I would share a few of those with you.
Items of interest, Max Gill, Sirpa Kutilainen, University of Brighton Design Archives
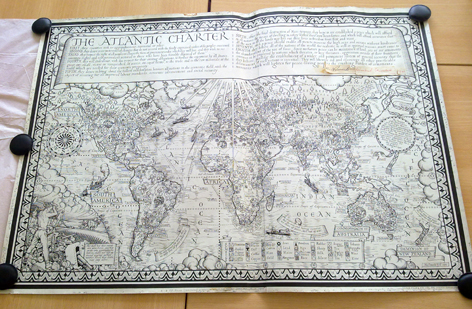
Max Gill’s Atlantic Charter map, pen and ink original, 1942

The first piece I’ll talk you through is the Atlantic Charter map from 1942. This item is a pen and ink original and has a variety of very interesting issues to bring up. The dimensions of the charter are 1100 x 775 mm and it has been constructed from two separate large pieces of paper stuck together. On the image above you can just see the slight bend on the surface where the two pieces are joined together. This off-middle joint consequently has a thicker feel to it compared to the rest of the paper.

Items of interest, Max Gill, Sirpa Kutilainen, University of Brighton Design Archives
Signatures of Roosevelt and Churchill (detail)

Under the main banner of text there are three pieces of ink of paper attached – the date 1941 and two signatures. On the left is a signature of Franklin Roosevelt and on the right an original signature of Winston Churchill. All of these pieces have been adhered to the original artwork with what, at first inspection, appears to be an animal-based glue. These types of glues have the tendency to become very brittle and yellow in colour with age. The hardened residues of glues like this can be removed by scraping with care. These three additional pieces will need to be secured during conservation.

Items of interest, Max Gill, Sirpa Kutilainen, University of Brighton Design Archives
Another loose piece needing attention (detail)

There is also an additional piece added to the original artwork at the bottom edge of the item. This appears to state the producer of the poster and will also need to be secured properly. The problem with these adhesives on any piece of art is that it they leave a permanent stain that does not really respond to washing treatments. The best that can be done is scraping away any residual adhesive and securing any such pieces to the original by using a wheat starch paste. This paste is used widely in paper conservation. It is easily reversible as it is soluble in water and it doesn’t leave any unwanted stains on the paper.

Items of interest, Max Gill, Sirpa Kutilainen, University of Brighton Design Archives
Ink markings along the edges of the poster (detail)

As I had mentioned before, this particular piece is a great example of showing something that isn’t intended to be in a ‘final piece’ and could, by some, considered to be unwanted markings. But as, after all, this is an original piece of artwork; Gill’s ink markings along the edges are beautiful little pieces of evidence of a work in progress.

Items of interest, Max Gill, Sirpa Kutilainen, University of Brighton Design Archives
Queen Mary map

Another piece that I thought I would use as an example is the draft watercolour from 1946 map designed to go aboard the Queen Mary ship. This item has the dimensions of 1600 x 806 mm. Before this piece was rolled up, it had been folded, as the fold creases run all across the object from left to right. It is not only an original draft watercolour, but also has ink handwriting in the top right corner area and below it, two photographs adhered to the paper.

Items of interest, Max Gill, Sirpa Kutilainen, University of Brighton Design Archives
Detail of the paper joints, part of original watercolour and a photograph adhered to the paper

The whole object is made up of segments of paper – there is one larger piece where the watercolour painting is that has been joined together with four smaller pieces of paper.

For whole objects that have been built up in this manner, any decision about aqueous treatments would need to be even more carefully considered than usual. When paper comes in contact with water, the fibres within it expand. If an artwork is made up of several sections and is not taken apart before washing, these sections can become separated. Once the pieces are separate, and wet, they would need to be left to dry before attaching them back together again. When paper dries, it contracts and if pieces are washed separately, or come apart during washing processes, the chances are that they will not fit together again as well as they did before wetting. The way in which paper acts and reacts has also to do with its grain direction and if joined pieces have grain direction running in separate directions, the piecing together will become even more difficult.

For the Gill material, there is a general understanding that no aqueous washing methods will be used in the conservation of these materials due to time and budgetary restrictions. However, some materials might need to be humidified before flattening if the heat press will be deemed unsuitable.

Unrolling and documenting

Unrolling and documenting, Max Gill, Sirpa Kutilainen, University of Brighton Design Archives
Documentation of one of the Gill items to be exhibited

Yesterday I spent the entire day going through the pieces delivered at the end of February for documentation purposes. This was also a really nice way to familiarise myself with the objects prior to taking them to the conservation studio for the planned dates early April. The decision to document the objects before delivery to the conservation studio was made to save time on the two days of conservation that are budgeted into the exhibition plan.

There were 31 pieces in total to go through and to document these in one day was no mean feat! Prior to starting to unroll the objects, I had to make sure I had a table space large enough to do this in comfortably and that the surfaces were thoroughly cleaned. The documentation requires cross-referencing the numbering system created by the collection owners to make sure that the pieces are named properly. I then measured and dated (where known) them, after which each of the items were examined carefully to document any issues with the paper and/or the inks and other media used in them.

Unrolling and documenting, Max Gill, Sirpa Kutilainen, University of Brighton Design Archives
An example of a part of a documentation sheet (work in progress)

Diagrams and photography also support these notes. This is to make sure the condition of each individual object is documented thoroughly before any conservation and framing takes place. It is also important to document both the recto and verso of the piece.

There can be conditions on how much conservation actually takes place. These conditions can be dictated by owners of collections and even by the piece itself. As an example an object that has lived its life being folded, the folds become a part of its history. They might need to be strengthened by adding support to prevent any damage and tearing happening in the future but flattening the object entirely may not be the best treatment for it. Just as with surface cleaning pieces with pencil marks on them, great care needs to go into the planning of conservation treatments, which also emphasises the importance of thorough documentation.

Delivery

Delivery, Max Gill, Sirpa Kutilainen, University of Brighton Design Archives
Some of the meticulously labelled rolls in which the Gill items were delivered by the collection owners

The exhibition planning team have now made final decisions about which of the Max Gill items are going to be included in the exhibition and the collection owners have delivered the majority of the pieces that are to be included in the exhibition. This means that all of the conservation planning can now really start to take shape.

Most of the objects, as expected, have come to me rolled up and inside tubes. The collection owners have very carefully labelled the items which makes the organisation at my end a lot faster and easier. First thing for me to do is to ‘unveil’ them, document their condition, draw diagrams and take photographs of the pieces. I can’t wait to get started!

Mechanical surface cleaning

While I am waiting on the exhibition planning team to make final decisions about which pieces from the Max Gill collection will be exhibited I thought I would write a little bit about the reasons for mechanical surface cleaning. All of the Gill objects might not necessarily need a lot of work doing to them, but they will all need to be surface cleaned prior to framing.

Surface cleaning materials is a very important first step in the chain of events that stabilise an item being conserved. Dirt on objects can be a source of deterioration and in worse cases can contain mould spores that flourish on nutrients found within the paper and any debris left on it. Water has a strong capillary ability and when paper gets wet, the fibres expand. They contract again when drying, and if surface cleaning hasn’t been done, this action traps in any dirt or dust particles left on the paper.

Considering the safety of an object needs to be taken into account. The strength of the paper will determine how and if surface cleaning can be carried out. It is important to remember and know that pencil marks, cataloguing marks and random smudges on objects can play a historic part in the object’s life and removing these marks will change the object drastically. I should also note that both recto and verso of the item need to be cleaned.

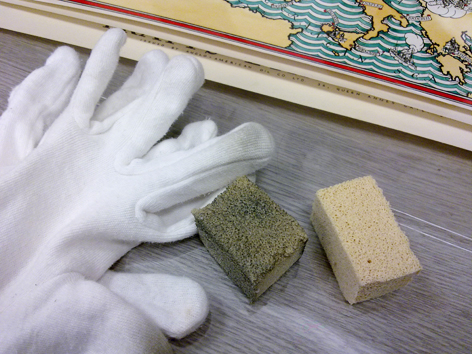
For the most fragile pieces, surface cleaning might take place by using only a brush – the size of the brush will be dependent on how fragile the paper in question is. Mechanical cleaning can also be done with the aid of chemical sponges, which are widely used in conservation. They are composed of rubber and are heavily filled with calcium carbonate and do not leave any residue on the paper’s surface, but are very effective in picking up dirt.

Mechanical surface cleaning, Max Gill, Sirpa Kutilainen, University of Brighton Design Archives
An example of how much dirt can be lifted off the surface of a print with a chemical sponge. This is from working on a Macdonald Gill print.

Rubbers are also commonly used, and the most widely used, to my understanding, are Staedler Mars rubbers. This particular make is used for the same reason as the chemical sponges – research has shown that this rubber does not leave any residue on the paper’s surface. On sturdier archival pieces, the rubber can be used as a block. For more delicate pieces and items with pencil marks, the rubber is grated and a piece of cotton wool is parcelled inside a piece of anti-static cloth and this is used to gently roll over the grated rubber, removing surface dirt as you go along.

Groomstick is another tacky substance that can be used when wanting to pick up larger bits of debris on an item – for example pieces of glass from a broken frame. Groomstick has a very tacky nature and is not recommended to be used directly on the paper as it can damage the fibres. Using a museum vacuum is also an option and is generally used with archives that are very dirty, for example objects that have not previously been stored correctly. Vacuums should have a filter at the tip to enable picking up any loose pieces that may come off in the process.

Cleaning tears and around holes and other damaged areas can also propose a problem, as it is important to take care not to damage the object any further. For tears along edges of a piece, a piece of melinex can be used to slide into the tear  – this way both sides of the tear can be gently cleaned with less risk of extending the tear.

Surface cleaning objects takes a considerable amount of time – especially cleaning larger pieces such as a lot of the proposed exhibition items from the Gill collection.

Facsimiles

Facsimiles, Max Gill, Sirpa Kutilainen, University of Brighton Design Archives
The original poster (left) with the two facsimiles

For the facsimiles, the digital master file was given to both the University’s reprographics service and a local photographic printers. It has been very interesting to observe the differences between the two. The colour casts are subtly different and there is appears to be a difference between the contrast settings. I believe neither place adjusted any settings prior to printing, so these differences will have occurred in the printing process. As the copies were made in the spirit of testing out the process, neither place had access to the original poster for reference so the colours were not as vibrant as on the original. There were also subtle differences between being able to see the pixels – one was a little bit softer compared to the other.

For the purposes of making a decision about whether to show facsimiles or not, we arranged for the copies to be magnetically hung on a wall for the collection owners to see what could be done. Although they were very impressed with the results, a decision has now been made in collaboration with the entire team that only originals will be exhibited.

Going through the process of testing out the option of showing facsimiles has been a really fantastic learning curve. The digital image can now also be used in the planned digital resource in support of the exhibition.