For students taking video-based module options in Media Studies / Media and Environmental Communication / Media, Industry and Innovation / Music, Business and Media.
This page outlines the video workflows you should follow as well as providing guidance on how to prepare video for submission / assessment.
Before you submit video work, you should always visit this page to ensure you are following the correct and most up-to-date specifications – this page will be updated from time to time.
If you want to do well with the video production module you are taking, and you would like to make life as easy as possible for yourself, please read through the whole of this page once; then you can use it as a reference guide when you need reminding of how to go about particular procedures. You can turn this page into a pdf for printing or reading offline: just go to the bottom of this page and hit the pdf button. Remember, however, this online page will be updated from time to time and it will be a very good idea to visit it before you export and submit your video for assessment. If you spot any errors or omissions, or have suggestions/requests for more guidance to appear below, please email Kevin Reynolds: k.reynolds3@brighton.ac.uk
CONTENTS:
- Audio
- Video
- Manual Exposure & White-Balance
- Manual Focusing
- Camera Audio
- Downloading Video and Screen Recording
- Filming in Public
- Consent
POST-PRODUCTION…
- Creating your Folders
- Creating your Premiere Project
- Setting up your Premiere Workspace
- Creating a New Sequence
- Organising Bins
- Using CMS Edit Suites
- Using Premiere Pro with your own Computer/Different Versions of Premiere
- Import your Media Files
- Construct your Sequence/Timeline
- Essential Keys to Start Editing
- Preparing and Syncing Audio
- Audio Noise Reduction
- Achieving a good Sound Mix within Premiere
- Colour-correction & Grading
- Saving Versioned Copies of Your Premiere Project
- Backup to the Watts Media Server
- Retrieval From the Watts Media Server
- Work Area Bar
- Export Settings
SUBMITTING VIDEO FOR ASSESSMENT
- Upload exported file to video platform
- Add a url link in TurnItIn document
- LM315 Submission of usb-drive/dvd-rom to School Office
*
PRODUCTION KIT
The standard production kit consists of two main recording devices – for (separate) Audio and Video recording. You record high quality audio on a dedicated audio device and low-quality ‘reference’ sound along with your video on a DSLR/mirrorless camera (you can book the kit with SiSo). You then synchronise the separate audio and video streams in post-production (Adobe Premiere) and mute the camera’s audio (see within the Editing section below for how to prepare and sync separate audio).
Audio
It might sound odd to hear that audio is the most important thing when making a video, but this happens to be true. Why? If you make serious mistakes with your camerawork, it may be possible to correct or hide those mistakes in the edit (perhaps, for example, you can later shoot other scenes to cover up most or all of the original video). If you make a serious mistake recording audio, it is very likely that there is little you can do to correct it (other than starting again, which is not always an option with, for example, interviews). Video productions that look good and yet sound terrible are terrible for the ‘viewer’. A ‘viewer’ is also a ‘listener’ and a viewer of badly shot video will be more forgiving if the piece sounds good. Bad sound is a hallmark of non-professional video, something we witness very often on youtube. So recording good quality audio is the most fundamental thing to get right and something that should set your work apart from the typical youtuber. So…
You should use a digital audio recorder with balanced XLR inputs along with a boom or lapel microphone (wired or wireless). You should always monitor your sound with headphones – visual monitoring of input levels is never safe enough on its own. Note that, with many different models of audio-recording devices, when you hit record once, the device only ‘monitors’ the recording level so that you can hear the input in your headphones: it does not yet actually record (this depends on the settings). You need to hit record once again. The surest way to ensure that you are recording is to check that timecode is running and the record symbol appears on the display (usually a filled-circle icon). If you don’t see the timecode running, you are not recording yet! With Tascam recorders it is a good idea to record in ‘Dual-Mono‘ mode (this may also be available with other recorders). This mode records two audio files simultaneously: a ‘normal’ volume level plus another at a lower volume that you can set (between -6dB and -9dB is a sensible range within which to set your second, quieter, file). This way, you can feel safer getting a good level recorded that, if it ends up being too loud (distorted), you can replace with the alternative quieter recording. When recording voiceovers or interviews, try to record a couple of seconds of the sound of the room (i.e. without any talking). This will help with noise-reduction in post-production (for examples: with computer-fans, air-conditioning, or ‘hiss’) .

Example standard kit that you can book on SiSo:


Sony ZV-1 Kit which includes a Sony ZV-1 camera, a Tascam DR-60 audio recorder, Rode Wireless Lapel microphone, Rode NTG-2 microphone, Libec lightweight tripod. There is also a charger for the Sony and AA batteries. You will need your own headphones or book them seperately (see below).
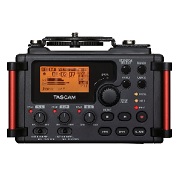
TASCAM-DR100 MkII audio recorder. The DR-100 Mk II will come with AA batteries but it also has an internal battery in addition. It is a very good idea to charge it (with a USB lead) before you go to your shoot! Ideally, you would also have your own rechargeable AA batteries and a charger.
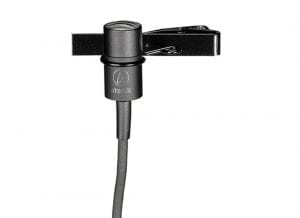
Microphone: Audio Technica AT803 Lapel Mic (Wired) or Rode NTG-1 Boom mic
A 5m XLR lead
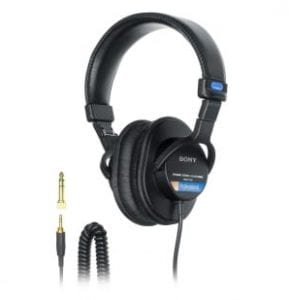
Sony MDR-7506 Headphones
Gain levels on the audio-recorder should be set manually; you should record uncompressed .wav files (not .mp3 files) at 48KHz and 24-bit.
Do not record important vocal audio (such as interviews) with general-purpose omnidirectional microphones, such as internal camera mics or those built into the Tascam-DR100, DR-60, or Zoom H2. This will result in low-quality audio (and, most likely, mean that you will loose marks). Place a dedicated external microphone as close to the source as possible. Placing even a high-quality boom-mic more than half a meter away from your source will most likely result in poor-quality sound (unless you are isolated in a sound-treated environment, i.e. a ‘dead’ room). A lapel-mic worn by your subject is the easiest way to ensure close and consistent proximity. Try to position the top of the lapel microphone slightly away/off axis from the mouth of the speaker so that, should they bow their head forward temporarily, no major difference in level will be recorded (you may notice on some news programmes, for example, that lapel microphones, if they are thin/small enough, are worn completely upside-down).
Setup/Settings: DSLR and Separate Audio Setup.pdf
Once you have recorded your high-quality audio on your dedicated audio device, you will need to synchronise it to the Camera which will have recorded low-quality audio to be muted in the edit. You do this in Premiere Pro. See ‘Preparing and Syncing Separate Audio (Adobe Audition & Premiere)’ in the Editing section below.
Video
A common mistake for beginners is to film a lot of hand-held shots with excessive camera movement and zooming (in or out) and to never use a tripod. Hand-held footage can be great in the right circumstances but requires a considerable amount of practice – especially with small, light DSLR cameras (most professional ‘hand-held’ footage you see is usually shoulder-mounted). Spend ten minutes watching a film or broadcast television and note how smooth and slow (or still) the camera movement is. It is very subtle and much of what you see moving quickly will often involve agents or objects within the scene – rather than with the camera itself. In short, begin by using a tripod quite a lot. You may think it looks ‘boring’, but that is where editing comes in. And when you shoot with your camera, you should always be thinking about how it will be used in the edit. A good trick in shooting establishing shots (of, for example, the outside of a building) is to shoot static shots on a tripod which you later modify in the edit with very subtle ‘zooms’ using the ‘Motion’ effect inside Premiere. If you come back to the edit with nothing but very shaky footage, then you have a much bigger job in making your video look good.
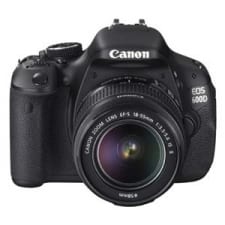
DSLRs that you can book with SiSo – Sony ZV-1 Kits (see above), Canon 600D/700D
Three important things to do when booking/picking up a camera from the kit store:
1. Make sure you have or book a spare battery for the Canon 600/700D if you are planning on recording for more than 20 minutes at one sitting or if you will be filming out for a long time (especially in cold conditions – batteries run out much quicker in the cold)
2. Make sure everything is present when you pickup – especially the battery charger, spare batteries, at least one SD card (you can book more of these too) and a usb lead or SD-card-reader to transfer footage.
3. Make sure it works. Switch it on to make sure it works and you have everything…and now is a good time to check the settings.
Do these checks before you leave the Watts building!
Unless you want life to be more difficult, it is really important to check the settings on your camera before you begin filming.
Make sure to set your DSLR to video mode before checking that your settings are correct…
Whatever camera you use for video, set your resolution to 1920 x 1080 and set your frame-rate to the standard for UK television – 25 frames per second (fps). If a 25fps mode is not available, this may be because the region mode is set to ‘NTSC’. You need to ensure it is set to ‘PAL’.

Next, if you want to make good looking films then you need to set most things to manual: especially exposure and focus (and white-balance, if not entirely manually set, will at least need to be set to a relevant preset rather than being on ‘auto’). This is all very difficult to get to grips with when you begin but you will never make a consistently good looking piece unless you do things manually…
Manual Exposure:
This is something that, at first, is very complicated and difficult but you absolutely must learn how to set exposure manually if you want to produce films that do not appear to be rather amateur. Exposure consists of three settings: shutter, aperture, and gain/iso…
Make sure any ‘auto-exposure’ settings in the menu of your camera are off.
First, set you Gain/ISO very low, i.e. at 100. Try to get a well exposed image by brightening it up using the other two exposure settings first:
aperture/iris: When you are indoors (or if you want a nice blurry background) you’ll probably want to open up as wide an aperture as possible (to f.3.5 on a standard kit lens). Remember when you do open up the aperture, your depth of field becomes narrower (i.e. the field of what remains in focus is reduced). This is good for the filmic look of having your subject in focus whilst the background is blurred. It may be that you want a wide depth of field so that a lot remains in focus (i.e. things closer and further away all appear in focus). In that case, close down your aperture (e.g. to something like f.8 or f.16). You will have a wider range of distances that remain in focus but remember that this will reduce your exposure (i.e. things will appear darker) which means you may need to compensate with other exposure settings…
shutter speed: when shooting at the UK standard 25 frames-per-second, the shutter-speed should be set to 50 as a default standard (that’s 1/50th of a second, 1/2 the time of the frame-rate). However, if the environment is really dark (underexposed), you can go down to a shutter speed of 30 or 25 but more than a little movement may become too blurred (you will get away with a seated talking head at these low shutter speeds if you need to).
gain/ISO: You should have begun with a low gain/iso setting (e.g. 100); now, having set your shutter/aperture you may need to turn up the gain/iso. You have kept it low until now because turning it up adds horrible ‘noise’ to your picture (what some people incorrectly call ‘grain’). So the idea is to start with it low (100), then set the shutter/aperture and, if you exposure is still too low, only now do you start adding more gain/iso. On a Canon 600D or 700D, an ISO over 1600 will add far too much noise to your video in most circumstances. If you find that your image is over-exposed when your gain/ISO is set as low as possible (100) then you need to either close the aperture further or add a Neutral Density (ND) filter to the front of the lens. Do not be tempted to shorten the shutter-speed radically as this will result in rather unnatural-looking footage – especially with movement. The only time you should use a high shutter-speed with video (e.g. 100) is when you are shooting green-screen work with plenty of light or when, with capable cameras, you are shooting slow-motion (high frame-rates) with plenty of light.
White-Balance:
White-balance should not be left on auto. Choose a preset that looks most neutral (daylight, tungsten, shade, etc) or, even better, take a photograph of something white and do a completely manual white-balance. To choose a preset, hit the ‘Q’ button and then, using the cursor keys, choose the White-balance preset icon. Then use the dial to scroll through the options, finding the most appropriate setting that is neither too warm (orange) or too cold (blue). Any of these presets will be slightly wrong. But it is better to have something consistently wrong that you can easily change in your edit. If you leave white-balance on auto (‘AWB’) then you will not be able to correct it properly in the edit because the colours will be constantly changing. This may not be noticeable on the camera screen whilst you are filming.
To do a completely manual white-balance, take a still picture of something white (the whole picture should be white so, for example, zoom into a white piece of A4 paper). Then hit the menu button and, using the third menu, choose ‘Custom White Balance’, hitting ‘ok’ to choose the picture you just took. Hit Menu to retun to the live view, hit ‘Q’ and select the manual white-balance icon which looks like this:
![]()
Manual white-balance is something that takes considerable time and care so it will be more usual when shooting documentary footage to choose a preset (see above) which should be close enough (that you can fix in the edit).
Manual Focusing
You need to get used to using manual focus – there is a switch on the lens itself (set to ‘M’ or ‘MF’). Auto-focus will ‘hunt’ for focus continually and occasionally go very wrong. With old-school fixed-lens cameras, the best way to manually focus was to zoom all the way in with the lens, adjust the focus ring on the lens, then zoom out to how you wanted the picture framed. But the method is slightly different with DSLRs…
With DSLRs you should take these steps:
- frame your picture as you wish to record it by adjusting the zoom ring on the lens (to a specific point known as the ‘angle’);
- then use the magnify button (hit twice to get to x10 magnification, see picture below) you may wish to use the arrow keys that surround the ‘set’ button to choose the magnified area of view;
- then adjust the focus ring to achieve focus. sometimes it helps to go completely out of focus before going back in;
- then hit the magnify button again to resume to the normal view you wish to record (or if you are still in magnification view and hit record, the camera will automatically revert to the normal view);
- Hit record.
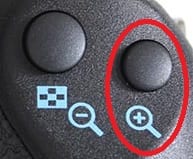
Note that you need to sort out your focus before you hit record because once you are in record, you can no longer use the magnify button (it will no longer work). Without installing extra software (a freeware package called ‘Magic Lantern’, which you should not install on Kit-Room cameras) you can no longer check focus whilst recording. The best thing to do is to ensure that you maintain a constant distance between the subject of focus and the camera.
Camera Audio
Since only reference (low-quality) sound is required on the camera, audio gain on the camera should be set to auto (audio gain on your separate audio recorder should be set manually). Your camera should be in ear-shot of what you are recording so that its poor-quality sound can be easily matched (synced) to the good-quality audio in your separate audio-recorder.
Setup/Settings: DSLR and Separate Audio Setup.pdf
Downloading Video and Screen Recording
Before you reach the editing stage, you may need to grab footage from various online sources. Please be aware of copyright and what you are allowed to do under ‘fair dealing‘ with copyright materials (use creative commons licences if you can). Perhaps you have found news footage that can’t be captured any other way, or perhaps you want to record some form of online interview. There are a number of online capture sites that can help with capturing youtube and other sources. At time of writing, this one seems very reliable:
There are also browser plug-ins that can download video – such as ‘Video DownloadHelper’ for Firefox.
In some cases, the only way to get footage (and the right mix of audio) will be through screen-capture/recording on a computer. One of the best/standard software packages for screen-recording is a free, open-source package called OBS (Open Broadcaster Software). It can be used for screen recording and also live streaming – so it is worth getting to know. It works on PC and Mac and can be downloaded here: https://obsproject.com What is particularly good about it is the ability to mix/mute/separate various sources of sound as well as mixing various sources/types of video/stills. In the video-guide below, for example, I setup OBS to record Desktop audio and mic audio in two separate stereo streams. The guide is focused on setting up OBS so that your recordings are appropriate for UK PAL HD video projects- i.e. the format that your Premiere projects should have (resolution: 1,920 x 1080; 25 frames-per-second; 48kHz audio). Note that with some web browsers, the video appears blank within OBS. For this, and a number of other reasons relating to privacy/security, it is best to use Mozilla Firefox as your web browser (on Mac or PC – https://www.mozilla.org/en-GB/firefox/new/).
If you are working on a Mac, you might get away with using the screen-capture feature within Quicktime Player but you may not be able to record sound along with your screen straight away. You may also have problems capturing sound within other applications. In such cases you may need to install a ‘virtual’ audio driver. Here is a guide to setting up with one called ‘SoundFlower’:
Here is the link to the download (mac only): https://github.com/mattingalls/Soundflower/releases
Filming in Public
This section will be updated further but, in the meantime, view this guidance on the legal situation: https://www.youtube.com/watch?v=ZZ5d7TVNYUs
Consent
With any interviewee or subject who features significantly in any way, the very least you should do is ensure they sign a consent form. For third-year research projects you should ensure you have ethical approval via the online BREAM process.
POST PRODUCTION…
*
CREATING A NEW PROJECT
Before you go near Premiere, create the right folder-structure for your project on your local hard-drive (not on the Server).
Creating Your Folders
You should be using a local hard-drive: either a plug-in usb drive, or the local D: drive in Watts 611.
If you use the local D: drive on a computer in Watts-611, first create a folder with your module-code and name before creating a project-folder beneath that (e.g. D:\LM115-Kevin-Reynolds).
When you create a new video project, make a new folder which should contain your Premiere project file (more on that below). So, for example, within D:\LM115-Kevin-Reynolds I would create a folder for my music documentary project called D:\LM115-Kevin-Reynolds\Music_Doc. Within that, I would then create the following folders:
Video, Audio, Graphics, Renders, Output.
‘Video‘ is where your camera-files (e.g. .mov/.mp4/.mts) should go and you would be wise to create sub-folders such as ‘Interviews’ ‘B-Roll’ and, if you are well-organised, you may wish to make further sub-folders within these.
‘Audio‘ is where you should put all your ‘.wav’ or ‘.mp3’ files (although you should always use/record uncompressed .wav files if you have the option). Beneath this folder, you should also add a sub-folder called ‘Originals‘ if you are going to work on noise-reduction, normalisation or other aspects of audio in Adobe Audition before editing those audio files within Premiere. The idea is to keep the original audio files as they are so that you can revert back to them if you make mistakes in editing your files with Audition in the main Audio folder.
‘Graphics‘ is where you should keep all stills that you shoot or find (.jpg, .tif, etc)
‘Renders‘ is where you store video files that have been output from your project that are, in turn, used in your project. Sometimes an element of your project might be so complex and processor-intensive that it is easier to export it as a single rendered video file (you should export it with higher data-rates/quality than your normal project export settings). This would also be the place to keep exported compositions from After Effects.
‘Output‘ is where you should store drafts and the final edited video that you export from the timeline. You should version your output e.g. Music_Doc_v01.mp4; Music_Doc_v02.mp4, etc.
So if you have created a project on the local D: drive of a Watts-611 PC, you should have folders that look something like this:
D:\LM115-Kevin-Reynolds [containing folders for separate projects…]
D:\LM115-Kevin-Reynolds\Music_Doc [containing your project file, e.g. Music_Doc_v01.prproj plus the following folders…]
D:\LM115-Kevin-Reynolds\Music_Doc\Video [containing your .mov/.mp4/.mts video files]
D:\LM115-Kevin-Reynolds\Music_Doc\Audio [containing you .wav/.mp3 audio recordings/music/etc]
D:\LM115-Kevin-Reynolds\Music_Doc\Audio\Originals [containing original copies of interview audio files you have in your Audio folder (you leave the copies here unedited and use Adobe Audition to edit in the Audio folder beneath)
D:\LM115-Kevin-Reynolds\Music_Doc\Graphics [containing any photographs]
D:\LM115-Kevin-Reynolds\Music_Doc\Renders [which may later contain video files that you have rendered and will use within your project]
D:\LM115-Kevin-Reynolds\Music_Doc\Output [which will later contain the drafts/final edit of your final video]
Creating your Premiere Project
There are a number of important things to get right from the outset when you create a new project and a new sequence in Premiere Pro.
In short, you need to get the project-filename, folder-location, codec, resolution/field-format, and frame-rate set correctly.
First, open Premiere and create a new project (if the option is not immediately available in a pop-up window, hit File->New Project)
Then enter the filename of your project, ensuring you version-it (e.g. Music_Doc_v01). Get into the habit of using ‘underscores’ rather than spaces in all filenames (‘Music_Doc_v01’ rather than ‘Music Doc v01’).
Underneath the filename, choose the correct location (folder) that you should have just created on your local hard-drive (e.g. D:\LM115-Kevin-Reynolds\Music_Doc):

Once you are sure the filename and location are correct, hit OK. A project file will be created in the project folder you specified (in our examples so far, this would create the file:
D:\LM115-Kevin-Reynolds\Music_Doc\Music_Doc_v01.prproj
Setting up your Premiere Pro workspace
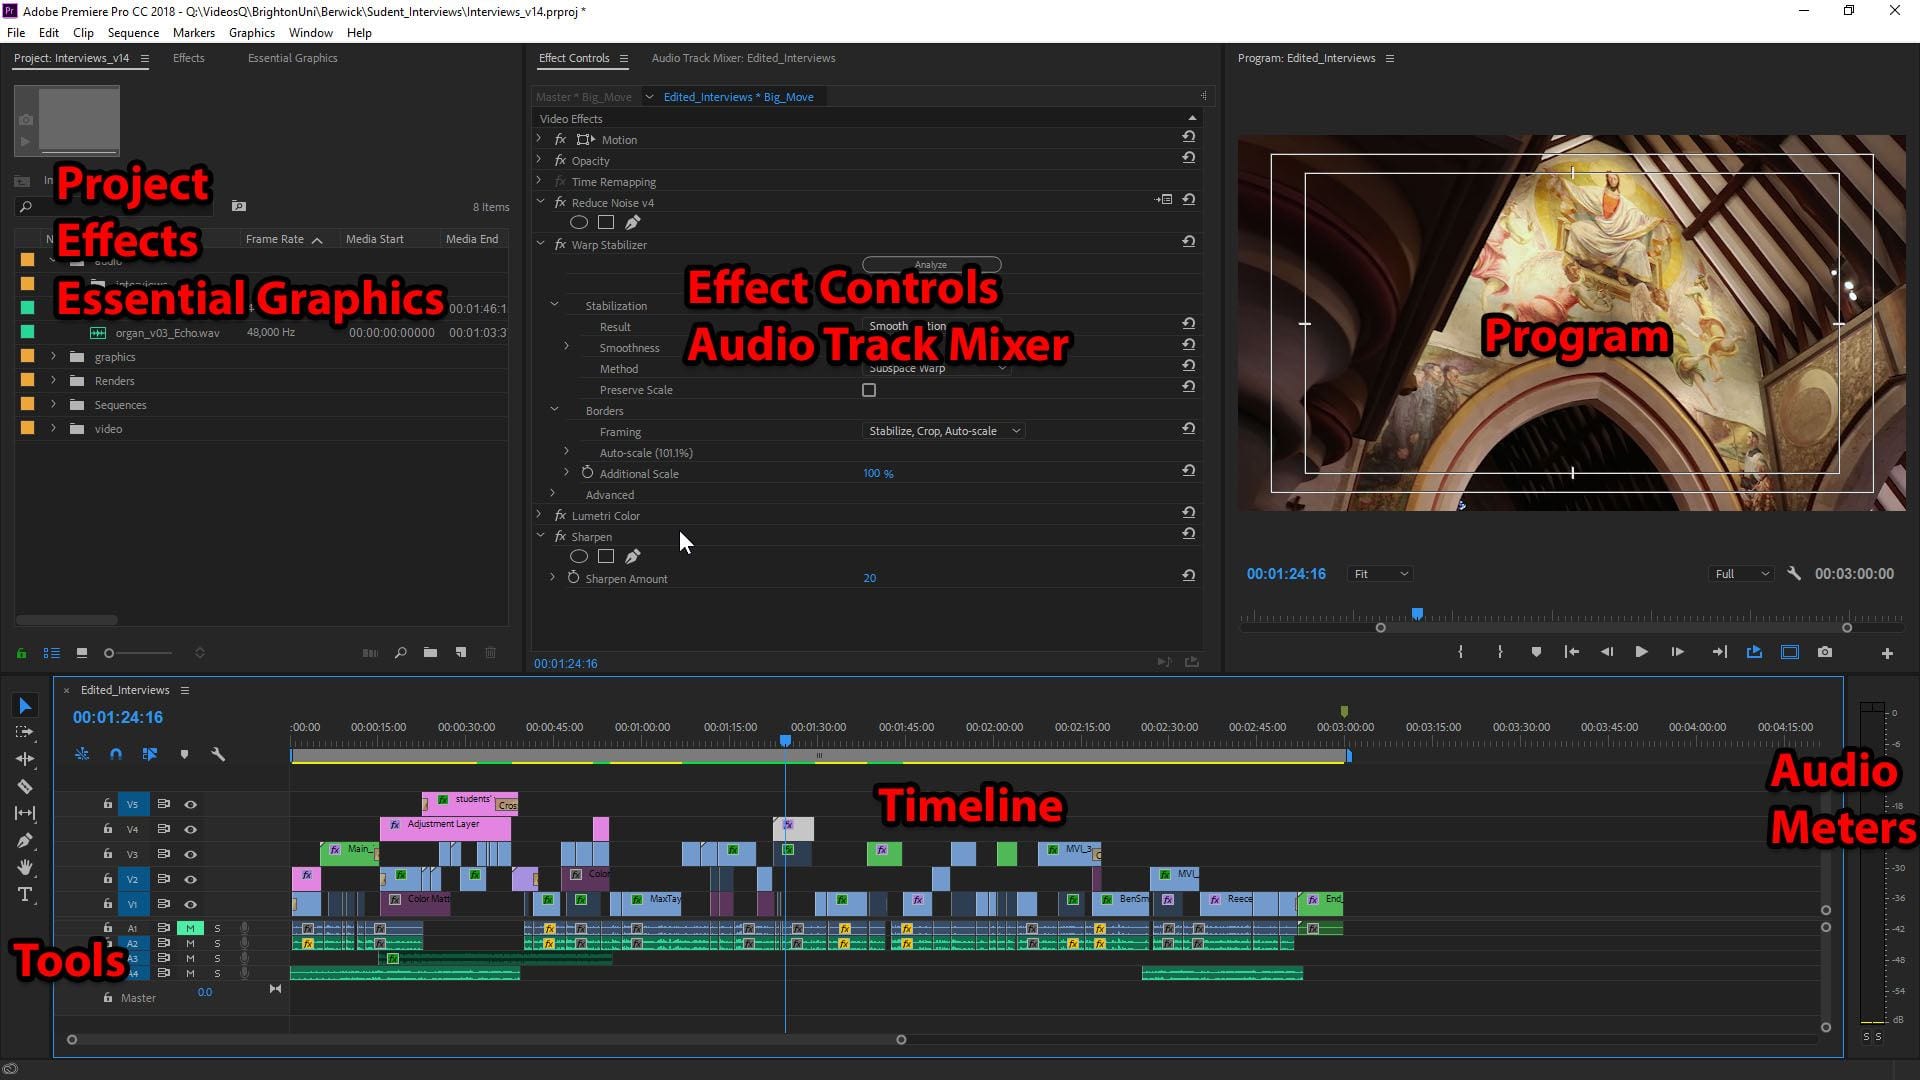
When you first open Premiere Pro, any one of the default workspace setups can show you an awful lot of windows/tabs that unnecessarily clutter your screen. You should close many of them so that you have only the following left available in your workspace:
- Project – where all your media, organised within ‘bins’ is imported & located
- Effects – these are all the effects you can choose to apply to your video and audio clips
- Essential Graphics – useful for tidying up titles you add to your video
- Effect Controls – for viewing and editing effects you have applied to particular video or audio clips on the timeline
- Audio Track Mixer – for adding audio effects and changing volume levels to entire audio tracks (rather than individual clips)
- Program – the video output from the timeline
- Tools – various tool-selections for editing
- Timeline – where you construct your video – also referred to as a ‘sequence’. You can nest sequences within sequences.
- Audio Meters – important visual feedback of how your audio levels are behaving
(which means, for now, you can close the following: Source, Media Browser, Libraries, Info, Markers, History)
Set up your workspace to our in-house style – the best way to edit without confusing clutter:
Once you have your workspace looking like this, choose [Window->Workspaces->Save As New Workspace] from the menu and save it so that you don’t have to re-adjust again.
Later on, when you become more proficient, you will also want the following open:
- Source
- Lumetri Scopes
- Essential Sound
Creating a New Sequence
Before adding any media, it is now best to create a new sequence. Do not make the mistake of dragging an imported clip to an empty timeline to create a new sequence (this will use the settings of that clip which could be wrong, resulting in quality issues when you come to export) . Find the project window (window->project) and create a new sequence (right-click on blank space, new item, sequence).
AVCHD
You need to specify your sequence’s working codec (we will use ‘AVCHD‘), its resolution/field-format (1080p) and its frame-rate (25 frames per second). There are several alternatives, but there are several reasons why you should use AVCHD/1080p/25 unless you know exactly why you wish to choose otherwise (and what the consequences are). A video ‘codec’ is a coding and decoding algorithm that stores and reads video data; it is a method of compression/decompression to make the size of video data manageable. Think of the most common audio codec you will have some familiarity with: mp3. Mp3 audio files store a lot less information than ‘uncompressed’ or ‘raw’ audio files and involve a clever algorithm to trick your ears into listening to audio without realising so much data has been thrown away. The AVHCD codec works in an analogous way for video and works well at particularly low data-rates so that your files will not be enormous (different codecs compress video data in different forms and at different data rates). Broadcasters use different codecs – such as particular flavours of ‘Prores’ – and, whilst these are better in many ways (mostly concerning colour-depth), they can eat up huge amounts of hard-disk space. So we shall leave those until you are ready to make your award-winning feature-length documentary for world-wide distribution.
1080p
1080 is the (HD) resolution we work with in Watts (the number of horizontal ‘lines’ of pixels – the standard HD resolution being 1920 x 1080). The ‘p’ in ‘1080p’ means ‘progressive’ (rather than ‘interlaced’) which involves cpaturing/reproducing all the pixels in one go rather than ‘interlacing’ alternate lines as older video standards did (to work in the same way that older ‘CRT’ televisions reproduced images). Whilst 4K video is more common these days, you need more power to edit and the jump from 1080p (HD) to 4k (ultra-HD) is not yet universal and can make life much harder for computers and humans.
25fps
We use the standard frame-rate for UK television (25 frames-per-second, as per our ‘PAL’ regional standard – not, for example, 30 frames-per-second such as in the USA which uses the ‘NTSC’ standard). Again, if you are interested in world-wide distribution you would shoot at 24fps or 23.97 and, as long as both your camera and Premiere sequence are both set to this, there’s nothing to stop you doing this now. However, it is probably easier to stick to the UK ‘PAL’ standard of 25fps for now.
Reality can be a little more complex than the above brief explanations, but until you learn more, just use these standard settings for your new sequence (AVCHD/1080p/25). When you have selected that, also give your sequence a meaningful name such as ‘Main_Sequence’:

Organising ‘Bins’
You should now have a project that simply contains a single empty sequence (or ‘timeline’ – the terms are used interchangeably). Now you should add ‘bins’ (internal project folders) to organise the materials you will import. To start with, create them to reflect the folders you have created within your main project folder on your local hard-drive (Video, Audio, Graphics, Renders, but not Output). As you continue to organise your media, it is a good idea to create bins within bins. So, for example, in your ‘Video’ bin, you might have an ‘interviews’ bin plus a ‘b-roll’ bin. Within your ‘b-roll’ bin you might have separate folders for each of the locations you filmed.
In case you are wondering, these bins do not create folders or anything else visible on your hard-disk: they are simply a way or organising your media within your Premiere project (so they only exist, and are stored, within your project file). The term ‘bin’ does not reflect some kind of ‘trash’ area but, rather, is an historical term that reflects the days of storing film reels in separate physical bins next to a film-editing machine.
To create a bin, right-click in empty space within the project window, then select New Bin. After creating your bins, you should start loading in your media to the appropriate bins (to start with, within Video and Audio – see ‘Importing your Media Files’ further below). Just double-click within a bin before being prompted for the location of your media to import.
When you are finished editing for the day, you should backup your project using the watts media server (\\wattsmedia.brighton.ac.uk). When working in groups, this is essential so that the latest version of you project is available to others in your group (but even if you are working on your own, it is very important to make a backup on the server so that you will always have access to it at the university). When you come back to edit your project, if there is any chance someone else in your group has worked on it, you need to copy it from the server to your local hard-drive, then edit, and then back it up to the server again.
You have begun your video project….well done & GOOD LUCK.
*
EDITING
Using CMS Edit Suites
You are strongly encouraged to make use of the edit-suites available on the ground floor of the Watts building. These are nice rooms that you book and have good quality speakers as well as a second screen to monitor your video-edit full-screen. It is fine to make your rough edits elsewhere (e.g. in Watts 611). However, when it comes to colour-correcting your clips, fixing framing issues, and perfecting your sound, plus ensuring that any titles look right (on a full screen), you should use these suites. Make sure you enable the second screen to view your edit in full-screen mode (Preferences->Playback, then tick the second monitor). The edit-stations can be bootable as Macs or PCs (but default as Macs, so it is a very good idea to format new hard disks in the exFAT format so that they work on both). You need to book these suites with Central Media Services.
Using Premiere Pro with your own Computer/Different Versions of Premiere
Some students decide to edit on their own laptops/computers by downloading a free student trial of Adobe Premiere or Creative Cloud. If you do this, you need to be careful with at least three issues.
- The first is that you should not download the latest version of Premiere because that is likely to be a version ahead of what is installed on university machines (check which version is installed at university and make sure you install that one if you are going to use it on your own computer). Very often the very latest versions of Premiere will have bugs and issues that need to be ironed out by Adobe. This is one reason why the very latest version will not always be availbable at university. As a result, students often find that when their free trial ends or their laptop stops working, they cannot edit their project at university because an older version of Premiere will not open a project created on a newer version. There is a quick solution to this problem but your best bet is to edit with the same version installed at university from the start (see here for a more comprehensive guide).
- If you only edit on a computer with a small screen and no external speakers, your video will very likely end up with poor quality titles, poor image-quality (colour, framing etc), and awful sound-quality/levels (even if you are using good headphones). It is fine to edit early on with a standard computer but you should, at least, finish you edit in one of the CMS edit suites (see above). This is another reason why you need to ensure you edit on your own computer with the same version of Premiere that is installed at university.
- It is tempting to forget about backing up your project if you have it easily to hand on your own laptop. Laptops fail and so you should use an external hard drive from which you should backup your project to the wattsmedia server on campus (\\wattsmedia.brighton.ac.uk). Essentially, you should assume that your laptop and/or external hard drive will fail during the progress of your project and know that you will be able to keep going with a backup that sits on the server at university.
Import your Media Files
In your Project window, double-click on some empty space within an appropriate bin to import media. You will be prompted to locate the media – e.g. video file(s) – on your hard drive. Common video formats are .mov, .mp4, .mts. Canon DSLRs record .mov files. Common audio files have extensions such as .wav or .mp3 (record/import uncompressed .wav files if at all possible). As a reminder, files you import should be sitting on a local hard-drive – not on a server. It’s a very good idea to save your Premiere project after you have imported some video/audio/graphics files (on a local drive, not on the Server).
Construct Your Sequence/Timeline
We use the words ‘sequence’ and ‘timeline’ interchangeably: they mean the same thing. There are two basic ways to construct an edit. The quick way, when you are starting out, is to simply drag a clip from a bin in the Project window and drop it on the timeline… and then edit the ‘in’ and ‘out’ points by dragging them from either end with the mouse (and cutting them with Ctrl-K – see essential keys below). A more organised way is to double-click on a clip in the project window which opens it in the Source window. You then set ‘in’ and ‘out’ points in the Source window before inserting/overlaying it onto the timeline. Starting off, just drag clips onto the timeline. Premiere may warn you that the format of the media/video does not match the sequence settings. Don’t change the sequence settings, however: its up to Premiere and you to adapt various media formats to the settings of your sequence (which will reflect what you are aiming to export as a final movie). See below for the very basic keystrokes you need to get started.
Essential Keys To Start Editing
- Zoom in/out on the timeline: + –
- Cut a clip on the timeline: Ctrl-K
- Standard Selection Tool: V
- Play/Stop: spacebar
- Next/Previous edit point: up/down arrows
Any good editor will use the keyboard as much as possible (rather than the mouse) so learn these key-strokes & many others and you will edit much quicker…freeing up time to make more advanced amendments.
Preparing and Syncing Separate Audio (Adobe Audition & Premiere)
When recording interviews with DSLRs you need to record sound separately with Tascam or other audio-recorders (as well as lapel or boom mics). You should then prepare your separate sound with Adobe Audition before pulling it into Premiere and syncing it up with the poor-quality camera sound. Here are the steps you should follow:
1) First store your audio files in an ‘Originals’ folder. Then copy the ones you intend to use/edit to the folder beneath. You should then use Audition to edit the copies in the folder beneath whilst leaving the originals alone. This is because, unlike ‘non-destructive’ editing in Premiere, Audition changes the contents of the source files. If you make a mistake, you can only start again with a fresh version copied from your originals folder. Be careful to keep the copies you work on the same length as the original audio files – so don’t use Audition to cut out sections of audio after you have made your copies to work on. You may discover issues with your audio and need to revert to fresh copies at a later stage – after video-editing in Premiere – and you don’t want to have to re-sync during a later stage of video editing.
2) You should ‘Normalize‘ your audio in Audition so that it will playback at a good level (to minus 3dB).
3) [Optional] This is a very good stage to also apply noise-reduction (see further below) but this can be left until later (in Audition) – or may not be necessary. It is, however, not a good idea to apply any dynamics-processing here (such as compression or noise-gating) as such things will easily affect your audio permanently and so should be left to Premiere where they can be modified ‘on-the-fly’ or ‘non-destructively’.
4) Next, save your audio as a stereo file (so that it can be linked to the stereo audio of your camera).
5) Then import your camera video and separate audio into Premiere and synchronise them.
See the video guide here:
See the section below entitled ‘Achieving a good sound mix within Premiere’.
Audio Noise Reduction (Adobe Audition)
If you want to have a clean piece of audio then it may be necessary to add noise-reduction to your audio files using Adobe Audition. With recordings of voice-overs, this is strongly advised. When applying noise-reduction, you need to work with very good headphones or, much better still, in a quiet edit-suite with good speakers (‘nearfield monitors’). Make sure to have recorded a couple of seconds of ‘scratch’ sound – i.e. just the sound (the noise) of the room without any speech. Typical examples of ‘noise’ when recording voiceovers (besides in recording studios) are computer fans, air-conditioning and the ‘hiss’ sound of noisy microphones and/or ‘pre-amps’ in recording devices.
Although you can add ‘adaptive’ noise reduction in Premiere, that is, by far, inferior to doing it properly within Audition. The difference is this: Premiere, with ‘adaptive’ noise reduction is constantly ‘guessing’ what constitutes noise and can’t always be very accurate; with Audition, you can specify, quite precisely, what constitutes ‘noise’ (by capturing a ‘noise print’) so that it is much more accurately removed. Because you can’t ‘capture’ a noise print with Premiere, you need to apply a more drastic level of noise-reduction to get close to the result you get with Audition. Too much noise reduction makes your audio sound rather strange.
You can add noise reduction to your audio files with Audition either before or after you have loaded and edited them within Premiere (just be sure not to change the length of your audio files in Audition). See the video guide here:
Achieving a good Sound mix within Premiere
There are a number of things you should do in order to achieve a good sound mix:
1) keep distinctive types of audio on separate tracks
For example, a voiceover should be kept on a separate track without any other type of audio on that same track. A separate track should be used for interview audio. Low-level incidental sound (e.g. such as traffic noise or the ‘background’ sound of a busy cafe) should be on a separate track. Music should, again, be kept on a separate track.
2) achieve consistent basic volume levels within each track
For each track, get a consistent level across all clips. Right-click an audio clip on the timeline and adjust the audio gain up or down. Use the audio meters, as well as your ears, as a guide to achieving consistent volume levels. This should be minimal or entirely unnecessary for well-recorded voiceover audio that you have already Normalized in Adobe Audition. But it may well be required, for example, to match the audio levels of different interviews.
3) apply dynamics processing at track level
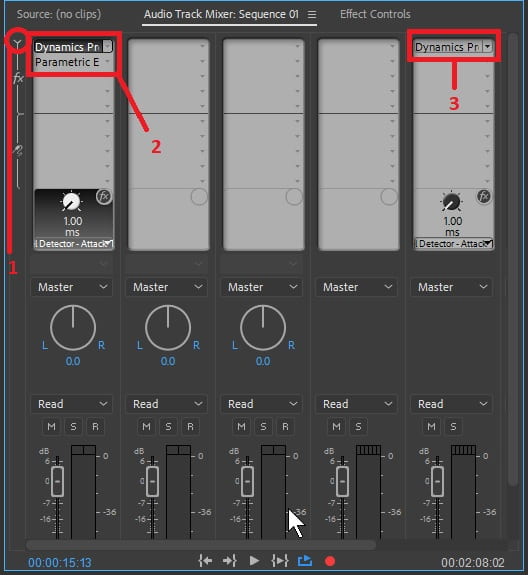
A very important effect to apply to good quality audio is compression. Compression dampens the volume of the loudest audio to ‘level it out’. It therefore also happens to make it quieter overall so you need to compensate by turning the overall gain up. So overall, it has the effect of making the louder bits quieter and the quieter bits louder – exactly what you want for a consistent level and a good overall mix. However, you shouldn’t add any or much compression to any audio that is noisy – because the effect will be to increase the volume of the noise. Hence the importance of recording good quality sound in the first place (or, second-best, removing such noise with Adobe Audition). In the Audio Track Mixer, expand the inserts section [see 1 circled in image below] and add the Dynamics Processing effect [see 2].
If you double click on the effect in your inserts mix (item 2 in the image above) you can manipulate the Dynamics Processor and a typical configuration is the S-curve – which makes the loudest audio quieter and the fairly quiet bits (i.e. noise) even quieter – see the image below. Notice that, because the overall audio is quieter after adding the compression, Make-Up Gain is added, in this case, by a quite considerable 9dB of gain:

Also note that it’s a very good idea to tick ‘Spline Curves’ to make the changes more progressive – rather than having harsh thresholds where compression suddenly ‘kicks in’.
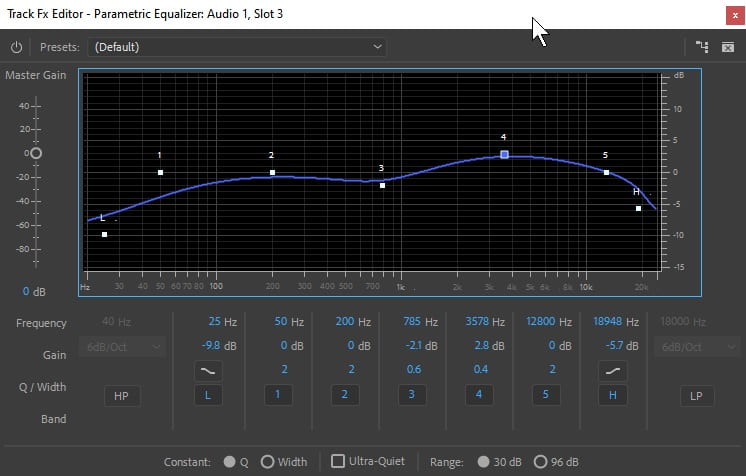
4) apply EQ (‘equalization’) at track-level if possible (and clip-level, in addition, if necessary)
Note that when changing EQ you should really be using near-field audio monitors (speakers) which can be found in the CMS editing suites (see above). Headphones – even expensive ones – are not reliable. Insert the Parametric EQ effect for the specific track within the Audio Track Mixer. Seek out the nastiest frequencies to reduce first (before boosting the ones that make things sound better overall). In the example below, very low-frequencies are cut (‘L’), mid-range frequencies are cut (‘3’), fairly high-frequencies are boosted to brighten up a voice (‘4’) and extremely high frequencies are cut to reduce noise/hiss (‘H’):
5) work on the relative levels of separate tracks (i.e. at this stage, make your ‘mix’)
This might be as simple as adjusting the sliders to the right permanent positions in the Audio Track Mixer. Or you may need to do more. You might wish to manually keyframe track volume levels on the timeline. Another method is to use the Essential Sound window to identify dialogue and music tracks to then apply ‘ducking’ to the latter – which adds the keyframes for you.
6) apply dynamics and loudness adjustments to your overall Master level (the final stereo mix)
You should add a small amount of compression to your overall mix. Again, do this in the Audio Track Mixer: add the Dynamics Processing effect to the Master stereo track. There are clever ways to ensure that the perceived loudness of your mix meets any particular broadcast standards from within Premiere Pro (using the ‘make-up gain’ of the Dynamics Processor and an effect called ‘Loudness Radar’. However, if you aim to have your mix sitting between -6dB and -12dB (looking at the Audio Meters rather than using the Loudness Radar) then you will have a quite loud mix that will compete with most of the content on youtube/social media.
Colour-Correction & Grading
Only when you have the content of your edit locked down should you start to work on colour-correction. This is because you don’t want to waste time correcting clips that might end up being deleted from your final cut. You should, in general, apply a three-staged process to giving your edit a certain ‘look’: 1) basic colour-correction; 2) fixing specific problems; 3) Grading.
The idea of basic colour-correction is to have everything looking well-balanced and exposed over the entire piece. For example, if you are switching between different interviews during a particular scene/section, you may want them all to appear with approximately the same brightness. You will certainly want them all well balanced so that one is not noticeably too ‘warm’ whilst another appears too ‘cold’. Whatever look you might want to end up with, you should have them all appearing well-balanced and similarly exposed to begin with. See the video below for a guide to using the essential tools. If you want to colour-correct properly, you need to use ‘scopes’ as you adjust the parameters withing the ‘Lumetri Color’ effect…
After basic correction, you may want to spend more time fixing particular/localised issues within particular parts of your images. For example, you may have a shot that appears well-balanced overall but has just one portion of the screen that is over-exposed or too warm/cold. Or, whilst the overall picture of a clip might look correct, perhaps you want to improve the skin tones of a subject without affecting the rest of the picture.
Finally, you may want to give a scene/section a particular look – perhaps if you are switching to the ‘lab-science’ bit in your documentary, you might want all clips in the scene to be a little ‘colder’ than the previous, more ’emotional’ scene. This is the (optional) grading process.
Saving Versioned Copies of Your Premiere Project
You should occasionally save a new version of your Premiere project. So, for example, if you open Music_Doc_v09.prproj, and do some important work, save it as Music_Doc_v10.prproj (so hit File->Save_As, rather than just hitting save). You’ll always know which version to open next time by using the one with the latest (biggest) version number. There are at least three very good reasons for this: 1) if you make a mess of things, you can open up the previous version; 2) if your project-file gets corrupted, again, you don’t loose the entire project but only the current version – just open the previous one; 3) although Premiere itself auto-saves versions in a separate folder, this is not always reliable when things go wrong (yet it is a good thing to be aware of if they do). You should save a new version of your project file after a few hours work or after you have made intricate / considerable changes that you don’t want to loose. For example, adding the Warp Stabilizer effect to a few clips can increase the size of your project file considerably, making ‘corruption’ of the file more likely – after that, you should save a new version. Always prepare for the worst and it wont happen!
Backup to the Watts Media Server
When you are finished for the day, backup your work to the relevant folder on the watts media server (\\wattsmedia.brighton.ac.uk). If you have not loaded in any new media files, this may just be a case of copying the latest version of your project file (e.g. Music_Doc_v11.prproj). If in doubt, copy everything. The correct place to copy to on the watts media server will be beneath the folder ‘Video Production/[year]/[Semester/Module]/[Groupname].
(e.g. /Video Production/2018-19/Sem1/LM115/MusicGroup/Music_Doc).
Retrieval From the Watts Media Server
With group-work, when you come back to editing a project, first ask yourself: Is it possible that other members of my team have been editing the project after I last worked on it? If so, their most recent work should be backed up on the server (they should also have their own ‘local’ copy of what they last did on either their own hard-disk or it should be sitting on the local D: drive of the PC they last used). Copy from the server (\\wattsmedia.brighton.ac.uk) to your local hard drive (ideally a portable hard-drive). Do not drag the folders/files. Instead, select them on the server and hit File-Copy. Then move to the appropriate position on your local drive and hit File->Paste.
You should always edit on your local hard-drive (your portable usb-drive or the D: drive of a PC in Watts 611). If you try to edit on the server, you will encounter problems.
*
EXPORTING
When you’ve done your editing, to create a draft/final cut video file, it is time to export your sequence to a new .mp4 file.
Work Area Bar
Set the workbar in your sequence timeline to cover what you wish to export. The workbar is positioned just underneath the timecode ruler which sits towards the top of the sequence window; if the workbar is not visible, switch it on via the sequence menu (see image below).

With the sequence window active (click somewhere within it; it should be outlined in blue as in the image above), select file->export->media from the menu. Set your export settings as follows…
Export Settings
Format: H.264
Output Name: click on the blue filename link to save a sensibly named and versioned file in your Output folder. For example, if you have already exported 5 drafts, your last export should be named something like Music_Doc_v05.mp4; name this one Music_Doc_v06.mp4.
Video-Tab:
Use Sotware Encoding. N.B.: If you do not have both ‘Target Bitrate’ and ‘Maximum Bitrate’ options available (see below), you need to switch Export Settings->Performance to ‘Software Encoding‘ (they will then no longer be greyed out). Do not be tempted to use ‘Hardware Encoding’ as, although it is much faster, it can degrade, radically, the quality of the video you export (this option is available on certain PCs, such as those in Watts W611, that have particular types of Intel chips, the option does not appear on Macs at the time of writing. For evidence, if you’re interested/sceptical, see the difference in quality explained here).

In ‘Bitrate Settings’:
- Bitrate Encoding: VBR, 1 pass
- Target Bitrate: 17
- Maximum Bitrate: 21
Audio-Tab:
- Audio Format: AAC
- Audio Codec: AAC
- Sample Rate: 48,000 Hz
- Channels: Stereo
- Audio Quality: High
- Bitrate: 320 kbps
- Precedence: Sample Rate
[If you are exporting a video for re-use within your project, export it to your ‘Renders’ folder and use a higher Target/Maximum bitrate of at least 21/28 for ‘Target’ and ‘Maximum’ respectively]
Check your settings in the ‘Summary’ tab and, if you are happy, hit ‘Export’. Depending on the length & complexity of your project, you will have to wait for a certain period of time.
Things can go wrong so always check your output. When the export is complete, minimise Premiere and play the new video file with a separate viewer (VLC player or Windows Media Player). Use an old-fashioned pen and paper to note issues (with rough times) that you need to correct when you go back to Premiere. Never assume that your export has worked fine even if you check the first few seconds – the only way to be sure is to watch the entire video you have exported.
*
SUBMITTING VIDEO FOR ASSESSMENT
Currently, with LM115, LM215 & LM316 modules, you need to upload your video to Panopto before providing a link in the (Word) document that you upload to TurnItIn (your official submission). Please make the link in your document visible as a full URL (rather than hidden beneath a title or ‘click here’ link). If your submission includes more than one video, you need to upload each one to Panopto and have all the links in the single (Word) document that you submit with TurnItIn. With the LM315 practice-based (video) dissertation, you should also provide the link to an online video in the main Document that you submit to TurnItIn. However, you will also need to submit your originally exported video file to the school office (USB-drive or DVD-ROM). In all cases, you must upload and link your video to Panopto.
After you have exported your video from Adobe Premiere:
1. Upload your final exported video to Panopto
2. Make sure you change the Panopto video so that it is shared. Otherwise it will not be possible to mark your work. After uploading the video, navigate to ‘My Folder’ and choose the ‘Share’ button for your new video. Underneath ‘Who can access this video’ hit ‘Change’ and select ‘Your Organization (unlisted)/Anyone at your org who has the link’.
2. Retrieve the url link from your video so that you can add it in full within a document you submit via TurnItIn – make sure that your video link works after you have logged out of the video platform. To get the link from within Panopto, before you leave the ‘Share page’ hit ‘copy link’ so that you can paste it into your word document.
3. If required (as with LM315) make a physical (USB-drive/DVD-ROM) submission of your video file to the School office by the deadline.
Please be aware that this is a process that you should not leave until the day of your submission deadline.
You should finish your edit, at the very latest, by the day before. Exporting your video from Premiere and uploading it to an online platform can lead to problems and delays… so plan everything in good time. If you have a big video file to upload it’s a good idea to do so on campus rather than relying on a much slower, and possibly less reliable, broadband connection at home.
Good luck with your submission!
If you spot any errors on this page, or have further questions, please email Kevin: k.reynolds3@brighton.ac.uk
