Introduction to AD138

Monday 5th January

For the first seminar of 2015 was in both form of a more detailed briefing for our next module; Introduction to fashion illustration and drawing! I’m really looking forward to learning new skills and being part of some more physical interacting classes. I myself am not the best at drawing fashion illustrations so I am excited to see what I can produce within the next few weeks.

The aims for our brief are:

1. To introduce students into fashion drawing, imaging processes and their roles in the fashion communication industry

2. To learn specialist techniques and become confident with specialist tools and equipment through project work, research and experiment in prac/ce

3. To experiment with different techniques, ideas and outputs within project briefs and sketchbook work

4. To prac/ce professionalism by commiRng to studio prac/ce through recording professional development, through crea/ng a blog and PDP

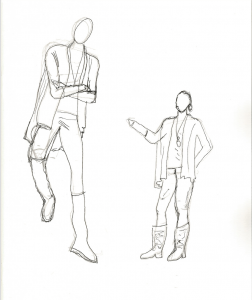
Initially we looked at some examples of how to produce fashion illustrations that are in proportion:


We then had a chance to practise and remind ourselves of how to use a pencil (it has been a while i must admit!)

Analogue film processing

Friday 14th November

I absolutely loved processing our film images and experimenting with the length of time in which we exposed them for today.

Looking at the first outcome in a technical view, it was not a good quality of print (which you can see from the faded/ grey colour around the photos) however I actually thought it worked really well for some of the images. Because they were under exposed when I took then, it meant that exposing them to light for a smaller amount of time (10 seconds) results in a visible photograph. E.g.

IMG_8274

IMG_8267

For the second set I decided to extend the length of time the images were exposed to 20 seconds, allowing more light to come into contact with the images. This gave the photographs a better quality in that the images were sharper and more crisp.


Overall it was a really useful and enjoyable experience and I can’t wait to do it again!

Here are my favourite images from session:

IMG_8273

Lighting Introduction

Monday 10th November

Setting up your camera for a shoot:

  • It is best to use a RAW file not j.peg because it allows you to export in a larger film size, it also produces a better quality, has a greater colour depth and the resolution in relation to grey tones is better.
  • ISO needs to be at 100 due to amount of flash that will be present
  • White Balance should be set to flash
  • Shutter speed can be at either 60 or 125

Using the light meter:

  • Make sure you have entered the ISO you have set on your camera 
  • If using your own lights then set to Flash synced

Lighting:

  • In order to have control of the picture you need to set your back lights so that they don’t escape around model
  • To test this take a picture with only back lights (the result will be a silhouette)
  • Once this has been checked you can then add front lights
  • You can use soft lights which are nicer the skin and give a more even surface
  • Alternatively you can use hard lights which pick up more shadows however are not so kind to the skin


I feel this session went really well and i really enjoyed learning new skills. As i am a novice when it comes to photography i am really interested in gaining experience and the knowledge needed to create a really strong shoot.  I really liked to use the extremes of either a lot of light or hardly any at all. The crisp white background really appeals to me in the same way as a black back drop creating a small but really detailed picture does too. Overall a really insightful and fun day.

Its strange how exciting the sense of control you get makes you feel when being the photographer of a shoot, although due to my inexperience my comfort levels are definitely not as high as I hope they will be in the near future.


White back drop, a lot of flash

White back drop, lots of flash

Black back drop, spot light

Black back drop, spot light

Creating a Moodboard

Tuesday 11th November

To introduce us to the world of photoshop we had the pleasure of attending a workshop run by Stephen Myers. During the session he taught us the basics of photoshop and how to use the different layers though creating a moodboard.

Creating a moodboard isn’t actually that difficult, once you know what you are doing that is. There are a set of basic rules you need to follow and repeat and once you have mastered those I found it was actually quite simple.

1.Make sure you unlock the layer so you can edit it freely.

2.Select the part of the image you want to use. To do this you can use the magnetic tool to draw around your object or use the magic wand tool and then using the window use the ‘select similar’ tool.

3. Then delete the surrounding area by selecting the inverse.

4.After this you need to create a new layer and drag the image into it (making sure you name the layer so to make it easier for yourself later on if you need to rearrange anything later on).

5.Repeat all the steps above.


I found this exercise really helpful and it has increased my confidence with photoshop dramatically.

Finished Moodboard

The final copy sent off to Stephen Myers demonstrating that I have labeled each layer and considered the placement of objects

The story behind the object.

Thursday 30th October

Our lecture today, led by Jane Hattrick was one that focused on this idea that an object / artifact can possess a meaning; one that is not necessarily the same to all those that come into contact with it. We looked at Norman Hartnell, in particular we looked at  his regency chaise longue that went from being once an amazing piece of furniture to now being situated in a house in cornwall, covered in manufactured teddy bears.

Further more Matt Smith also spoke to use about his work and how he creates new objects out of already made pieces of art work. On his website, (http://www.mattjsmith.com/one-off-pieces.html) it is stated that:

“Through repurposing and reinterpretation, the work aims to question the stories we are told, explore those we are not told and allow a space for the viewer to reach their own conclusions.”

Hide and Seek, by Matt Smith

Hide and Seek, Matt Smith.


For the seminar this week we were asked to bring in an object we felt had some meaning or a story to it, for mine I chose my treasured teddy bear, Money bags. I suddenly went totally blank when asked why he was called that and so asked my dad to text me the reason and this is the message I received:

“His name comes from a time I left Cyprus. I was 10 and leaving Cyprus and I saw him in a shop. According to Grandma I had never asked for anything but asked her if she liked him? She said yes she did and asked me if I would like him. As I recall I said well I thought he looked at me! She persuaded Papa to buy him and he said he was the most expensive Bear in the shop. I was struggling for a name so Papa said call him “Money Bags” as he is the most expensive Bear in the airport! I then had to walk across the Tarmac to the plane and Grandma said it was the only time she saw my Dad with a tear in his eye as I walked to the plane. Hence why he is so precious! Does that help? Sx”

The whole class including myself got teary eyed and felt an emotional response to the meaning behind this object- a very unexpected outcome to my afternoon I must admit!

Money bags.

Money bags.

Form Follows Function: Form Follows Fun?

Thursday 16th October 2014

So today was my second lecture followed by a seminar on HCS (Historical and Critical studies) and I feel it went really well. Damon Taylor gave the lecture in which I feel was delivered to an extremely high standard. Some people just have good stage presence don’t they?

Although I was interested with the subject matter throughout the whole lecture I think the beginning was really gripping. He spoke about ethics and our sense of right and wrong, which in itself is an exciting topic as it is rare for two people to  completely agree on what they feel to be right and wrong in any given situation. The most interesting part for me was the idea that design should make the world better and thus there is this hierarchy of values that change due to the situation we are in. Damon gave the example using an iPhone, a T-shirt and a gun. In every day life you’d say that the iPhone came first, then the T-shirt and then the gun however in times of war you’d swap the gun to be first, then the iPhone second and the T-shirt last. I’d never thought about ethics and the difference a situation can have in this way before and found this exciting.

For our seminar we had to choose an object we thought was both functional and fun. I chose a skateboard because its functional in that it gets you from A to B, it is lightweight and easily transported and it poses as a form of exercise although I felt this could also go in to the fun section – i appreciate not all find exercise fun! Furthermore it is fun because it is a gateway for social interaction and it allows the boarder to form new skills and thus expand on their capabilities.

dogskate-2