Assignment 2: A Exploration Of 3D Modelling And Rendering Technologies In Blender
Here I will be detailing my exploration and methodology of 3D modelling and rendering technologies in Blender.
What is 3D rendering?
3D rendering is a computer graphic process of converting 3D models into 2D images. 3D rendering process enables methods of adding photorealistic or non-photorealistic styles to 3D visual effects such as lighting, shading, shadows, texture mapping, reflections and much more.
Exploration into Blender
To aid my exploration in 3D modelling and rendering, I downloaded Blender for the first time diving right in at the deep end with no clue how to use the program with only some prior knowledge of CAD programs. I started by researching and learning the basics through various online tutorials and quickly realised there’s a labyrinth of hotkeys and shortcuts to understand and utilise.
Blender is an open sourced 3D creation suite which supports 3d modelling, rigging, compositing, motion tracking, simulation, rendering, video editing and 2D and 3D animation.
I will be focusing on using the 3D modelling and rendering tools through my exploration of this project.
URL: https://www.blender.org (Free to download)

Here I have annotated some of the tools and functions I used most in blender

The basics
For useful tips and tricks, hotkeys and shortcuts this online manual was very helpful and effective.
Link: Blender handbook
Pressing F3 keyboard button pops up a search box with all the programs featured with just a quick search.

Search – Actions And Hotkeys
Lets Explore Blender
Firstly I explored various object editing tools in Blender by building three basic objects to work on.
After creating a sphere I noticed how multifaceted it was and not smooth as desired, to rectify this, I discovered from the tutorial video that the subdivision surface tool can smoothen the surface.
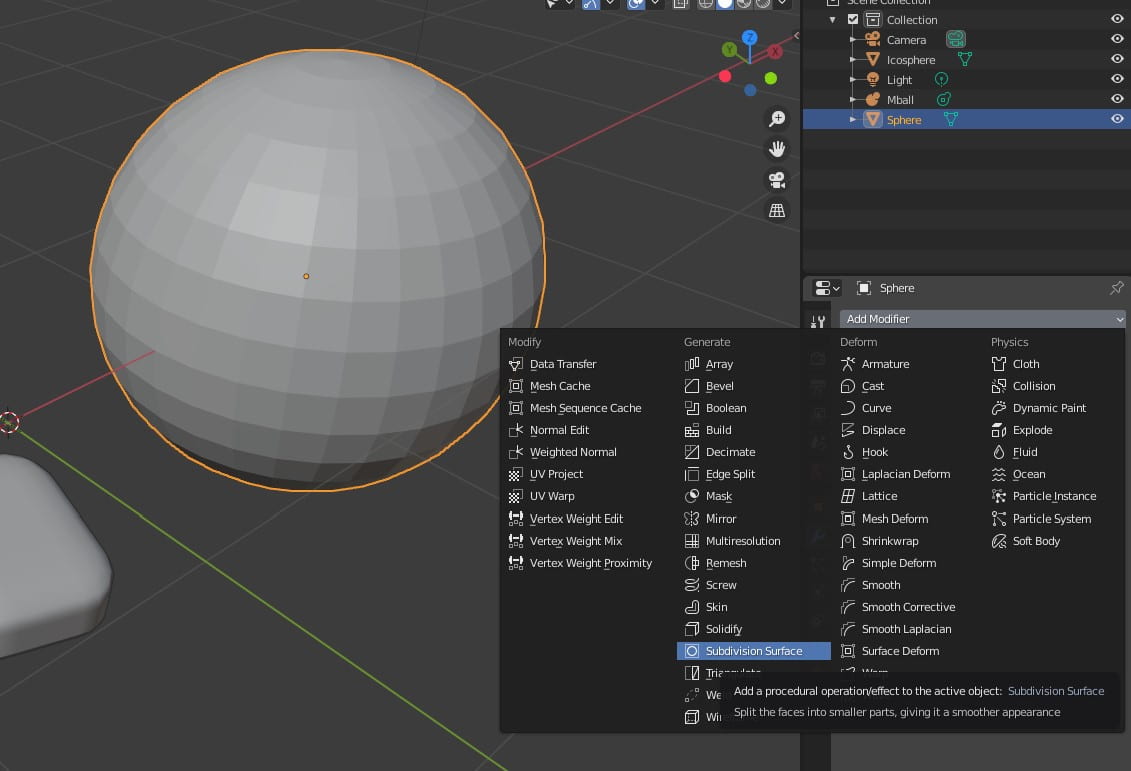
Adding Modifier – Subdivision Surface
Altering the levels viewpoint and render settings increased the number of nodes in the mesh of the object.

Subdivision – Smoothing The Sphere
I added a plane to give the objects perspective.

Adding A Plane
I added colour to the plane and selected the render viewpoint to view the objects rendering in real time.

Realtime Render
Important to note is the Scene settings.
The render engine and device settings are crucial to rendering in real-time. Device set as your GPU allows you to work on projects using your graphics card to process and render. For some reason the program is defaulted to CPU which was costly as you’ll find out. I was recommended by the tutorial video to use blender own cycles as the render engine, as it performs the best for rendering models into 2D.

Scene Render Settings
After adding colouring and roughness to the objects I first dived into rendering my first image in blender by setting the scene with the camera and source of light in the desired locations.
Simply clicking the render tab in the top left hand corner and then render image open up a new window which quickly produced a render.

First Render in Blender
These are the results of my first two renders, I altered the material colour and material settings to change the aesthetic.

First Render Image
I changed the material colour roughness and smoothness of the objects. I discovered a tool called auto smooth which increased the realism of the sphere and metallic material. Reflecting on this image the sphere appears to be reflecting light from light source and noise from the reflection of light off the grey object.

Testing Materials and Object Settings
Press fits and snap fits are very satisfying, as any Lego user will confirm. I wanted to explore press fits and the oddly satisfying aesthetic visually, I started building a simple Solidworks part comprising of 4 cross fit pieces on a plane.


After being satisfied with the shape I saved the file as .Stl which can be imported into blender.

Imported Solidworks File
I used this colour pallet below called Pantone to colour the press fit pieces. I found this pallet at Ucl.ac.uk

Reflecting on these renders below they’re dark and don’t resemble plastics in the level of detail I was looking for.


I ventured back into Solidworks to create a more detailed and interesting part, using a more evolved press fit cross shape and casing with rounded press fit parts.
I decided to add chamfers and fillets for more detail and reflective areas. adding more realism to the object and hopefully the render.

I noticed the cylindrical areas of the part were not smooth enough in blender so I tried numerous methods to rectify the issue. I first used the auto smooth tool by change the smoothness in degree’s with the constraints option available but unfortunately that didn’t change anything. Then I used the subdivision surface tool again which completely changed the surface of the part, creating a geometric mesh nightmare. I investigated online and thought I should be changing the solid works file… but then I thought – I should just do a render to see what it appears like…

Just as I was setting up my first render of this part the program crashed… I was shocked!
Then I realised the big and very costly mistake…

I forgot to change the scene render settings to the process on the GPU (Graphic Card) instead it had attempted to render this scene using the CPU and it unfortunately crashed, losing the progress I made because I didn’t save… damn!
I will hopefully learn my lesson going forward. Below show the scene setting that I should have change before attempting to render.

Scene And Render Settings
To increase the detail and realism of the object and renders I explored how to add texture to the image, I discovered I can add texture to the image, which changes how light appears off the object. The closets of the default textures I found was distorted noise, I applied it to the object and altered the settings.

Texture Settings
I was pleased with the result of these renders, I altered the light positioning and strength to make the image seem like it was captured peeping inside the assembly of a product. Which I think is a nice aesthetic.


I quite like the look of this render above as the material looks like a soft plastic and the lighting is well balanced.


Its clear from these images I need to work on the objects roundness, smoothness and texture. As it jumps out when the 3D model is processed.

Creating A Scene
A beautiful aspect of rendering is the photo realism that can be achieved through realistic 3D models. A visually appealing technique to creating realistic objects is through 3D scanning items and mapping photos onto objects. Really amazing renders use a combination of techniques to create effective lighting, textures and coloured surfaces with photo referencing or photos themselves to create a render that at first glance could be seen as real.
I searched a variety of websites for 3D models and environments to experiment with, I started with this detailed model of a cosy room, which I found at cgtrader.com which I found to be one of the best for detailed models.

Cosy Room Scene

Cosy Room Scene Material Viewpoint
I played around with the camera to eye in a good composition, the result of the first render was amazing, the lighting was incredibly balanced and resembled sunset light.

Cosy Room Scene Partial Render
First render using the cosy room file. It took around 20 minutes to complete the render. To my surprise I was very impressed with the results I really wasn’t expecting such a high quality image.

First Cosy Room Render
I played around and experimented with the composition, lighting and camera settings, I altered the aperture and focal point to create a sense of depth in the image which is well demonstrated below.

Alternative Cosy Room Render
I decided to experiment with different models appended into the room, I started with this Herman Miller Eames Chair shown below, which is an iconic chair, very detailed in its structure and is mainly comprised of three materials.
Editing the image after rendering.
Saving the file in Targa Raw format allows to change the values of the image before it is processed. The example below demonstrates how to save the render file in Raw form.

Saving Options
The example below demonstrates the ability to alter the image in photoshop, lightening up the shadows in the image to create a brighter image. This alternative way of altering the image is useful for any post render edits.

Post Render Photoshop Edit
At this stage of using blender I became quite comfortable with using objects and importing files however I did have some trouble with certain 3D objects and file types with finding and importing missing textures and materials. I found that online 3D files that are built in Cinema 4D were troublesome with blender, this may be down whomever built the models and the texture pack included, however I found with trial and error that the preferred file types were; .fbx, .obj (3D object – wavefront) and .blend files.
I played around with the scene, moving and incorporating objects to add a greater sense of atmosphere as a lived in space. The orchid plant works in that position with the light.

Orchid Scene
I found this incredibly detailed telescope which reflects light with amazing detail.

Orchid and Telescope Scene
At this phase of the project I reflected on the possible directions it could go.
I revisited an mini project where I captured 3D scans of a family heirloom on the app Trnio.
3D Scanning and modelling
Trnio

Trnio is 3D scanning app which can be found on the Apple app store for £4.99. Its an incredible application that takes images of an object and creates reference points to build a 3D object using vectors. There are two modes called ‘Object’ and ‘ARKIT’ which shown below display two methods of gathering these vector points. The capturing modes instruct the user to orbit around the artefact to build a detailed map of the object.
I am lucky to have this marvellous bust of the composer Beethoven which was made by a relative and is perfect for the phone camera and application which together works best when capturing a large object.


I used both scanning modes to find out which one had the best outcome. The processing of the objects then takes around 20 minutes for the 3D object to be generated as Trnio cloud service does this part of the process.


The objects below show a great level of detail and colour, however as shown above and below the 3d object generated did not completely capture the full object filling areas with just mesh, this is because of the positioning of the camera when orbiting the bust, the action of horizontally orbiting the object didn’t capture enough vertical images to populate parts of the object.
The mesh can be altered with sculpturing tools in blender once uploaded.


I emailed the 3D object files from my phone to my PC and uploaded it into blender.

Sculpturing In Blender
Edit mode in Blender allowed me to bisect the fat of Beethoven’s bust and fill in the mesh.

Mesh Bisect in Blender

Mesh Bisect and Fill in Blender
This scan needed some more work done to it, there was a few vector mesh imperfections so I used the sculpting mode tool to make any alterations. This scan also needed more definition around the mouth so I made some artistic changes using a variety of sculpting tools.

Sculpting Viewport
The first render I did below of the scene and Beethoven incurred this visual render error in the windows and prompted the blender application to go into ‘not responding’ mode (a dreaded problem in windows), however it makes for a interesting aesthetic, a night time shot with sunset rays shining into the room.

Beethoven’s 1st
I tried again three more times, altering the compositions every time resulting in varying successes.

Beethoven’s 2nd

Beethoven’s 3rd

Beethoven’s 4th
Best Composition? I think so