If there’s one thing the Brighton Product Lab does better than most it’s teach. When we’re really good at something there’s nothing we enjoy more than sharing it with others so you can look to build on your own expertise.
Ex-University of Brighton Product Design student James Coleman has had immense YouTube success with his Maxwell Render tutorials, over 60 tutorials with nearly 150,000 combined views.
Now we look to another CAD render package, Keyshot, and this time the skill of James Palmer. To date, James has produced a few Keyshot tutorials with aims to release a whole load more. Simple to follow and well guided through, the tutorials make light work of showing you how to improve you’re renders tenfold even just using some basic skills and a powerful software package in Keyshot.
The Design Museum, London,has announced the seven category winners of the 2014 Designs of the Year competition. This annual prestigious event celebrates the best design talent and innovation from a unique range of fields and now that the winners of each category have been announced they will be judged against each other to decide which earns the outcome of Design of the Year.
The seven winners were taken from the categories of Architecture, Digital, Fashion, Furniture, Graphic, Product and Transport design and included designs from a global audience. Here are the category winners (pictures) alongside the designs they were pitted against:
ARCHITECTURE
Winner: HEYDAR ALIYEV CENTER, BAKU, AZERBAIJAN
Façade For Paul Smith, Albemarle Street, Mayfair, London
Frac Centre – Les Turbulences, Orléans
Frac Nord-pas De Calais, Dunkerque
La Tallera Siqueiros, Cuernavaca, Morelos, Mexico
Makoko Floating School, Nigeria
Mont De Marsan Mediatheque
Museo Jumex, Mexico City
Newhall Be, Harlow, Essex
Praça Das Artes Performing Arts Centre, São Paulo
St Moritz Church, Augsburg, Germany, Interior Renovation
The New Crematorium At The Woodland Cemetery, Stockholm
DIGITAL
Winner: PEEK (PORTABLE EYE EXAMINATION KIT)
Aerosee
Citymapper
Generations
Hello Lamp Post
Lego Calendar
Metro Trains – Dumb Ways To Die
Oculus Rift
Public Lab Foldable Mini-spectrometer
Sidekick Creatives – Crowdfunding Great Art & Design
Touch Board: Interactivity Everywhere
Christian Dior S/s13
Das Collection
Rick Owens S/s14 Show Presentation
The Hinterland Of Ronaldo Fraga
‘totemic’ Collection By Sadie Williams
Tracey Neuls Bike Geek
FURNITURE
Winner: PRO CHAIR FAMILY
Bodleian Library Chair
Iro
New Interior For United Nations North Delegates’ Lounge (new York)
Ripple, An Ultra Light Timber Table
‘simple’ Exhibition At Projectb Gallery, Milan
GRAPHICS
Winner: DRONE SHADOWS
A Magazine Curated By Stephen Jones
Artdirectorsclub: Art Directors Annual 91
Building Stories
Castledown Primary School Type Family
Chineasy
Creation And Realisation Of The Visual Identity And The Signage System Of The Frac Provence-alpes-côte-d’azur
Escuyer Undergarment Brand Identity
Grand-central
M To M Of M/m (paris)
Serpentine Galleries Identity
The Gourmand – A Food And Culture Journal
Whitney Museum Identity
Works That Work, A Magazine Of Unexpected Creativity
75 Watt
Abc Syringe: A Behaviour Changing Syringe
Alba Collection Of Vases
Chair 4 Life
Clever Caps
Fairphone
Formlabs Form 1high-resolution Desktop 3d Printer
Gopro Hero 3+ Black
Luffa Lab
Lunaire
Nest Protect: Smoke + Carbon Monoxide Alarm
Pet Lamp
Phonebloks
Plume Mudguard
Risk Centre
Silk Pavilion
String Lights
The Alchemist’s Dressing Table
The Bradley Timepiece
TRANSPORT
Winner: XL1 CAR
Obree Electric Bike
Ifmove Bicycle
Me.we: Forward-thinking Car
Single Seat Aircraft
Th category winners and the other 69 nominees are currently on show at the Design Museum in the Designs of the Year 2014 Exhibition and they will be viewable until 25 August this year. The overall winner of Design of the Year 2014 will be announced on 30 June.
For more information on the Designs of the Year Exhibition visit the Design Museum website HERE and for full details about all nominees and category winners click HERE
The exercise of reverse engineering products involves taking things apart. Shown here is a simple Phillips Norelco Shaver (courtesy of Tristan Rose), displayed in a similar way to the mounted disassembled bike from Todd McLellan’s “Things come apart” image exhibition and now a book also showcased on the BBC website. I love this abstract method of visual display of a product. It’s amazing when you see the object in this form – there are so many parts, so many materials, so much design! Sometimes this can be done elegantly with a screwdriver, other times it needs prizing with a screwdriver, other times it’s an act of destruction by cutting things in half (or quarter) with a blade or saw, other times things can be unpicked, unlocked, unsnapped, or even thrown to the ground to be smashed (although only as a last resort!). You can take apart pretty much anything, but really good products to reverse engineer are those whose insides we’re not used to…those products we may be familiar with on the outside but whose insides are a mystery. Examples include remote controllers, cameras, shoes, phones, gearboxes, game consoles, joysticks, toys, other electrical goods like printers, irons, toasters, speakers, computers, VCRs (do they still exist?) etc. Ideally use something that’s defunct, that doesn’t work anymore, so if you break it (or can’t reassemble it!!) then you’re not too bothered. Freecycle is great, Ebay can be good too, so can charity shops, skips, or ask family and friends for broken things.
Figure 1: Philips Norelco Shaver (courtesy of Tristan Rose)
When reverse-engineering a product (and I recommend doing this often! – it’s a great way to learn), you should consider two things:
Firstly, consider what your objectives are. There’s lots to learn by taking something apart, but what are you specifically after? Try to refer this to Design for Manufacture and Assembly (DFMA) principles by Boothroyd et al(2010) where possible. Below are a list of things SOME that you might want to consider.
Secondly, consider what you’ll need to disassemble the product. Will you need specialist tools? will you require personal protective equipment (PPE) in the form of gloves, goggles, lab coat? will you need a cutting mat? will it be messy? will you need lots of space? how will you lay out the object to the best effect? will you need to re-assemble the object, in which case how will you layout and/or label the objects? when you record the process, how will you do this? pen/paper? photographs? if so, how will you stage this to get the best effect using a tripod? or how will you keep your camera/phone still? and with good lighting? with a suitable clean backdrop? will you be able to capture it all in one go or will you need to piece images together in photoshop? (for the big products – like the tractor – Todd McLellan (2013) did just this).
A sample list of things to take to a reverse engineering party:
pen and paper
a decent camera (or camera phone) and something to mount it on (ideally tripod) – also consider how you’ll take pics to maximise the visual effect (a nice matt white background is always good!)
white sheets of paper taped together to lay things out on
steel and plastic rulers
screwdrivers (normal size and small terminal size), both phillips and flat head
other flat tools for prizing open troublesome products
allen keys (and other specialist tools for unfastening?)
sharp stanley knives and cutting mats
blue tak or superglue (to hold small parts on the table)
sticky tape and masking tape
digital callipers
scissors
possibly board (painted white) and pins/screws/wire/fishing line to mount things permanently!
For the super keen, mount all the parts neatly onto a piece of painted board (possibly with a small label) and we’ll put it up in the studio!
General assembly/disassembly considerations (related to Design for Assembly – DFA guidelines):
how many parts does the product have? often products have individual part numbers actually shaped into an internal surface.
how many of the parts are standard? how many are “designed”?
how many different materials are actually used?
what is the assembly process?
to what extent is the product able to be disassembled at end of life?
what type of fit is there for the product? is it possible to measure the tolerances for any mating components to understand how much clearance or overlap is there?
Plastic specific considerations:
how was the part made? is there any evidence on the part to give you a hint? this could be a parting line (showing where the mould cavities meet), or an ejector pin mark.
what material is it? often it’s labelled.
what draft angles are used? you’ll need to measure this!
has the product been glued, ultrasonically welded, riveted, screwed, snap fit, other? look for clues before you take it apart.
what features are included internally and why? consider tabs, ribs to stiffen, bosses to screw into, slots to guide, other mounting features, strain relief etc.
what are the material wall thicknesses? these vary from main walls to ribs, bosses, other features. There are recommended wall thickness for different plastics. It’s always good to check that the material you’re looking at fits with these guidelines!
what are the thick to thin wall transitions like? are they suitable? are there voids or sink marks present on the part?
what are the surface finishes like on the surfaces of the part? these should give you a hint about the quality of the mould, or the requirements of the part itself. They can also help to show or hide any manufacturing problems (e.g. masking sink marks).
is there a mix of flat or curved surfaces? does the quality of their surface finish differ?
for any living hinges what’s the material thickness? and how have they designed this into the part bearing in mind moulding processes? this is clever indeed!
for any snap fits, what is the shape of the cantilever that “bends”? does it taper or is it straight? how does this fit with the design guidelines for snap fit? (or not!) are there signs of strain at the join?
if it’s a moulded part, is it a straight pull mould (ie where the mould can be pulled straight from one side to leave the part – with no undercuts), or would inserts be required to allow for undercuts to be produced? often there is evidence in the sign of parting lines to indicate various inserts for the mould.
Electronic specific considerations:
try to identify what electronic components are present?
try to identify which are sensors and which are actuators?
how are things mounted to a) each other, b) the case?
for any circuit boards, are the components surface mounted or through hole mounted?
are the technical specifications of the components obvious? what are they?
what does the main circuit look like? can you draw this? for battery driven products, are the batteries in series or parallel? and if so what’s the voltage?
Figure 2: Nikko radio controlled ford fiesta RS (courtesy of Chloe Fong)
Electrical specific considerations:
how has strain relief used for mains cables?
is there an earth? what colours are used for the wires? do they conform to relevant BS safety standards?
how is the wiring connected to terminals/pins?
is the casing suitably insulative?
is it waterproof? it’s worth looking into IP (ingress protection) requirements for electrical products.
Sheet metal considerations:
what processes were required to make the part? these could be cutting, bending, punching, rolling, stamping, etc…
in what order were these processes done? is there a way to tell?
what kind of fastening was used? welding, rivets, screws, glues, etc.
what kind of tools or punches were used to make certain features?
what are the bend radii for any bends?
are there any notable design features, e.g. reliefs in the corners?
are there any surface treatments used to finish, coat or debur the part?
Machining specific considerations:
what processes were required to make the part? drilling, milling, turning?
in what order were these processes done? is there a way to tell?
were any tertiary processes required to finish the part to give a particular surface finish or detail?
how was the object held while it was made?
are there any key datums, e.g. surfaces on the part?
Others? there are plenty more things to consider and to learn from these exercises!
This afternoon we welcomed Laurie Rowe BSC (Hons) IEng MIED, a Design Ambassador from the Institution of Engineering Designers, in to the design studio to talk about the benefits of joining the iED as a student, a graduate and a practicing engineer and how gaining membership with the iED can lead to registration with the Engineering Council.
Laurie’s own engineering design career journey has seen her work on everything from Sheffield steel to Estée Lauder and from orthopaedic hip implants to Xbox.
Membership to the iED provides professional and international recognition for engineers and designers and is a great way to further your engineering career.
Find out more about the iED and registration HERE| Find out more about the Engineering CouncilHERE
In case you missed it, last month Jonathan Chapman gave an insightful and thought provoking presentation entitled ‘Meaningful Stuff: Designing Longer-Lasting Material Experiences’. Fortunately the University of Brighton filmed the Professor’s inaugural presentation and you can view it in full view Youtube below.
Jonathan Chapman is a Professor of Sustainable Design in the School of Art, Design & Media, and Course Leader of the MA Sustainable Design – a ‘transdisciplinary’ postgraduate course, which he co-wrote and launched (2009). Chapman is also the author of Emotionally Durable Design: Objects, Experiences & Empathy (Earthscan, 2005). The books main focus of ’emotional durability’ has been adopted by designers, students and educators around the world, providing valuable shorthand for the complex and manifold factors that determine the endurance of ‘value’ and ‘meaning’ in a given object.
The Design Museum’s latest exhibition In The Making opened yesterday, curated by award winning and well celebrated designers Barber & Osgerby.
Open from now until May 4th, In The Making captures over 20 objects mid-manufacture showing them off at the ‘centre-stage’ of their design process. An interesting range of products have been chosen by the British design duo, from everyday objects such as a cricket bat, £2 coin and coke can to Barber Osgerby’s very own London 2012 Olympic Torch, which won the Design Museum’s Design of the Year in 2012.
Cricket Bat / Barber & Osgerby / Derwent Pencils
The objects have been selected because they each have an unexpected quality about them in those moments, hours or days before they assume their final, recognisable form. These points in the making process capture a peculiar and unconventional slice of time in the production of everyday objects such as tennis balls, banknotes and even diamonds. – The Design Museum
Optic Lens / Exhibition Graphics / Aluminium Can
Edward Barber and Jay Osgerby comment ‘We have always been fascinated by the making process as it is an integral part of our work. We have curated an exhibition that will provide a platform to capture and reveal a frozen moment in the manufacturing process and unveils an everyday
object in its unfinished state. Often the object is as beautiful, if not more so, than the finished product!’
What: In The Making
Where: Design Museum, SE1 2YD
When: 22 January – 4 May
Price: Adult £12.40 / Student £9.30
Brighton is regarded by most as a hub for all things art and design, and with a population drowned in creativity there’s always something to see.
This weekend is no different as some of Brighton’s many creatives open their doors to the general public to showcase their work, ranging from photography to jewellery and ceramics to knitwear, as well as handcrafted Christmas cards, wreaths, tree decorations and foodie gifts all on show, all part of the Artists Open Houses festival.
There are 49 open houses to root around within Brighton & Hove all with something different on offer. And the best part? If you’re struggling to sort out your Christmas shopping and have left it to the last minute, Artists Open Houses advises that “An afternoon spent browsing Brighton and Hove’s Christmas Artists Open Houses is the perfect way to take the pain out of Christmas shopping and a chance to pick up a present or something unique for the home.”
So don’t miss out!
For a full list of the open houses, map of where they are and further information click here
Artists Open Houses runs the 14th & 15th December.
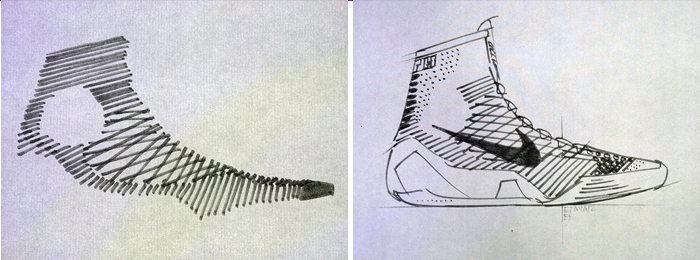
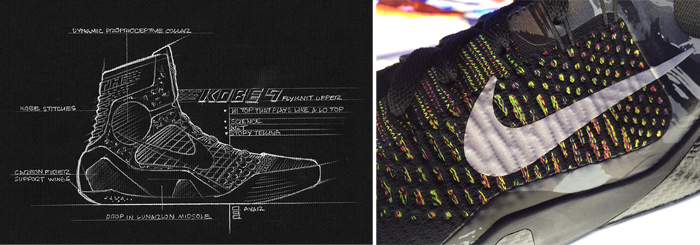
Kobe Bryant is one of the most decorated NBA stars of all time, and one of the highest paid. That fact, in some part, is down to his Nike endorsements, one of which is the KOBE elite basketball shoe series.
Last week saw Nike reveal the ninth show in that series simply named the KOBE 9, and listed the staggering material technologies that have gone in to the making, including flyknit, flywire and lunarlon cushioning technology.
Of the KOBE 9, Mark Parker, president & CEO of Nike said, “We are just scratching the surface of the potential of NIKE flyknit to transform the way we design shoes to meet athletes’ needs. the KOBE 9 redefines the basketball shoe by combining power, strength, and flexibility with lightweight materials and a whole new method of manufacturing.”
Here are the key facts of the design…
• NIKE flyknit and flywire technologies are a one-two punch, leading to a dynamic fit for KOBE’s intricate footwork.
• The single layer NIKE flyknit creates a seamless engineered upper that is the ultimate in superior lightweight performance integrating areas of high breathability, stretch and support where it’s needed most.
• NIKE flywire technology is strong yet dynamic for lockdown through the midfoot; its cables loosen and tighten with the natural motion of the foot.
• the carbon fiber heel counter provides strong and lightweight lateral stability when moving from side to side, while the heel remains stable.
• eliminating bulk and distraction was a focus for avar. the idea of ‘simplifying without compromise’ helped shape the design of the KOBE 9 elite.
• NIKE lunarlon cushioning insert provides responsive cushioning that keeps the foot connected to the court.
• the pressure mapping designed, minimal rubber outsole delivers durable traction and mimics the natural contours of the foot.
The KOBE 9 elite releases globally on February 8th 2014, at NIKE.com and select global retail locations.
3D printing is nothing new but in the last year 3D printing has crept out of the labs and workshops confined to printing solid prototypes, and in to new and unexpected fields.
The murmur of 3D printing food has seemed like a dream to many but with Barcelona based start-up Natural Machines developing the Foodini kitchen appliance perhaps we’re one step closer to designing, making and printing our own food without getting our hands dirty.
The Foodini is intended as a domestic device, and looks aesthetically clean in the house, while managing the time consuming parts of handmade food preparation that often discourage people from cooking at home, like rolling pasta dough, filling individual ravioli, and crafting cookie silhouettes. Streamlining the process, the 3D food printer creates shape, height, and volume independent of the user and can generate both large products like chocolate figures, and flatter foods like crackers. So far, the natural machines team have printed a bean patty, roll, and cheese sauce onto a burger, crafted pumpkin gnocchi, and fashioned a pizza from printer to plate. – Designboom
the Foodini home appliance image courtesy of natural machines
With one week left to go, the countdown to our exhibition begins!
As part of Brighton’s Fringe festival, 47 final year students will be showcasing their products for public view.
We have a diverse range of innovative products in development, some of which have the potential to save lives.
The exhibition runs from 11am to 8pm on Friday 31st May, in the Design Studio in the Cockcroft Building at the University of Brighton, BN2 4GJ. Invites to the exhibition can be found below.
Events will be held throughout the day such as guest speakers and idea generation sessions.