#12brightapps Day 12 – Explain Everything

#12brightapps – Day 12 (The final app of 2015) – Explain Everything

First, a bit of begging on our part: Would you be so kind as to take our ‘leaving survey‘ on the #12brightapps course? Thank you! I have a couple of minutes. Now, to the app!

What is it?

Explain Everything LogoExplain Everything is an amazing whiteboard/animation/screencasting juggernaut of an app. We admit that this is the only app that we’ve covered that costs something, so we won’t expect you to download this app only on our suggestion, however… If you’re working on a ‘Flipped Classroom’ scheme, or need to do quick explaination videos for your students, it’s worth the few pounds that they’re asking for it.

What does it do?

Really, what doesn’t it do?  You start off with an infinite white-board that you can zoom into and out of forever… You can import images, video, draw on video, share websites, annotate on everything, animate your presentation, save it all as a recorded screencast in Mp4. Explain Everything works on iOS, Android AND Windows mobile devices. You can use it simply to record before your class, or if you have an AppleTV or GoogleCast or other system (Like Reflector 2), use it in the classroom live (but still record the session, as that would be wonderful for your students’ use during revision.)  Explain everything not only allows you to draw/annotate/animate but also has a built in Math Equations tool, for all our kind Maths teachers out there. (Note: Explain Everything’s tool is called the Math Equations tool, because of ‘American English’, not because we can’t spell maths correctly.)  All in all, although we tried to stay away from apps that weren’t free… We just couldn’t help ourselves.

Okay, but I’m still not interested in buying this app, no matter how wonderful you say it is…

Fair enough.  We’ll be providing (what we hope) to be a very FUN and informative Periscope session about using Explain Everywhere on the morning of the 16th, just after 10am.  Please feel free to watch this instead of buying the app.  Who knows, after seeing us show it off… You may change your mind about the few quid the app costs.

Download it now.

1. Go to either the App Store or GooglePlay and search for Explain Everything.  Download the app to your device.
2. Open the app, press the upper-left + symbol to start a new project, and have a little play with the different tools.  Scribble on the whiteboard, and click an hold on the tool-bar to see other options available.

10 Minute Task

If you would like to see a live broadcast we are going to start rolling in about 15 minutes (15 past 10am-ish GMT)! The link will be posted to Twitter, but you don’t need to have a twitter account to watch:
https://twitter.com/hashtag/12brightapps

1. We’re going to make an agenda introduction to a talk/conference/lecture using Explain Everything.

2. Because it may be easier/quicker to start with something, open up your favourite slide-show creator (Powerpoint, Keynote, Google Presentation) and let’s make a slide that we can play with in Explain Everything. I’ve pre-made this slide and exported it as an image to my Dropbox.  You could also export it as a PDF, if you wish. Or save into your camera-roll if you made it on your device.

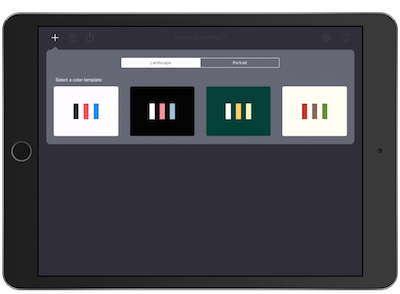
3. Open Explain Everything and click the plus-symbol in the upper left-hand corner.  Pick a theme (I like the cream one, personally)

theme chooser screenimage

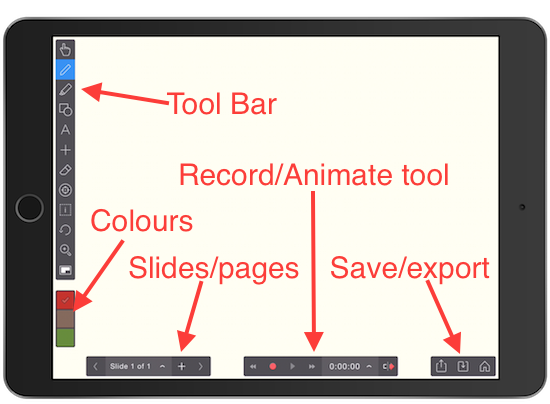
4. Let’s take a quick tour of the app (in it’s pristine shape)

Tour of tools picture

5. There are other choices for tools (under) many of the tools in the Tool Bar.  Check them out, by clicking and holding on a tool.
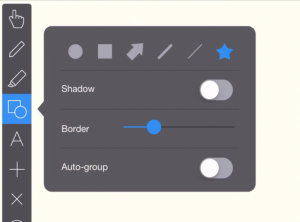
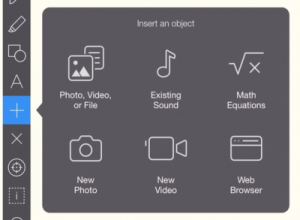
shape option picture Insert tools picture
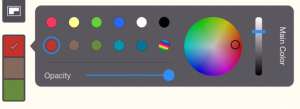
colour picker picture

Above Left: Shape tools
Above Right: Insert Objects

Left: Colour Picker

6. Okay, let’s import that ‘Agenda Slide’ that we did in our presentation software. Go to the plus symbol in the tool bar, and click on the top left choice “Photo, Video or File”

visual discriptive screen capture

7. Pick where your ‘picture’ is living, in a Cloud-service, or on your camera roll (Photos)? Click on it.

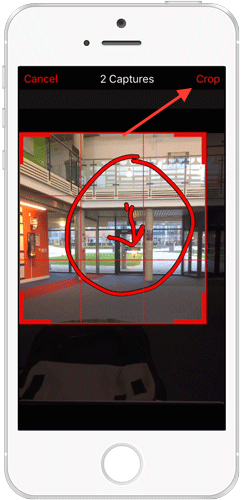
8. You can edit the photo (crop or rotate) then click Done.

visual discriptive screen capture

9. With the ‘Hand’ tool you can pinch and rotate the image to fit on your Whiteboard/canvas in EE.

visual discriptive screen capture

10. Let’s first zoom in, and then Hit Record! We’re going to make a little animation.

visual discriptive screen capture

11. I’m choosing a star shape from my menu, and then I’m going to move it around with the hand tool… (I’ll attach the video, so it will make more sense when you see that.)
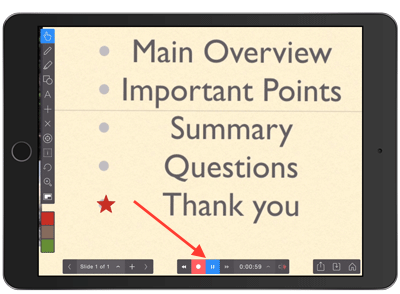
visual discriptive screen capture 12. I’ve moved the star from point to point, and moved the screen around as well.  Now that I’m done, I’m going to hit the record button again to end the recording.

13. If I click on the timer, it gives me a timeline that I can scroll through, and make sure I like what I’ve done.

06-Timeline-scrolling
14. If I like what I see… I can then hit the export button.

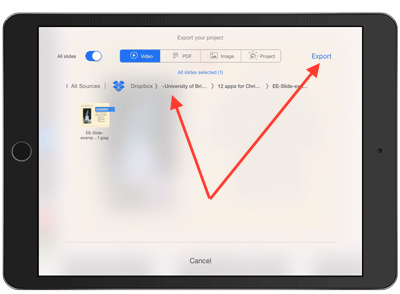
visual discriptive screen capture15. The export gives me many choices… Video, PDF, and more, as well as places to put them.

visual discriptive screen capture16. I’m going to make this a video, and export it back to my Dropbox where I originally got my presentation slide.  You can put yours where-ever you wish.

visual discriptive screen capture

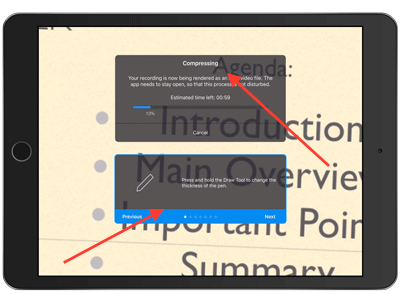
17. Explain Everything then has to compress my video.  But, it does give you quick little tips to read to keep you interested.

11-video-compression

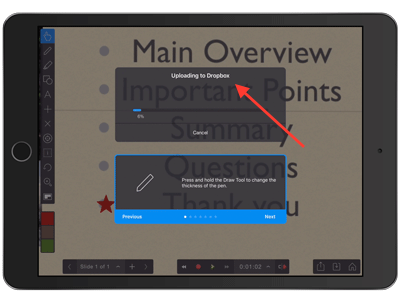
18. Once it’s compressed the video, it then has to upload it to the service that you chose.

visual discriptive screen capture

19. Once it’s done, it will tell you so, and you can click “Ok’.

visual discriptive screen capture

20. Although you’re done with this exercise… Feel free to keep playing!

visual discriptive screen capture

Here’s the results of my recording with Explain Everything:

And Finally…

What’s black and white and noisy?

A Zebra with a drum kit.

Part 2

Discussion Board and Twitter

As I’m pretty certain, many of you didn’t download the app yet… What other tools are out there that you like using for screen-capturing a learning object?

Further Tasks

Watch our Periscope – Star Wars vs Star Trek, with Fiona and Tucker starting around 10:15 GMT, or, once it’s been done, we’ll post it later to this blog.

The link will be posted to Twitter, but you don’t need to have a twitter account to watch:
https://twitter.com/hashtag/12brightapps

Oh… Hey… Survey!

If you’d be so kind… Taking our short ‘leaving survey’ would be really wonderful! It should only take a couple of minutes…

I’d love to take your survey!

THE CONTEST!

To win a £10.00 app voucher for the ‘store’ of your choice… Have you been paying attention? We’ve hidden secret codes throughout the #12brightapps course.  Fill in our list for your chance to WIN!

Star Trek vs Star Wars
The Explain Everything Challenge

#12brightapps – Day 6 – Techsmith Fuse

#12brightapps Day Six – Fuse

Welcome to Day Six of 12brightapps – our app is Techsmith Fuse…

What is it?

Fuse is an app that is used to interface with other Techsmith products such as Relay and Camtasia. However, it can be used by itself too.

What can it do?

Fuse works on both iOS and Android devices… It has added annotation tools if one is on an iPhone, however. It’s primarily used to interface with other Techsmith products. Relay (for streaming servers) Camtasia and SnagIt.  However, with the annotation tools, or even without, Fuse is an easy app to capture video, and to share it to other apps or your camera-roll.

Download it now.

  1. Open the App Store or Android market on your phone or tablet, search for ‘Techsmith Fuse’ and download.
  2. Launch Fuse

10 Minute Task:

Whether or not your institution has a Relay-server or not, this activity is spread into three pieces. Follow along, and skip ahead, as it makes sense to your own situation.

Part A.

First, we have to make a video.  As we draw to the end of this term (or, getting close, anyway) we will be gearing up for the new term soon.  Many times, your future students are excited to get started on the next course.  The first thing they see, is often a ‘fairly empty’ module/course waiting for them in their VLE/LMS.  A great way to start off the new term, would be to have a short introductory video greeting your future students to your module/course.  We’re going to make that video, using the Fuse App.

1. Open Fuse, and click on the video camera icon. It defaults to the external camera, so you’ll have to rotate the camera so that it’s “looking at you, kid.”Photo illustration of text description

2. Click on the Video camera in the middle, when you’re ready to make your course/module introduction.  It starts recording right away, so be ready to start talking!Photo illustration of text description

3. When you’ve finished click on the tick-mark.  Or, pause if you want to gather your thoughts. Fuse is happy to wait for you.Photo illustration of text description

4. Okay, you’ve reached the step where you can skip ahead to step number 11 if you’re not a member of the Uni of Brighton.  Brightonians: Once you’ve clicked the tick-mark DONE choice you should see this, click on the R, for Relay.Photo illustration of text description

5. Next it will ask you to scan the code.  Rather, click on “Manually Connect”Photo illustration of text description

6. Fuse will ask you for the address of the streaming server that Brighton uses.  If you’re from outside of the Uni of Brighton, it’s quite possible your institution has something like this.  Ask your technicians!Photo illustration of text description

7. Once you’ve clicked connect, it will ask you for your username and password.Photo illustration of text description

8. Once you’ve clicked ‘Done’ it will log you into the streaming server and ask for a title and description of your video.Photo illustration of text description

9. Choose the profile that fits what you want.  MediaStream for our ‘campus video service’ or “All formats” for our Relay Streaming Server (Brighton Only – If you’re not Brightonian, ask your media team what the options may be.)Photo illustration of text description

10. Once you’ve chosen your destination for the video, click Send.Photo illustration of text description

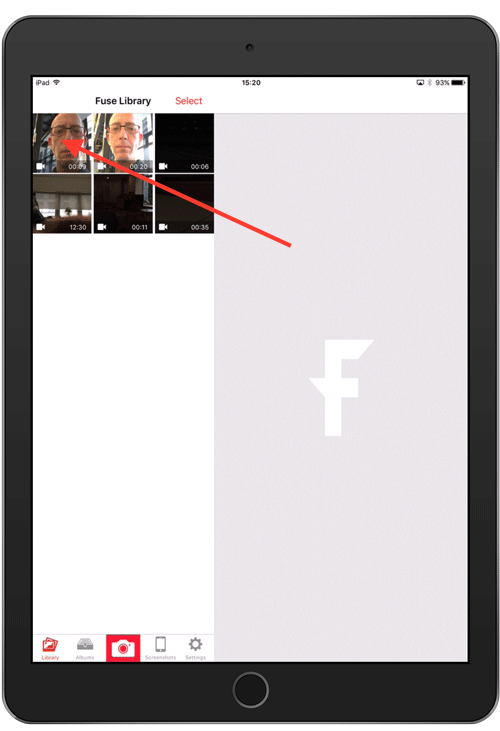
11. HEY WE’RE BACK TO EVERYONE! So if you’ve finished your video, you can go to the Library and there are a few more fun options (That don’t involve server things.) Now choose a video that you’d like to export.Photo illustration of text description

12. Once one is selected, go to the Share Icon to see the options.Photo illustration of text description

13. With Fuse, you can export the video to other apps and services, Nearpod, Dropbox, Faceboock, etc… Save your ‘Introduction’ video to your favourite service.Photo illustration of text description

Part B. – But WAIT, there’s more… I told you that there were more options, if one was using an iPhone. Annotation and Video Cropping!

Photo illustration of text description Photo illustration of text description

Otherwise the iPhone app has the same functions as the Android and iPad app.  Sending to other Techsmith Services or Apps or your camera roll.


And Finally…

What do you get if you eat Christmas decorations?

Tinsilitis!


PART 2:

Discussion Board and/or Twitter

Are you worried about the idea of having a video introduction on your modules/course areas? What other things could you do that would ‘humanise’ your module areas?

PART 3:

Further Task(s)

Make a silly Christmas/holiday greeting video with Fuse, and share it with your Facebook/Social media of choice.

Useful resources

Here’s the link to Techsmith’s website.

Helping Students Find Identity Through Student Created Video – A blog by Matt Miller a well known teacher and author.

Today’s secret code… (Keep this handy): “Luke, I am your father!”

#12brightapps – Day 5 – iMovie

#12brightapps Day five – iMovie

Welcome to Day Five of 12brightapps – our app today – iMovieScreen Shot 2015-12-04 at 11.32.01

What is it?

iMovie is a robust iOS version of the classic Mac software for video editing.

What?!?!? I’m on Android.

We aren’t deliberately being mean, if you’re on an Android device, we suggest Video Maker Pro Free – The activity will work with that app as well. Although, you’ll be a bit more on your own about how to make the app do what you want.

videomakerprofree


What can it do?

iMovie is a very robust and easy to use video editor for iOS devices.  Many times you shoot a short video for class, or record a students presentation, and want to do some simple trimming and text additions to your video. iMovie is a great tool for that.

iMovie (and Video Maker Pro Free) also do a great job at making slide-shows with text and even audio, out of still images. Document your class/event with your camera app, and easily import the photos into iMovie, add text and even a backing soundtrack to export a video-slideshow of your event.

Download it now.

  1. Open the App Store, search for ‘iMovie’ and download.
    (Or open the Googleplay and search for Video Maker Pro Free [or really just click that last link])
  2. Once installed, launch iMovie, and if you’re asked, allow iMovie access to your camera roll and camera and microphone.

10 Minute Task:

We may have given this away in the “What can it do” section, above… We’re going to make a winter-holiday-themed slideshow with iMovie, and… It’s all about you.  That’s right, this will be the best and most narcissistic video-slideshow that you will ever make.

  1. First we need material. So, using your camera on your mobile-device start shooting a few ‘selfies’.  Make one a very happy face, make one a very sad face, make one a particularly egregious duck-face photo (you know the type), and make another of your natural expression.  Take as many more as you’d like.
  2. Once you’ve shot the selfies, let’s open iMovie on your device.
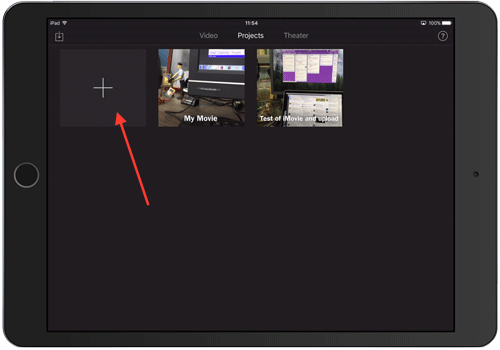
  3. Click the + symbol to start a new video project.Screencapture showing step
  4. Click on Movie (as opposed to Trailer)Screencapture showing step
  5. Choose the theme (transitions, look and feel of the project) or just leave it ‘Simple’ and click CreateScreencapture showing step
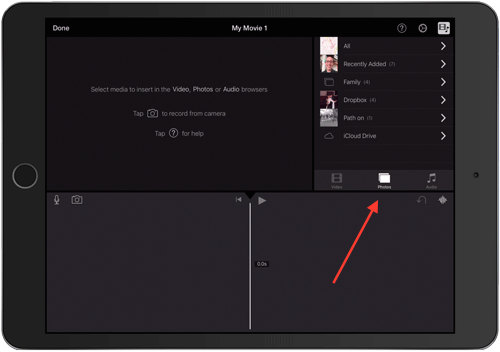
  6. Let’s find the photo library.  The top left is your ‘viewer’, the top right is your library, this is where you would find your video, photo or audio file libraries.  The bottom area is the timeline. Choose “Photos” to open your camera-roll library.Screencapture showing step
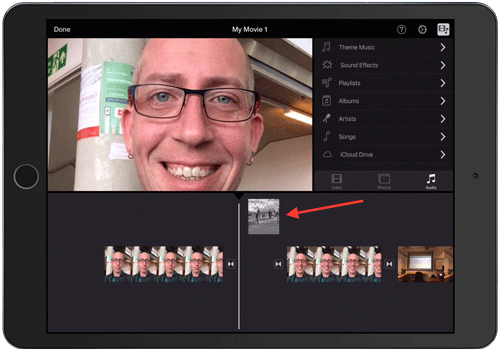
  7. Find your selfies in your library, and touch them.  They should automatically be added to your timeline.Screencapture showing step
  8. Don’t despair… You can click on a ‘picture’ in the timeline, and drag it to a different place in your timeline. So the order doesn’t matter yet…Screencapture showing step
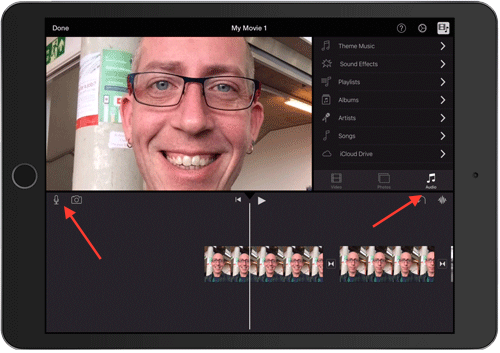
  9. Now it’s time to add some audio to your video-slideshow.  You can either find some music in your iTunes library or add a voice-over by using the built-in mic function.Screencapture showing step
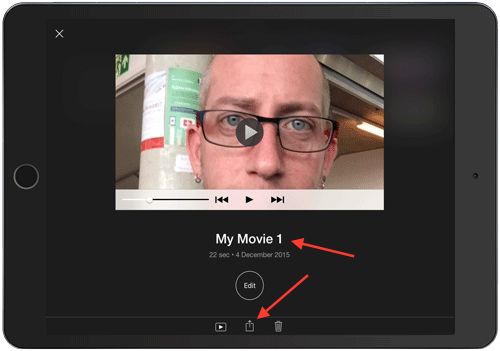
  10. Once you’re satisfied, click on the “Done” button in the top left corner of the screen, and you should see this window appear.Screencapture showing step
  11. Click on My Movie and you should be able to edit the text.  Call it something like “Your Name’s” Emotional States During the Holidays. Then click on the ‘share’ icon in the center middle.Screencapture showing step
  12. You can share your video to other apps you may have installed, or save the video to your Camera-roll or iTunes or iCloud Drive account.

And Finally…

What do you call a little lobster who won’t share his Christmas presents?

Shell-fish.


PART 2:

Discussion Board and/or Twitter

Try to think up ways that iMovie (or Video Maker Pro Free) could work for you in your classrooms and lecture theatres? How would you use it? Recording student-presentations? Oral-Exams? Short video demonstrations that you can use to “Flip” your classroom?

PART 3:

Further Task(s)

You can record directly into iMovie, and choosing the ‘camera’ icon, start recording directly to a time-line.  This can be great, if you want quick recording and easy manipulation before saving and sending a video to students, colleagues, or if at home, ‘Crazy uncle Eddie’.

If you have enough ‘random’ photos and videos on your device, using the “iMovie Trailer” function is a great ‘drag-and-drop’ way to make a frankly quite professional looking trailer about your ‘event’.

Useful resources

Here are a few useful links:

John Scotland’s iMovie tips and tricks. (YouTube)

Flippedinstitute.org – Mobile Video in the Classroom (PDF)

Animoto.com – 6 Best uses for Video in the classroom (Commercial app product, but good advice, none-the-less)


#12brightapps Day two – Nearpod

Welcome to your second day of #12brightapps – Today’s app? Nearpod!

A quick note about our survey
If you haven’t taken our survey yet, please take a moment to do so when you get a chance.
https://brighton.onlinesurveys.ac.uk/starter-survey-12brightapps

On the subject of the survey, it was a bit of a warm-up activity… We are implementing some gamification into the proceedings throughout #12brightapps and you will have the opportunity to retrieve some secret codes as you take part. Collect the codes for the opportunity to win a small prize at the end.


What is it?

nearpodNearpod is a great tool to introduce interactivity into your lectures by adding polls, quizzes and more to a presentation which is pushed to your student’s devices during a class.

What can it do?

Think ‘Powerpoint’ but with interaction.  Nearpod is a presentation application, where you can add activities that students can use in the classroom.

  • Add quizzes, polls and Open-ended questions to your presentation
  • Easily upload existing powerpoints into Nearpod, then add your interactions
  • Build presentations natively in the app.
  • Create a library of presentations on the web, for access from anywhere with a web connection.

Download it now.

  1. Open the App Store or Android market on your phone or tablet, search for ‘Nearpod’ and download.
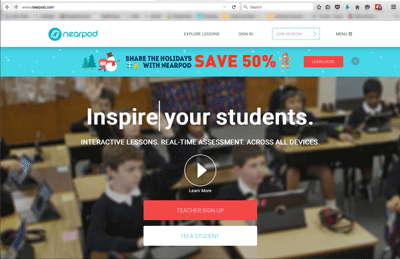
  2. Using a computer (or tablet-browser) go to http://www.nearpod.com
  3. Click on Teacher Sign-up.Nearpod-teacher-signup
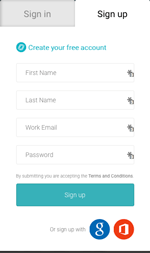
  4. Create your free account.Nearpod-Signin
  5. Click on Explore in the Nearpod Menu, and take a look at any of the examples of Nearpod presentations. Try one out, using a computer to run the presentation, and your mobile-device to see what a student would see on their mobiles.

10 Minute Task:

Let’s create a Nearpod presentation, and add some interactive, real-time assessing magic to your presentation.

First, be logged into Nearpod on a computer or a tablet device.  (Sadly you can not be in “Teacher mode” on a mobile-phone.)

Click on “My Library” in the top left menu of your Nearpod. Click on the New Presentation button.

Nearpod-New-Presentation

Browse your computer for your favourite powerpoint slide-show.

Drag the .ppt file onto the Nearpod window.  This will convert your powerpoint into a Nearpod Presentation.  Depending on the size of your powerpoint, this may take a minute to process.

Nearpod-Drag-pptx

(*Please note, some things may well ‘break’ in your powerpoint.  Transitions, animations, and the occasional web-links will not work anymore.  Don’t worry, once you’ve spruced up the presentation with some interactive magic, the students will never notice.)

Once your Powerpoint presentation is “Nearpod-ised” It’s time to add some activities.

Click on the “Add Slide” button.  Nearpod-publishYou will see three buttons, the Add Content button (this is to create a slide), the Add Web Content (This is a ‘premium’ option so ignore it.) And finally the “Add Activity” button.

Nearpod-add-menu

Choose “Add Activity” and let’s make a poll.

Nearpod-addactivity

Decide what you would like your poll to ask the students, and make one up.  It could be a ‘get to know your class’ sort of poll… Or, if you asked a question somewhere in your presentation, perhaps you could add a poll there, or an ‘Open Ended Question’ instead of calling on students in the classroom.

The poll will automatically appear at the end of the presentation.  You can click on the poll, to ‘pick it up’ and move it to anywhere in the presentation.

Now try to add an Open Ended Question to your presentation.

Finally, at the end of your presentation, let’s add a relevant quiz.  Create a three question quiz that will test your pupil’s knowledge of the topic you discussed in your presentation.

Once you’re done adding your interactivity… Click on Publish.

Nearpod-publish

Your new Nearpod presentation is ready to go, for your next class! Congratulations!

And Finally…

What kind of athlete stays warm at Christmas?

A long jumper.

PART 2:

Discussion Board

How do you feel about your students all having their mobile-phones on, in the classroom? Discuss on the App Discussion forum!

PART 3

Further Tasks

Be sure to try out your presentation using your computer as the “teacher” and your mobile/tablet as a student.  See how the two interact with eachother.

Useful resources

Here are a few useful links to help you get started with Nearpod

Nearpod presentations, that show you how to best use it: http://www.nearpod.com/help/#started

Great tips and tricks for making the most out of your Nearpod experience: http://www.ipadeducators.com/#!top-10-tips-for-nearpod/c40y

The Blog…

In the blog for our #12brightapps site, we will be posting the Apps and related exercises every week day starting the 1st of December and running through the 16th of December. (We’re resting on the weekends.)

Do “Subscribe” as the Apps and the exercises will be e-mailed out to people who have subscribed… Or, you could just interact with the blog if you wish.

Make sure you tweet with the hashtag #12brightapps to continue our conversations out in the Twitter-verse.