VI-Suite v0.6 – Basic Radiance Simulation

Sawtooth

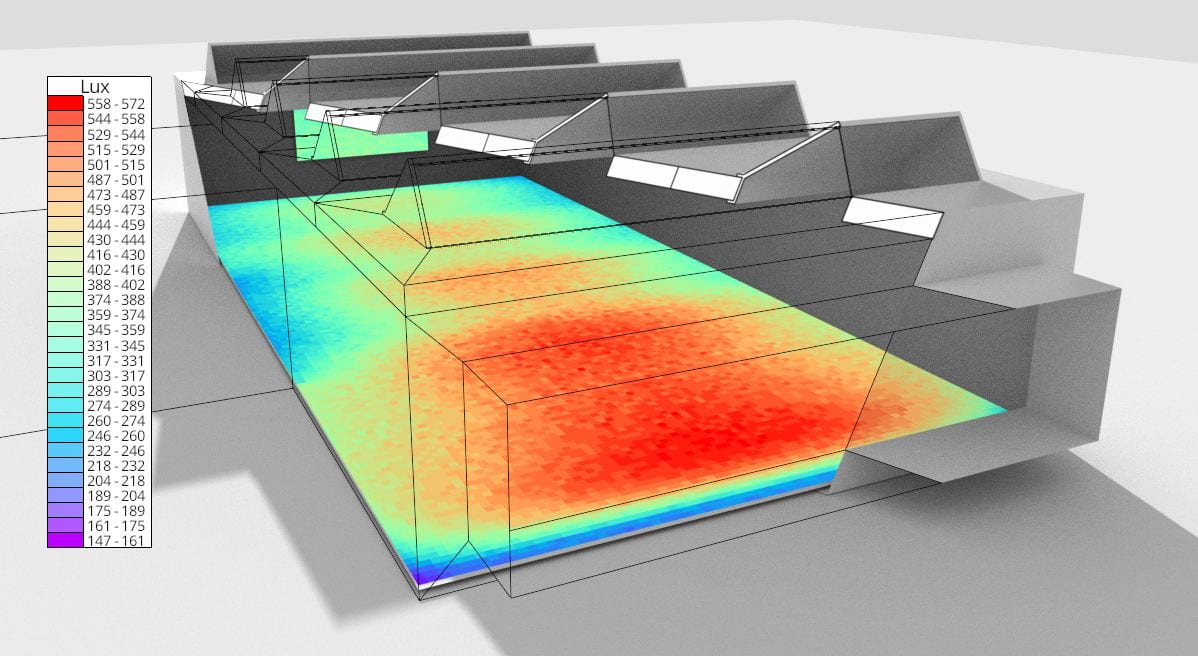
Cutaway of a saw-tooth roof and lux simulation

Hello.

I have now uploaded a video tutorial covering the basics of Radiance simulation with the LiVi component of the VI-Suite. The video concentrates on the options within the relevant nodes and the Radiance material options. One thing I should probably reiterate is that a single Blender object can have more than one Radiance material attached as Blender allows you to associated materials with each individual face. The example below shows a red glass sphere with some blue plastic faces.

Radiance materials

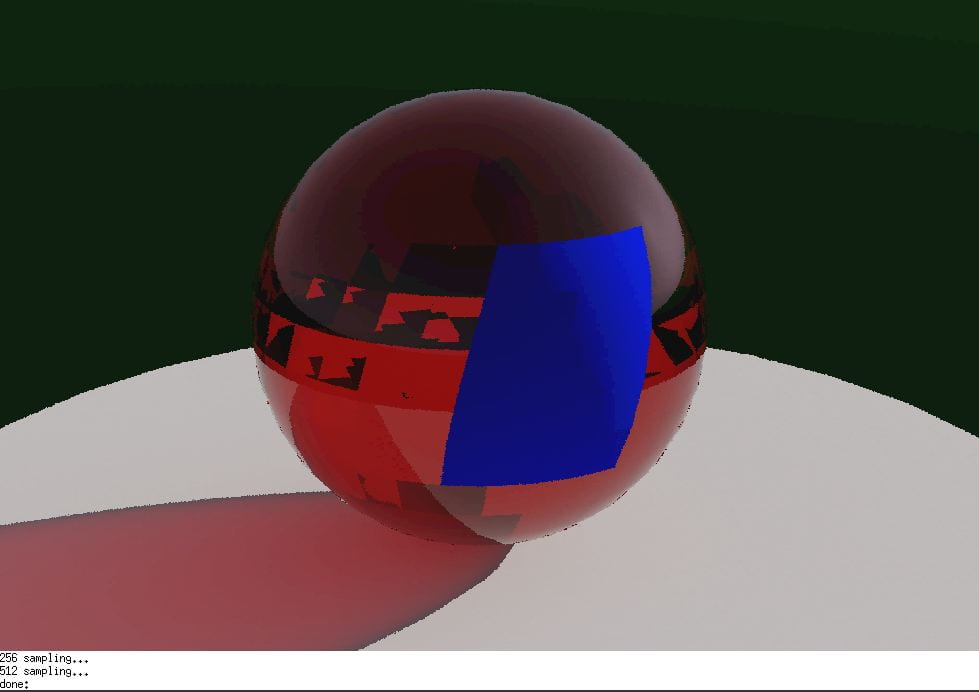
Radiance per face materials


Also a version from today or later should be used to correspond completely with the options I talk about.

Otherwise I think the video mentions everything else I wanted to say and, as ever, can be viewed below.


VI-Suite v0.6 – Sun Path

I’ve just uploaded a video tutorial for sun path and simple shadowing analysis in v0.6.

The video covers sun path creation and the features of Blender’s viewport shading for single and multiple sun shadow creation.

There’s a couple of things I forgot to mention in the video. One is that when creating a new sun path you’ll notice that a new collection is created called ‘SunPath’ and the sun path object is placed within it. As mentioned in the previous video you should avoid putting your own geometry into this collection. Another is that the colours of the sun path base can also be altered with the material properties associated with the sun path base object.

And one final thing. The time used for the sun position is local solar time, not clock time. Any local daytime saving, or time zone adjustment, should be factored in by the user.

Link to the video is below and to those who celebrate it I wish you a very Merry Christmas.

Ryan

VI-Suite v0.4 – Version 0.4.13 and Radiance Images

Irradiance falsecolour image

Irradiance falsecolour  image

I have just uploaded VI-Suite 0.4.13 to the download links at http://arts.brighton.ac.uk/projects/vi-suite/downloads. Changes in this version can be seen in the Changelog. One of the main new features of this version is the LIVi image nodes which enables the generation and manipulation of Radiance images for falsecolour metric visualisation and glare analysis.

Images can be generated in parallel on multi-core machines when using OS X and Linux. Unfortunately the methodology employed will not work on Windows.

As ever the tutorial video below explains their operation.


VI-Suite v0.4 – Version 0.4.11 & Sky View Factor Calculation

Version 0.4.11 has now been released. This version contains a number of bug fixes and new features,  including the ability to create a sun path with hourly or monthly suns and a new Sky View Factor node. A zip file containing the VI-Suite addon for Blender version 2.7.8 has also been released for Linux 64bit systems. See the changelog page for more details.

The sky view factor (or VI SVF) node operates in a similar manner to the Shadow Map node except that instead of checking if a point can be seen from the perspective of simulated sun positions it is checked if it can be seen from different portions of the sky. The sky can be subdivided into 145 portions (Tregenza) 577 portions (Reinhart 577) or 2305 portions (Reinhart 2305). Accuracy and simulation time increases with each one.

The VI Sky View Factor node can be added through the ‘Analysis Nodes’ menu. An image of the node is shown below. Options are similar as for the Shadow Map node except there is no location input required and no time options, as sky view factor is location and time independent. The ‘Results Out’ socket can be used to save the results to CSV file.

SVF Node

Sky View Factor Node

An example analysis with a 3D city model of the Hague in the Netherlands can be seen below.

SVF analysis

Sky View Factor analysis of the Hague. Model provided courtesy of Filip Biljecki.


VI-Suite v0.4 – Radiance Textures

Normal mapping

Radiance render with multiple normal maps

This tutorial is basically a follow up to the Radiance Patterns tutorial and details how normal maps can be used to specify Radiance textures. Textures in Radiance terminology is a perturbation to the surface normal to give the impression that the surface has detailed physical features. If for example a point on a surface has its normal perturbed towards a light source the point will receive more light than if the surface normal is perturbed away.

Although, like Radiance patterns, textures are not often necessary for numerical lighting simulation, and indeed are ignored if they are on an illuminance sensing surface, they can provide extra realism to visual Radiance renders and there are certain circumstances where they may be useful numerically and/or save time by not requiring the creation of detailed physical geometry.

The video below details the process.

VI-Suite v0.4 – Radiance Patterns

As of version 0.4.7 the VI-Suite can now use Blender’s UV image mapping system to create image based Radiance patterns. In the example Radiance rendering below an image texture has been mapped to the wall and picture to create a diffuse reflecting Radiance image pattern, and to the window to create a transparent one.

The video tutorial below details the process.

VI-Suite v0.4 – Radiance Photon Mapping

Hello.

Radiance’s Photon Mapping capability can really help a backwards raytracer like Radiance achieve good results in situations where it is difficult for backwards rays fired from the camera or sensor point to find a light source e.g. interior scenes with small windows or small artificial lights.

The video below shows how to turn on and use photon mapping in the VI-Suite. The current implementation in the VI-Suite only works with natural lighting. When I have it working with artificial lights I’ll update this post.

Video below.


VI-Suite v0.4 – Importing Geometry

Hello.

If you’re doing building modelling outside of Blender and importing the geometry into Blender for analysis with the VI-Suite there are some things to bear in mind, especially if the other application is not a mesh modeller like Blender e.g. Rhino, Sketchup.

If possible export the model from the other application with the unit as metres as Blender will interpret the unit as Blender units which are equivalent to 1m in the VI-Suite. Also make sure that your model is situated appropriately relative to the origin point in the other application. If importing 1 building for example put the building near the origin point before exporting.

For most types of analyses with the VI-Suite exporting the geometry as one OBJ or 3ds object can be useful as it makes manipulation of the geometry in Blender a bit easier. If doing an EnergyPlus simulation with EnVi, exporting an object for each thermal zone you wish to simulate is optimal.

Applications like Rhino and Sketchup also have to convert their native geometry for export to 3ds or OBJ files for import into Blender, and this conversion can lead to very messy mesh geometry. The Blender tools ‘Remove Doubles’ and ‘Limited Dissolve’ can help you clean up this geometry.

The video below shows how to prepare imported geometry in Blender for simulation with the VI-Suite.