An update
Re-organising the main archive space we work in alongside our researchers has been no mean feat, but we are now getting there – slowly but surely. The long-awaited new cabinet for the large format ICOGRADA poster materials arrived from France at the end of last week and due to our meticulous calculations, fitted perfectly in the space allocated for it. We are now waiting for the large format made-to-measure Melinex sleeves to arrive and once these come in, the surface cleaning and repairing of the materials can step up a gear.

As you can imagine, due to the size of the posters, we are running out of flat surface space to place materials on, and it will be a great sigh of relief from everyone once the posters start to slot into the new cabinet. As a part of the re-design of our working space, we are also going to be re-housing all of the smaller scale ICOGRADA posters currently stored in horizontal plan-chests in the vertical poster cabinet. Once empty, the removal of the plan-chests themselves will free up more space in the middle of the room. This means a third desk can be placed in this ‘researcher space’. More flat table space also means that minor conservation works on the posters can continue possibly even when researchers are in.

Suzy Horada has been a great help in the conservation process by giving me a hand in surface cleaning. For most of the materials so far, we have been able to use a Mars Staedler rubber directly on the surface of the paper due to the strength and thickness of the paper used and the stability of the printing inks. However, a selection of the posters are printed on more fragile paper. In these cases, a chemical sponge and/or grated rubber has been used for the removal of surface dirt.
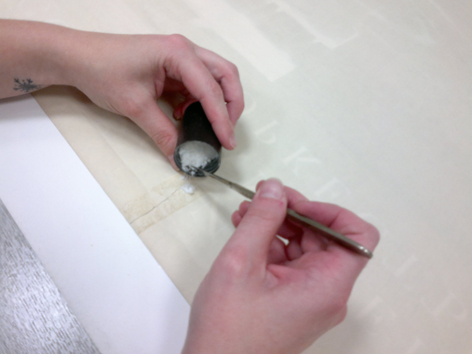
I have been repairing tears from the verso with heat-set tissue as well as filling in torn corners and other missing areas. An issue with this particular collection has been the general use of adhesive tapes (mainly sellotape and masking tape) in earlier ‘repairs’ as well as in attachments of labels to the verso of the materials. Sadly in some cases, the staining left behind by the adhesive has also seeped through to become visible from the recto of the print. In a handful of posters, some tackiness was also left in the adhesive mass after the backing was carefully removed. In some of these cases, I am using fibrous cellulose powder to aid the removal. With most of the posters, the tape has already turned brittle with age and fallen off, leaving behind a dried up yellow mass and stain. I have been removing the remaining residue by carefully scraping it off with the aid of a scalpel.

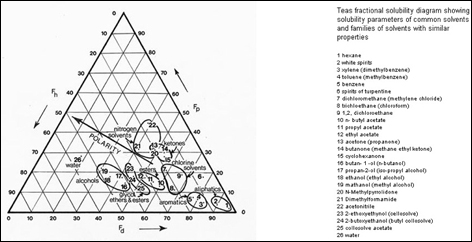
In conservation laboratories, the Teas chart can be used to visually locate effective solvents or solvent blends for given polymer-resins in a systematic manner. The chart gives an indication of suitable solvents according to their three components of molecular interaction – polarity (fp), hydrogen bonding (fh) and dispersion forces (fd). Resins left behind by adhesives can be easily removed when fresh, but as you can imagine in conservation, this is generally not the given situation. Due to oxidation, resins tend to move towards being more polar meaning that more polar (ie ‘stronger’) solvents need to be used. The most commonly used solvent groups in paper conservation are the aliphatic and aromatic hydrocarbons, ketones and alcohols.

If this has sparked anyone’s interest in reading more about adhesive tapes and techniques for removal, there is a good overview article you can read in the Journal of the American Institute of Conservation.
