Along with designing electronics using software and diagrams as detailed in my previous post we were also tasked with exploring programming of Micro:bits to create circuits.
The BBC Micro:bit is a tasty little microcontroller that is self contained, very powerful (for its size), very affordable and easy to use with lots of online resources.
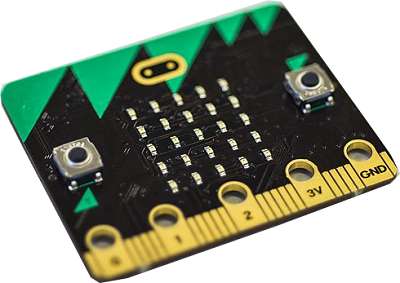
Quick overview:
- Outputs
- 5×5 LED array
- 25-pin edge connector
- audio out using pins 0v (positive) and GND (negative)
- radio and bluetooth antenna
- Inputs/Sensors
- 3 push buttons, 2 front 1 rear (which provide 4 inputs, A, B, A+B, reset).
- 3-axis accelerometer
- 3-axis magnetometer (used as a compass and metal detector)
- light sensor (useing the LED array)
- temperature
- radio
- Connections
- a MicroUSB connector
- battery connector
- 25-pin edge connector
- radio and bluetooth antenna
- 43mmx52mm with connections along the top and bottom.
This Micro:bit documentation goes into excellent detail about every aspect of Micro:bits hardware, inputs, outputs, programming, tutorials and projects to work through.
Programming
Micro:bits are programmed using the app or in browser code editor:

The editor uses a very intuitive drag and drop method of constructing the program using blocks. These blocks are organised into their different functions and are clip together in a logical way to build up the program.
Once you have your program it can be flashed wirelessly to the Micro:bit from the app over bluetooth. This has never, ever worked for me – although I’ve seen it done by others. I prefer to connect the Micro:bit by usb to a PC where it becomes available as a removable drive and drop the downloaded .hex program file onto it – it’s easier to create code on a PC anyway…
One great feature of the default app or browser editor is on the left of the screen there is a visual of the Micro:bit which changes in real time as you create and adjust your code. It can also be used to simulate the program without having to upload it first.
In addition to the default method there are various other ways to program a Micro:bit:
- JavaScript – it is possible to switch between blocks and JavaScript in the app/browser editor.
- MicroPython – this is a more complicated and detailed type of programming which can achieve more but is harder to use… Quality info on MicroPython can be found here.
- GitHub – GitHub is a code sharing resource/network and isn’t just limit Micro:bit.
- MU – this is a simple Python editor for Micro:bit, similar to MicroPython. I tried an OLED project that required this application to program the Micro:bit. I never got it to work and managed to complete the project without it. Available here anyway.
Additions and kits
There are various add-ons and kits that make it easier to connect the Micro:bit and increase it’s potential.
The main one to get is an Edge Connector Breakout Board. It makes connecting the Micro:Bit to other components somewhere between easier and possible. Detailed specs/data sheet can be found here.
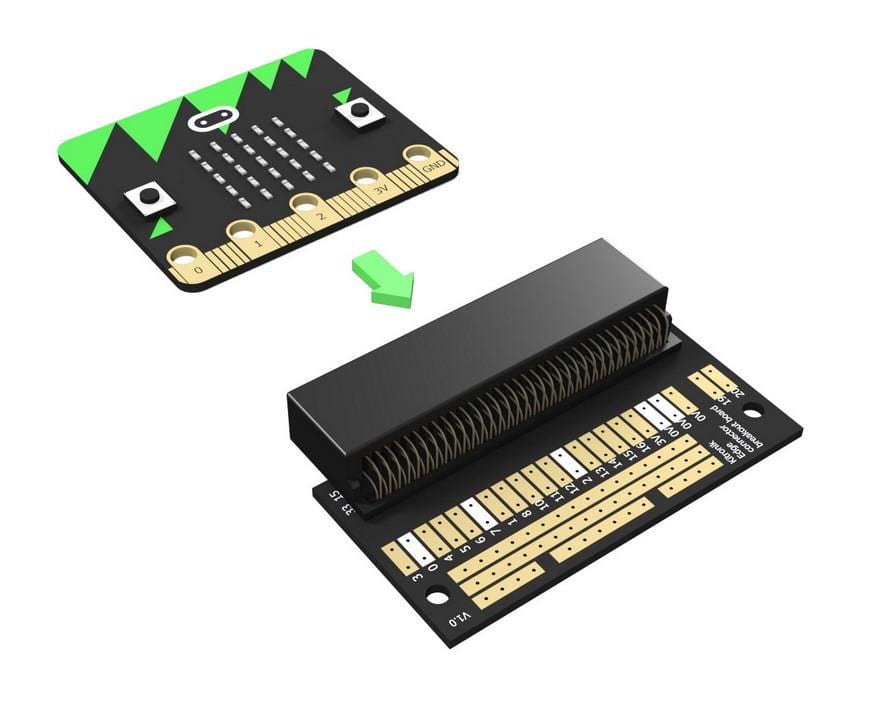
Edge connector breakout board
I would l like to try the Hover:Bit and the Air:Bit by Norwegian company MakeKit.
The tasks and my experimentation are in the next post.
