LiVi Climate Based Daylight Modelling

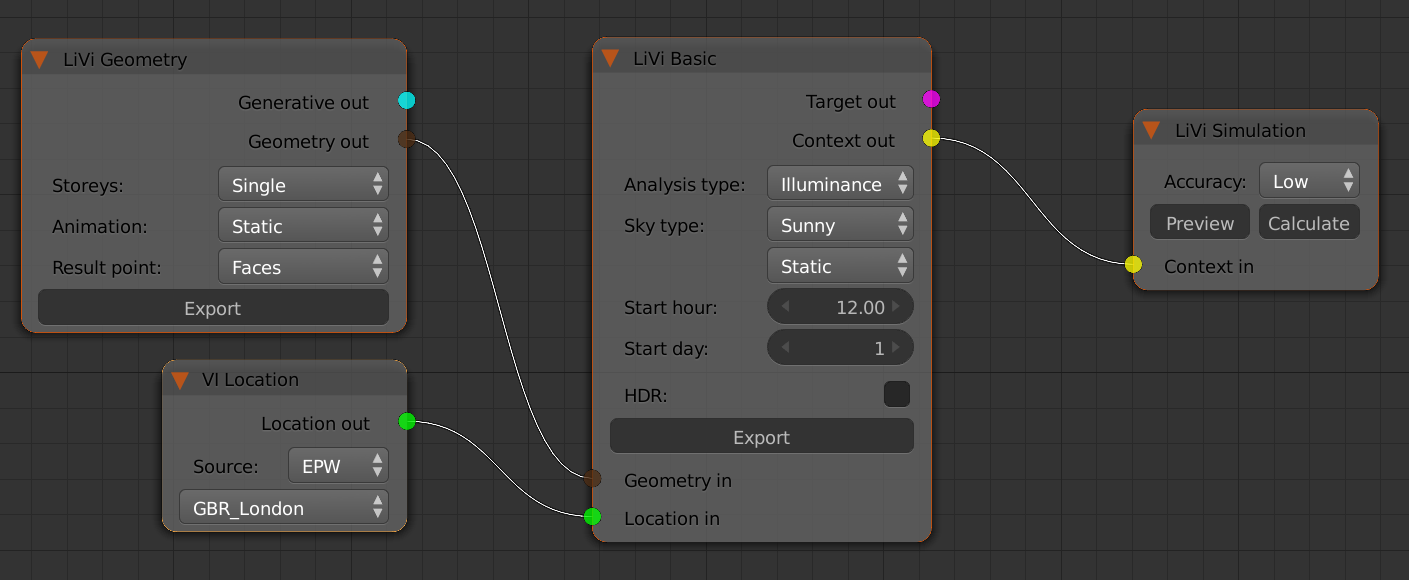
Climate Based Daylight Modelling (CBDM) is achieved with the LiVi CBDM node. CBDM takes hourly sky data, in this case from an EPW weather file selected in a VI Location node, and calculates lighting metrics either cumulative;y for the period simulated, or for each hour. CBDM offers greater contextualisation compared to a daylight factor calculation, and greater confidence compared to static time based simulations. A typical node set-up for a LiVi CBDM analysis is shown below.
livicbdmnode
CBDM analysis for the calculation of advanced lighting metrics such as light exposure (luxhours), radiation exposure (kWh/m²), daylight availability (%), hourly radiation (W), and useful daylight illuminance (%).

A short video showing a CBDM analysis can be watched below.

VI-Suite Climate Based Daylight Modelling from Ryan Southall on Vimeo.

LiVi Compliance Analysis

A LiVi Compliance analysis checks the calculated lighting performance against some common lighting standards. Standards implemented so far are the Building Research Establishments Environmental Assessment Method (BREEAM) and the Code for Sustainable Homes. The process of doing a compliance analysis is very similar to a Basic LiVi analysis, but requires a LiVi Compliance node instead of a LiVi Basic node. Typical node layout is shown below.
livicompnode

The main difference compared to a basic LiVi analysis is during results visualisation where a compliance panel can be overlaid onto Blender’s 3D view. This compliance panel shows details about the target metrics required to gain compliance, the actual metrics calculated for the space and gives an estimate of overall compliance and credits gained based on the spaces simulated.
A short video showing the process of doing a compliance analysis can be watched below.

VI-Suite LiVi Complaince analysis from Ryan Southall on Vimeo.

Basic LiVi Analysis

LiVi is the component of the VI-Suite that acts as a pre/post-processor for the Radiance lighting simulation suite. An installation of Radiance is therefore required. Radiance installers for Windows, OS X and Linux can be found at https://openstudio.nrel.gov/getting-started-developer/getting-started-radiance (registration required). In addition on Linux Radiance may be available to install through the distribution’s package management system. LiVi assumes that the Radiance installation is situated in the following locations:

  • Windows – C:\Program Files (x86)\Radiance (64bit system) or C:\Program Files\Radiance (32bit system)
  • OS X – /usr/local/radiance
  • Linux – /usr/share/radiance or /usr/local/radiance

Radiance is a very advanced set of lighting simulation tools that permit the calculation of almost any lighting metric. A basic LiVi analysis can calculate illuminanace, irradiance and daylight factors. In addition, using the evalglare package included with the VI-Suite, glare can be predicted.

A basic LiVi analysis requires a minimum of three nodes: LiVi Geometry, LiVi Basic, and LiVi Simulation. A VI Location node may also be required. A typical node set-up is shown below.

livibasnode

LiVi Geometry exports Blender geometry and materiality to Radiance format, LiVi Basic creates a basic sky context, and LiVi Simulation runs the Radiance simulation. Display of the results is controlled from the VI Display tab in the 3D view properties panel.
A short video showing the set-up of a basic LiVi analysis can be watched below.

VI-Suite Basic LiVi analysis from Ryan Southall on Vimeo.

Compiling Blender to Increase Vertex Colour Layers

Blender usually comes with a limit of 8 vertex colour layers that can be applied to an object. As the VI-Suite uses vertex colour layers to visualise results this means that, in effect, only 8 steps of an animation can be visualised. To increase the permitted number vertex colour layers some changes are required to the Blender source code, and then Blender must be compiled. The Blender source code can be downloaded from http://www.blender.org/download/. In side the source archive file is a directory called source. Relative to this source directory the source code changes required to the 2.69 version are as follows:

  • Line 182 in the file source/blender/makesdna/DNA_customdata_types.h should be changed from ‘#define MAX_MCOL    8’ to  ‘#define MAX_MCOL   256’ or however many vertex colour layers you want. I have tested up to 256.
  • Line 143 in source/blender/render/extern/include/RE_shader_ext.h should be changed from ‘ShadeInputCol col[8];’ to ‘ShadeInputCol col[256];’

Instructions for compiling Blender for different platforms can be found here http://wiki.blender.org/index.php/Dev:Doc/Building_Blender

Shadow Study node

The Vi-Suite Shadow Study node uses an in-built function of Blender to check whether faces of the Blender geometry can see the sun at each time step of the simulation period. The Shadow Study node then composites these results to determine what proportion of time a face is in shade. A typical node set-up is shown in figure below.

ssnode1

And the video below shows the Shadow Study node in operation.

VI-Suite Shadow Study Node from Ryan Southall on Vimeo.

Wind Rose Node

The VI-Suite Wind Rose node creates a wind rose plane and a wind rose image based on the location data within the location node. The location node must be drawing its information from an EPW file to provide wind speed data. EPW files must be placed within the VI-Suite script directory in the directory EPFiles/Weather to be seen by the node. A typical node arrangement is shown below.

wrnode1

The wind rose node requires some dependencies to be installed which I dealt with in a previous blog post for OS X. Please note that as of Blender version 2.70 Numpy is installed with the OS X version of Blender and the installation of Numpy described in my previous blog post will not be required.
Installing these dependencies for Windows is more complicated and I have not figured out an easy way to achieve this yet.
On Linux, Numpy and matplotlib should be installed via your system’s package manager system and the /usr/share/blender/’blender_version‘/python directory deleted to force Blender to see the system Python installation.
The operation of the Wind Rose node is shown in the short video below.

VI-Suite Wind Rose Node from Ryan Southall on Vimeo.