Final Portfolio

The final portfolio continues the graphical choices outlined in the draft, but showcases a variety of work from the internal and external projects for the DP605 module. The portfolio is kept flexible and allows easy switching of work to keep it up to date. The boxes that outline the work is a constant throughout the document and therefore all work is a consistent size and able to be easily replaced.


The front cover is bold and striking because I wanted to make an impact on the reader. The blue and white colour scheme is calming and relates to my interest in sustainable solutions and modern problems that can be solved such as climate change, renewable energy and less fortunate people.

The contents page now displays the correct numbers and corresponding titles.

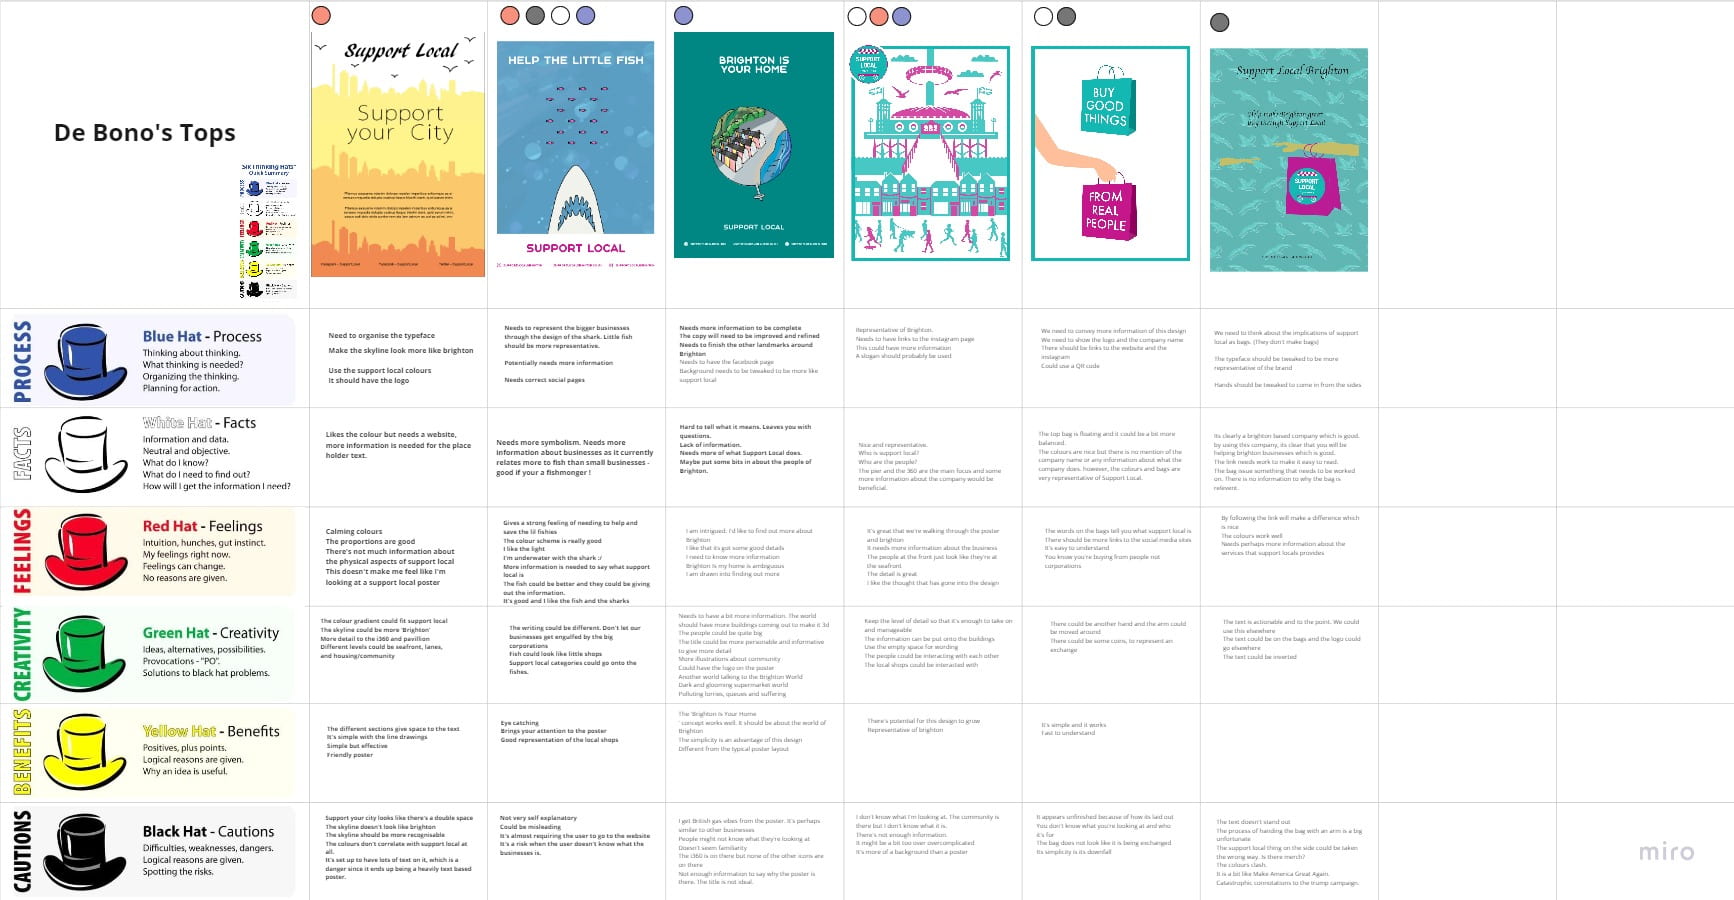
The internal project is first as my portfolio takes a chronological order. I have done this to show my progression and to give my portfolio some structure. It also creates a talking point if I were to use this document to showcase my work in a job interview.

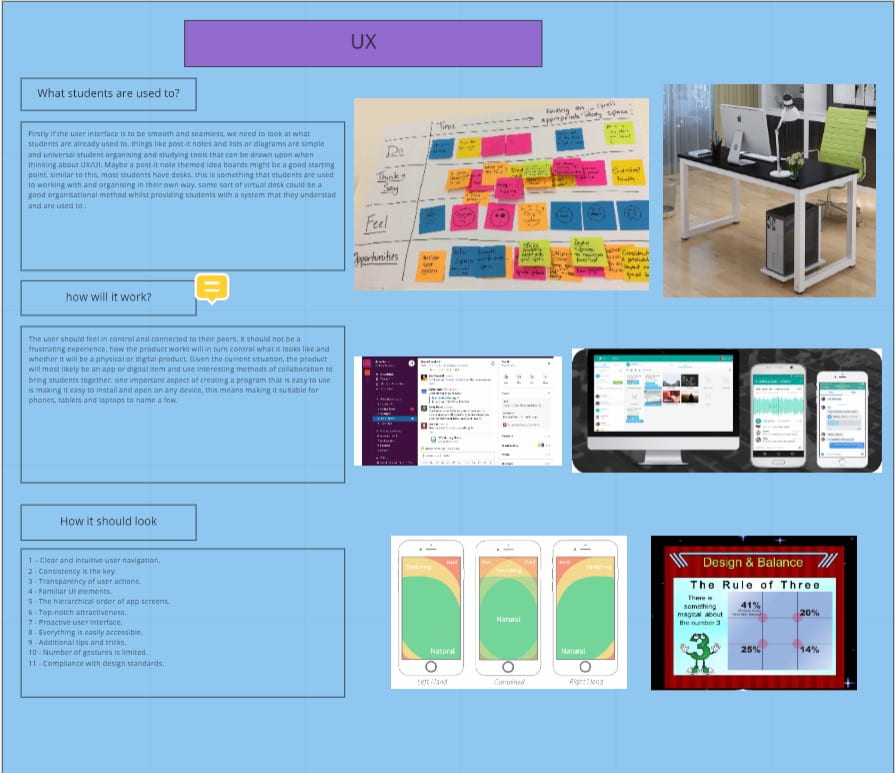
The internal project is continued here. This page is the most information heavy, with a small paragraph running through my ideas. I have tried to keep as much white space as possible to make it easy on the readers eyes but sometimes there is a lot to say about a project. If needed, I could adopt a layout similar to page 3 where the text is separated. This will look neater but more repetitive.

The second project is indicated with a bold title. I have continued with the chronological theme of the portfolio even within each project. The early work is first and the final designs are last. I have tried to include a range of work, even if it is not a polished final piece because I want to show the reader I am competent in the whole design process and I can manage my work well.

The second project had many developed designs which can be easily swapped in depending on who is reading the document. I have tried to best show my graphic design style but if I change my career direction, other posters or work can be used instead.

This is the final design for the second project. I have no text on this page apart from the title because I want the reader to be looking at the design and the photoshop render. I have really utilised white space here for maximum impact.

My social media is at the end of the document because it is the last thing the reader will read and is most likely to remember. As the reader has now finished looking through my portfolio document, they are free to browse the social media if they wish. If I had placed my social media links in the middle of the document, the reader might forget to visit by the time they reach the end. The link to the Instagram page is in blue text to indicate that its a live link.

External Project – Support Local

After talking to the client and understanding their requirements, creating posters to use in Support Local’s PR campaign was our main task in this project. Competitor analysis proved to be a constructive task as we were able to draw inspiration from posters that we, and the client liked. A lot of what we had learnt in the previous meeting influenced our design process. Before we started to ideate in any way, the first thing we did was to summarise what the client wanted and the direction the posters would take. The branding was something we were unsure about at the start of the project but was resolved after the interview meeting. Using the stylescapes that we had previously made helped us to think of ideas as the client had told us which one she preferred and why. The bulls eye technique outlined what had to be included and proved to be an excellent co-design method where the client could voice their wants and needs. We also used semiotic analysis as a co-design technique because the client was able to place how much information was needed on the poster and how serious or fun the poster should be.

When creating poster designs, we used the 635 method to quickly develop a large number of different ideas. We repeated the process 3 times as there were only 4 participants taking part in the exercise and we ended up with 19 different poster designs. These were drawn on paper which made the process quicker and easier, however, it meant that drawing ability affected the designs and each drawing had to be photographed. Despite this, I think hand-drawing quick ideas is still the best method as the designs do not need to be polished at this stage. We used the 635 method because it is efficient at collecting a number of different designs quickly and the non-verbal nature means all ideas are equally valid.

We organised the designs in Miro and using what we had learnt from talking to the client, chose 8 designs to develop. We took 2 posters to develop each. The developments involved improving the posters graphically, and making them clearer. It was worth doing this process using computer software as the posters needed to communicate a point clearly and it was important to be able to visualise what the final design would look like for our next design process. There would be no point developing the posters on paper as it would be time consuming and they would have to be digitalised anyway.

We decided to present to our client 3 posters to make their decision process as easy as possible. This was decided as a team member found an article explaining how 3 concepts is the optimum number of ideas to present to a client as it gives them choice without being overwhelming. To narrow our designs from 8 to 3, we used De Bono’s 6 hat method because it is a non-bias way of analysing ideas, considering each poster is made by one of us in the team. Despite not being time efficient, the information gained from this method was plentiful and it even allowed us to consider future possibilities for each poster. This was documented in Miro and conducted during a group video call. Using the 6 hat methodology findings, we then voted again on which 3 posters would be taken forward and presented to our client.

Before the pitch meeting with the client, the 3 designs were further developed to be more visually appealing, better communicate the points and include social media links. The posters were also mocked up in situ using photoshop. We did this to give our client a visualisation of how each one would look in real life. Adobe InDesign was used primarily to make the posters although Illustrator was also used to make icons and different elements of the poster. We decided to use the Adobe suite exclusively as it is industry standard, each program is compatible with other Adobe programs and the end result is of high quality.


External Project – Support Local

The first meeting with our client, Jo Childs, was during the introduction to the project. This intro talk gave us a good understanding of what the project required and what Jo’s company, Support Local, was about. Before our first official meeting as a group, we each made a project proposal. Having learnt from the previous project, I knew the earlier a project proposal was seen by the client, the better. During our first meeting, we found all our proposals to be very similar. This meant we all had similar ideas about what the project was about and showed that we were all on the same page when it came to deliverables. We combined our proposals into one and emailed them to Jo for a review. We did this because its important to outline what the project will entail from the beginning as it reduces confusion later on in the project and is good practice to get written confirmation of deliverables from the client at this early stage.

When contacting our client, we ensured to stick to one method of communication. We had already established a project leader to deal with communications, but we also asked Jo which method of communication she preferred. She replied with Email, therefore all contact with the client was via Email. I think this was a good group decision as it made us seem more professional and simplified the process of exchanging information with the client.

To ensure we had a competent understanding of the brief and client requirements, we prepared some questions to ask Jo. We would only be meeting 2 times with the client due to time constraints, which provided a challenge to ensure we got as much as possible out of every meeting. As we did not want to waste time during face-to-face meetings with the client, we condensed our list into 5 simple questions and emailed them. Unfortunately, we did not receive a reply and therefore had to add a question and answer session into our interview with the client.

The interview meeting was very information heavy and quite demanding for both the client and our team. However, it was extremely beneficial and rewarded us with a wealth of information and better understanding. The meeting started with introductions and the questions we had prepared. This meeting was recorded and available to refer back to, which meant our client’s answers were documented. Then we conducted a range of techniques that focused on themes, requirements and branding. We used an involving exercise called ‘is/ is not’, that required the client to circle words that related to Support Local, and cross out words that did not. We used this technique because it is helpful to understanding what our ideas would have to adhere to and gives us a foundation of branding guidelines. However, it caused an awkward silence as the client thought about which words to circle. If I was doing this meeting again, I would have made this process more of a conversational exercise.

Another method we used was the bulls eye technique. This was organised into ‘must have, should have, could have’ categories and was a really insightful exercise that we were able to collaborate with the client on, suggesting comments and adding them onto the board. We decided to use this technique as it outlined the requirements we had to include and any extra features that could be added. I am very happy with the result of this technique. We then used an attribute scale to further pinpoint the branding choices of Support Local. This was a good method and the client slid the attribute scales all the way to one side of the scale. This method was informative but maybe could have replaced the ‘is/ is not’ technique.

We also used semiotic analysis during this meeting which I was responsible for taking the lead on. I thought showing the client some ideas and inspiration would be very worthwhile. Also, asking her to plot on the graph where a poster for Support Local would go gave us some insight into the initial ideas direction. We also showed some stylescapes at the end of the meeting which complimented the semiotic analysis but they were probably unnecessary due to the number of tasks conducted in the meeting already. Overall the meeting was valuable and information packed. It lasted about an hour but was intensive. If I were to do it again, I would have added a break for the client to digest what has been said and to relax for a bit.

Secondary research was conducted during this project to discover more about the client and the company’s background. Researching Support Local’s website was beneficial in understanding branding requirements and identifying areas to improve upon. I also researched into how to run a business Instagram page as during the beginning stages of the project, this was a possible area we would be helping with. As the project progressed, it became clear that the deadline for this project would not allow proper growth of social media and the time constraints focused our efforts into making posters instead. Secondary research was also conducted in the form of competitor analysis. We conducted competitor analysis to give us inspiration and to facilitate the semiotic analysis process with the client.

External Project – Support Local

When starting this project, and having learnt from the last one, I knew it was paramount to set up a structure from the beginning that allowed clear project and time management. The first meeting was important as it required admin tasks and would influence future meetings and tasks. One of the first things we did as a group was assign roles based on the project and what was involved. We did this so we could have a project leader from the beginning that dealt with communications to the client. This made it easy for us to get started with research and I think added an element of professionalism which was important considering we were working with a real client. We also decided to have a different session leader for each meeting. This eased the workload of the project leader and ensured our meetings were coherent. I was responsible for leading the first meeting so I set up an agenda that outlined what needed to be accomplished. This proved to be very effective and was continued for every subsequent meeting.

During the first meeting, one of the first things we did was to set up a Trello board. This gave us a platform to organise, delegate and visualise tasks to do. We adopted the Kanban method to use within Trello because it made it easier to see who was working on a task. This simplified the process of delegating work and minimised the need to waste time sorting out who is working on a task. Trello was very efficient as an organisation tool and I am glad we started using it from the beginning of the project.

As well as Trello, we also made a private Miro board. This was a great collaborative tool that we used regularly to easily share ideas. The first meeting included curating a single project proposal, assigning job roles and establishing some questions to ask our client for the next meeting. These tasks were all carried out in Miro and followed the agenda that was previously created. Moving forward, the Miro board naturally took on a timeline format, where every meeting would be laid out to the right-hand side of the last meeting. This was not decided by anyone in particular, but made it easy to go back and refer to previous meetings. I’m glad the Miro board took this organised format as it saved a lot of time when looking for information.

During the first meeting we made a preliminary Gantt chart. This outlined the key dates of the project and allowed us to visualise the process we had to follow. Although it was basic at first, it was useful during the research stage of the project. A couple of weeks in however, we concluded that a more comprehensive Gantt chart would be useful. The new chart was made roughly half way through the project and not only allowed us to see what had to get done before the final pitch, but also documented who had worked on previous tasks and for how long. This chart was made in Trello due to its task delegation functionality. Due to the use of Gantt charts, we adopted the waterfall approach to project management. We decided to use waterfall methodology because it suited the time frames we were working to as we mostly had a different agenda and set of tasks each week. Working to a deadline meant we had tasks to stick to and needed to ensure they were complete before client meetings.


Our plans did change throughout the process and the meetings with the client were really informative, sometimes changing our weekly tasks. To manage changes and setbacks we had private video calls where we could personally discuss project matters and we also used a private group chat to ask quick questions. If I could do something differently within the project, I would not use the group messaging service and instead use Trello. Group messaging via Teams did not cause any problems but using Trello would have kept all organisational matters in one place.

Portfolio Layout Draft

I have decided not to create a website to show my portfolio but to use a more traditional portfolio exhibiting technique using Adobe InDesign. This decision comes from my personal brand choices and aims. Website design has never really been a passion of mine or really stood out to me in the world of design and therefore I have no reason to create a flawless website showcasing my work. I do however understand that presentation is key when showing design work. InDesign allows me to make my own graphic design style and export my portfolio in a variety of different formats without having to waste time making a website. There are aspects to digital design that I like and in fact, most graphic design formats are digital but I feel like I can best show my work and eye for graphic design without a website and InDesign is the perfect program to use. Also, if I were into website design, I can see how programming a website and having a professional web address would be very impressive but I simply don’t have the knowledge or time to create a visually stunning website from scratch. Although there are plenty of free website builders to use, they make it easy to make great websites but are very clearly a drag and drop, template based system therefore, take away from the overall wow factor of having your own website.


For the front cover, I have chosen a type face that has impact. This is what I want to draw attention to, so I’ve also gone for capital letters for the boldness. The font is also quite modern and the Sans Serif makes it look clean and shows stability. The background image portrays my design direction and shows my identity because I like designing for the changing world and creating interesting, sustainable, future oriented products. I have lowered the opacity of the image to soften the visual effect and add more emphasis on my name. The colour I have used is a nice electric blue that again has the opacity lowered to make it easier on the eyes. This blue colour relates to calm, fresh, trust and eco power which projects my brand identity.


The blue has been continued on the contents page as well as the bold titles. Having this as an ongoing theme will give my portfolio some continuation and it will seem more finished. This page is very minimal, which again shows my identity as a designer whilst also not cognitively overloading the reader. It makes use of empty space to show what’s important.

The ongoing themes have been brought into the main bulk of the portfolio meaning if a page were to fall out, the reader would immediately be able to see which portfolio it fell out from. I have also used the rule of three here by exhibiting three pieces of work at a time. This looks very aesthetic and therefore addresses a possible career direction as graphic design is very appealing to me.


Some big projects will require more space. This shows what this would look like, keeping in fashion with the rest of the document.

Internal Project – Collaboration Between Students

When designing a product for collaboration between students, we used multiple design techniques which helped us generate ideas, evaluate and plan. Brainstorming has been a commonly used tool for different uses within our project. We brainstormed a lot because it allows us to collaborate and share our ideas easily whilst being engaging and allowing for further iteration. A mind map suits Miro’s collaborative interface, which we use as our primary sketchbook for our work. Mind maps are great ways of sorting information visually but can not be used for everything. When researching, I mostly did desk research but also used critical thinking to construct my points. As this was very early on in the process and we had not finalised the brief with our client, I thought it was not necessary to conduct observations or interviews or design probes at this point.

When planning the interview, we used the bulls eye technique to make sure our questions were worth asking and to focus our interview. This ensured we got the most out of the meeting. After the interview, we had a better idea of the brief and could start ideating to think of a  solution. We used the 635 method for this because we were in our design sprint stage of the project and the 635 method is good for generating lots of ideas in a short amount of time. As there are only 5 of us in our group, we made it the 535 method and we illustrated our ideas on paper. Using paper meant we could quickly show our ideas without having to worry about graphic design or the common digital problems such as compatibility or time. This proved to be a worthwhile exercise because we were all able to pull together at the end and come up with a promising idea.


Only one of us in our group ended on a physical product, the rest of us had digital ideas. One technique we used to develop the physical product was user testing. This is where we gave someone a very basic shape of what the product could look like and asked their thoughts on it. This was only a very basic test to see what kind of shape the product should be but still uncovered valuable information. The only problem is that we conducted this test before the client had seen our project proposal and so the test could easily become irrelevant if the client was expecting a digital product. If we were to do this project again, I think giving a project proposal in early and making sure everyone is on the same page would be more of a priority.


Entering the prototyping stage and thinking about visuals to show our client, we were using Adobe XD as our main software. By this point we had worked with our client and realised that a combination of our digital ideas, taking the strengths of each one was the best option. Unfortunately learning Adobe XD took longer than expected as none of us had used it before. We wanted to use it because it was the best software for wireframing prototypes quickly, but as designers, we should have thought about what we know and maybe used a more familiar program as we did not need a finished working prototype at this stage.

Internal Project – Collaboration Between Students

When understanding the client and their requirements, the interviews helped a lot. Speaking to the client and being able to ask them questions was very useful for advancing the project. Being face-to-face also has the personal element and allows us to read between the lines and as designers, really listen and pick up on what it is that they want. During interviews, I also always make sure I have a note pad on me so that I can take down important information. I make sure to do this so I can assess the situation and quickly note down ideas based on how the client reacts to things, it also looks more professional. During meetings, we try to keep it informal and engage in natural conversation because it is the best way of finding out what the client is like, their preferences, aims and dislikes but for the sake of being thorough, we also record the meeting and transcribe it later on. This job is usually taken on by someone that is either lowest on work or happens to want the job. The transcribing process can highlight things that we did not pick up on during the interview and allows us to further understand the client. However, I never find it as engaging as a real time meeting.

Another method of making sure our project was moving in the right direction was making a project proposal. This solidified the client’s aims and allowed them to make changes or bring up any possible problems they see. It is a great way of ensuring we are all on the same page and understand the brief fully because it is a graspable, written document and the client is free to bring up problems.


The first meeting with the client was very informative as it adopted an interview style. We were able to ask about the clients job, company, competitors and previous work. It focused on the clients wants and aims rather than the brief as it was the first time we had met with the client. We used a couple of techniques when interviewing to make it run more smoothly. Firstly, we prepared questions and took turns to ask them. This meant we all got to speak with the client and we had more time to construct meaningful questions. We also took the time to introduce ourselves and think about the timing of our questions.  The only thing I would have changed would be making the interview less structured and adapting our questions to what’s already been said. We should have used more of a semi-structured interview method.

There was some secondary research that had to be done to learn more about an area that would clearly be an important part of the project. For me, this was UX research. I conducted a range of UX research to further my knowledge on the subject, segregating this research into 3 sections. I did this to structure my research process and make it easier for my team members and client to see what I had been doing.


Throughout the process, we continued to meet with the client once a week. We decided to meet this frequently as it allowed us to prepare content and show the development of the project whilst keeping the client involved in the process. The weekly meetings were our main point of contact for the client so we tried to get the most out of them by preparing content. Some weeks were more organised than others depending on how we had prepared so I think preparation is key for weekly meetings. More meetings per week would be beneficial but after listening to the client’s constraints, that wouldn’t be possible.

Internal Project – Collaboration Between Students

From the start, I knew I wanted to focus my efforts on the group project and work on my portfolio later on in the term. This is because I wanted to wait until I had some guidance and tutoring on graphic design before I made a start. This also allowed me to spend a good few weeks focused on the group project without distraction. When it came time to start my portfolio, I had to implement a time management routine and make sure both projects were getting the time they needed.

To structure our meetings we elected a chair person, minutes and decided an agenda for each meeting. We did this to structure the meetings and and ensure what was concluded from the meetings was documented appropriately. As elected chair person for the first week, I had to make sure the meeting was relevant throughout and that we were keeping to our time limit guide. I enjoyed being the chair person which made me think I wouldn’t mind taking a managerial job one day. I tried to keep everyone on track and direct the meeting but I also let people speak their mind and finish making points. Although the step from chair person to manager is quite a leap, it has opened up the possibility for me.

In terms of time management, one thing we did early on was a Gantt chart. This was only a preliminary solution but allowed me to quickly see what I had to get done and how long I had to do it. We thought using a Gantt chart was the best time management tool because it was easy to read, accessible for all team members and modifiable. This also helped with the collaboration of our group because we could use each others research to guide our own research direction. I undertook UX research and managed to get it done in time and make it relevant to our project.


Some other tools that we used to help us manage the project include Miro, Trello, Teams, group chats and video calls. I think being able to talk to my team on a video call was very beneficial as it has that personal quality that means we can all contribute our feelings and schedules at the same time, quickly and easily. Personally, to manage my own time and projects, I found keeping a note pad and writing things down helped a lot, just writing something down on paper may seem basic but it helped me remember project information and freed up my mind for other ideas. Miro also helped with this as we used it as a virtual sketchbook for our ideas due to its collaborative nature and tools available.

Communicating with my team was something that was always ongoing. We had a group chat that we can use to post our thoughts, questions and ideas but we also used video calls frequently. We would make sure to video call at least twice a week. As well as this, we used Trello to help us organise our time. Trello was used quite a lot but I think we had too many platforms of communication to keep up with and it got confusing at times. Maybe not using one of the collaboration apps would be beneficial in the long term as it would be easier to keep track of work. Living in the same house as two of my team members made it very easy to track hours worked and personal direction but it did require a different approach. For example, when we were doing the 635 method to create ideas, we could all be in the same room but I had to use an agile approach to my ideas as they would be built on very quickly by other group members. Being in the same house also helped with design sprints and ideating but the other two members did not benefit from this arrangement. To try to combat this, we used the Kanban approach and video called a lot during the ideation process. The Kanban board on Miro made it easier to stay on the same page and trach each others work loads.

Ikigai

Another task I did to think about what I wanted to do in the future was an Ikigai. Ikigai (生き甲斐) is a Japanese concept that loosely translates to “a reason for being.” or for getting out of bed in the morning. It is simply a Venn diagram with 4 connecting circles that ask questions about your self to workout what could be placed at the centre.


I have tried to loosely relate the sections together whilst keeping an open mind and not dismissing ideas. I can see now that my Ikigai most likely relates to the changing world and the issues it faces – climate change activism, connecting people in a non-disruptive way and trying to help people less fortunate than me, maybe in a lesser developed country.

The Ikigai is an interesting concept to me and one that I hadn’t come across before, it really helped me to focus on what I wanted to do but also relating that to how I could make a living. The Sub-divisions are truly relevant and have helped me to pin down what it is that I might want to invest into in the future.