Forms should be used to allow people to get in touch with the university, sign up for information or book onto an event.
If the form is for students to apply for a studentship then they should apply through the applicant portal in the usual way.
If the form is to collect leads for marketing etc then it would be a CRM form, in which case you should contact Anna Duda.
Other forms:
Forms are created separately to web pages. They are created in the ‘_forms’ folder, and can then be inserted onto any web pages you wish. It is possible to use the same form on more than one page, should that be appropriate.
- Data protection
- Creating a new form
- Form approval
- Downloading form submissions into Excel
- Multi-page forms
Data protection
Before you can have a form created within the CMS, you must make sure you observe all Data Protection regulations regarding the data on this form.
To do this, you must (ironically) fill out a form, a privacy impact assessment and a privacy statement – you can find these in the CMS.
These forms and documents must be filled in prior to the form going live and indeed the form will not be made live without them; however you can continue to create the form whilst the data protection aspects are being made.
This step will only need to be done once when the form is first created and will not need to be completed every time the form is simply updated. If the form is heavily modified with lots of changes, or if the purpose of the form changes, then you should contact us to see whether the original privacy impact assessment and privacy statements are still valid.
Creating a new form
Not everyone has permissions to create forms. If you need to create forms please email webteam@brighton.ac.uk so that this can be set up or you can be appropriately trained.
To create a form, expand the ‘_forms’ folder in the Website files and folders tree and choose the subfolder you want to put it into, or create a new subfolder. Click on the folder and click ‘New Content’ and then choose the ‘Form’ content type.

The forms creator uses a simple drag and drop interface. To add fields to the form, drag them from the area on the left onto your form on the right.
The set of fields at the top of the list are standard, plain fields that you can name yourself. They include text boxes, number fields, radio buttons (where a user can only choose one of a set of options) and checkboxes (where a user can choose one or more from a set of options).
The second set of fields headed ‘User Details’ are predefined, commonly used fields to make building your form easier. If you want to collect a user’s name, postal address, email address or phone number please use these. Predefined fields such as the ‘Email Address’ field also include automated validation to check that what a user enters is a valid email address, for example, so it is worth using them rather than just using a plain text box.
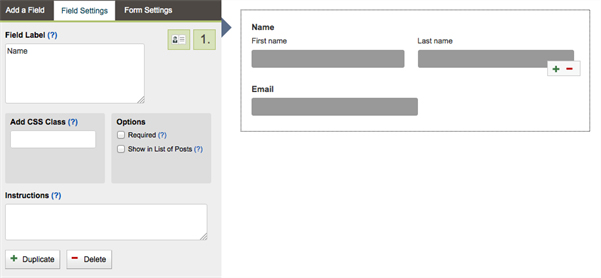
When you drag a field onto your form, you can edit its properties on the ‘Field Settings’ tab at the top of the left hand side.

Click on the field you have just dragged onto the form if it is not already selected, and then click on the ‘Field Settings’ tab to change its settings. Usually when you click on a field you have already inserted, the ‘Field Settings’ tab will open automatically. On this tab you can change the name of the field, set it as a required field, and add instructions on how to fill in the field for the user.
For checkboxes and radio buttons, the ‘Field Settings’ tab is also where you enter the options that the user can select and decide how you want them laid out on the page (side by side, or in one or more columns).

When you have finished adding your fields, click on the ‘Form Settings’ tab at the top of the left-hand side. This tab allows you to control what happens when a user submits the form.

Key things you can change here are:
- The text that appears on the form’s submit button (e.g. ‘Submit’, ‘Send your feedback’, ‘Book your place’).
- The confirmation text that should appear on the web page when the user submits the form. Or if you prefer, you can send the user to an entirely separate page instead.
- Whether to send a confirmation email to the user. You will need to have asked for their email address in your form for this to be possible. You can enter the text that will be emailed to them; choose whether to include a copy of their form submission; and set the ‘Reply To’ address. The ‘Reply To’ address is the email address that the user will send an email to if they click reply on the confirmation email they receive.
- The email address(es) at the university that any form submissions should be emailed to.
All form submissions are stored inside Contensis. If you do not specify any email addresses in the last option above for them to be sent to, everything will still be saved inside Contensis and can be accessed there. However, no one will know when a new submission has been sent, so it is best always to send them to an email address as well.
Form approval
When you have finished creating your form, save and submit it for approval. Only the web team can approve forms, and you will not be able to put the form onto any web pages until it has been approved.
All forms which collect personal data MUST include a privacy statement link and acknowledgement checkbox. The privacy statement will be based upon the privacy statement that you will have written as part of the Data protection step. We (the CMS webteam) will create and place the privacy statement on the form for you when you submit the form for the first time.
When you submit a form please email webteam@brighton.ac.uk titled ‘CMS form request’ to notify the web team that a form is awaiting approval.
Let the web team know:
- the location of the form – this will be _forms/your-form-folder/your-form-name
- the url of the page the form will be used on for eg /studying-here/my-page
- the date you would like the form to be live.
I know this seems a bit involved but it is very important that we ensure we are capturing user’s data securely.
Once your form has been approved, you can drag it onto your web page in the same way as you would drag an HTML snippet or editor template onto the page. Forms should go generally go into a two-thirds one-third panel, or a full-width panel.
Downloading form submissions into Excel
If you have access to view individual forms in the Website files and folders, you will also have access to view any submissions made by users to those particular forms, and to download the submissions into Excel.
To do so, click on the ‘Form Posts’ button on the left, below the Contensis logo.

On the form viewer screen, you can view individual posts one at a time by clicking the ‘View Posts’ link on the right-hand side.

To download all the submissions from a form and view them in Excel, click on the ‘Export Posts To CSV’ link on the right-hand side and then save or open the resulting file.
Please ensure that you store (and delete) this data in accordance with the university’s data protection policies.
Multi-page forms
It is possible in Contensis to create more complex forms where the fields are spread over several ‘pages’ and the user completes each page in turn or is jumped to specifc pages back on selections they have made (for e.g I want to study x -> page in form about event date for course x) before submitting the form at the end. For information and/or training on how to create forms like these, please email webteam@brighton.ac.uk. For the majority of the forms on our website, a simple single-page form is normally sufficient.